Migrate classic processing rules to OpenPipeline
- Latest Dynatrace
- Upgrade guide
- 11-min read
This article explains how you can manually migrate existing classic processing rules for logs and business events to OpenPipeline. It considers permission management and routing so that teams can get started with processing in OpenPipeline independently.
Why migrate?
- Unified processing model: Manage processing for multiple signal types in OpenPipeline, including logs, business events, security events, spans, and more.
- Scalable data handling: OpenPipeline handles high throughput at scale, supporting additional ingest sources and increased data volume.
- Grail data flow: Processing is Grail-based only, providing a consistent approach from ingest through DQL processing to storage.
- Pipeline groups: Enforce global processing while enabling teams to process their data independently and safely. For example, use pipeline groups for masking and permissions.
- Granular ownership: With OpenPipeline scoped ownership and access to pipelines, teams can manage day‑to‑day processing, and administrators can retain control.
What is new?
What will you do?
You'll identify the data sets processed by the classic processing rules and the users responsible for this data. You'll then build a pipeline group with a base pipeline translating the classic processing rules and an empty catch-all member pipeline to route all records. Once the catch-all member pipeline route is active, data starts being processed by OpenPipeline instead of the classic pipeline.
The classic pipeline remains active as a fallback until you can validate the new configuration. Finally, you can turn off classic processing rules.
Before you begin
Prerequisites
-
Dynatrace version 1.295+
-
Dynatrace SaaS environment powered by Grail and AppEngine
-
DPS license with log or business event capabilities
-
Permissions:
openpipeline:configurations:writesettings:objects:admin
Prior knowledge
- Familiarity with classic processing rules for log or business event
- Basic understanding of DQL
- Knowledge of pipeline access control
Breaking changes
Some behaviors differ between the classic pipeline and OpenPipeline and can break downstream consumers (DQL queries, dashboards, alerts, automations). The following table summarizes the key technical differences of processing logs via the log classic pipeline and OpenPipeline.
| Technical point | Log classic pipeline | OpenPipeline | Required action |
|---|---|---|---|
Data type support |
|
| Review queries that relied on implicit string coercion |
Content field limit | 512 kB | 10 MB | No action required |
Field name case sensitivity | Case-insensitive | Case-sensitive1 | Update DQL queries and downstream consumers to use OpenPipeline field casing before rerouting data |
Query language | LQL, DQL | DQL | Translate LQL processing statements to DQL; see Conversion to DQL for Logs and the classic command reference |
Connect log data to traces | Built-in rules | Automatic2 | No action required |
Technology parsers | Built-in rules | Add a Technology bundle in the Processing stage for each relevant built-in technology rule of the classic pipeline. | |
Metric dimension naming | Not supported | Supported | No action required. Existing definitions keep working; new metrics can use dimension names. |
Metric-key | Mandatory | Optional | No action required. Existing definitions keep working; new metrics can drop the prefix. |
When you ingest logs via Log Monitoring API v2 - POST ingest logs, field names are automatically converted to lowercase after data is routed to the Classic pipeline. While both pipelines run side by side, two records of the same type can end up with inconsistent casing depending on which pipeline they hit, silently breaking case-sensitive queries.
The enrichment runs automatically and is no longer rule-based, so it isn't visible as a processor in your pipeline.
New concepts
- Pipeline
Collection of processors executed in an ordered sequence of stages to structure, separate, and store data.
- Processor
Pre-formatted processing instruction that focuses either on modifying or extracting data. It contains a configurable matcher and processing definition.
- Pipeline group
Set of team-managed pipelines to which a shared configuration applies. The shared configuration can restrict or mandate processing, enabling centralized processing across multiple pipelines.
- Routing
Directing data to a pipeline, either based on matching conditions (dynamic) or by explicit pipeline selection (static).
How to migrate
The steps below use Dynatrace web UI. The Settings API is available as well. To see an end-to-end example with JSON payloads, see Configure multi-cloud ingest governance with pipeline groups.
1. Identify the data sets currently processed by classic pipelines
-
Go to
 Notebooks or
  Logs and filter on the
 dt.openpipeline.pipelinesfield to identify the records routed to the classic pipelinefetch logs| filter in(dt.openpipeline.pipelines, "logs:default") -
Review the corresponding classic processing rules and their context:
- Go to
 Settings > Process and contextualize > OpenPipeline and select your configuration scope (Logs or Business events).
 - Go to Pipelines > Classic pipeline to view your classic processing rules.
- Work on one data stream at a time to reduce risk and simplify validation. For each rule, perform the following actions:
- Learn the matcher expressions and processor definitions. If sample data is used, export it for reuse during testing.
- Identify downstream consumers such as dashboards, alerts, metrics, and automations to understand potential impact.
- Identify the users or teams responsible for that data.
- Go to
2. Create the pipeline group and base pipeline
-
Create an empty base pipeline.
- In OpenPipeline, go to Pipelines > Pipeline.
- Set the role to Base pipeline, enter a name, and select Save.
-
Create the pipeline group.
- Go to Pipeline groups > Add group.
- Enter a name for the new group.
- Add your base pipeline to the group and enable all stages.
- Position the member pipeline placeholder below your base pipeline.
- Select Save.
The base pipeline and the pipeline group are listed in the respective tables.
3. Migrate the classic processing rules to the base pipeline
Translate every classic processing rule into a processor on the base pipeline. These processors will apply to all records routed to the member pipelines assigned to the group.
OpenPipeline organizes processors into stages, including:
- Processing—Parse, transform, filter, and mask records.
- Metric extraction—Extract metrics from records.
- Data extraction—Extract and re-ingest a new record (business event or Davis event).
- Bucket assignment—Assign records to buckets.
For the complete list of stages and the processors available, see Processing in OpenPipeline.
The configuration workflow is
- In the base pipeline, open the stage that matches what the classic rule does.
- Select to choose the processor.
- Define the processor.
- You can reuse the Matcher and the Sample data from the classic processing rule.
- Account for breaking changes.
- Test the configuration using sample data.
- Once you're satisfied with the result, select Save.
No data is affected at this stage. The base pipeline is inactive until the catch-all member pipeline route is active.
4. Create the catch-all member pipeline and route data to it
When in a group, member pipelines support routing and inherit the base pipeline configuration. In this case, the catch-all member pipeline stays empty—its goal is to receive all the records to apply the base pipeline configuration to.
-
Create the catch-all member pipeline.
- Go to Pipelines > Pipeline.
- Set the role to Member pipeline, enter a name, and select Save. Leave the stages empty.
-
Add the catch-all member pipeline to the pipeline group.
- Go to Pipeline groups and select the pipeline group you created.
- Scroll to Member pipelines and assign the new pipeline to the group.
-
Create the associated route.
- Go to Dynamic routing > Dynamic route.
- Enter
trueas a matching condition and choose the catch-all member pipeline as target. - Select Add. The new route is added to the table and set to active by default.
- Position the route above the default route.
- Select Save.
The new route is active.
- Data that matches the condition is processed according to the base pipeline.
- Data that doesn't match falls back to the default route and continues to be processed by the classic pipeline until you turn off the rules.
Keep classic rules enabled until all data is reliably routed and processed by OpenPipeline. Compare OpenPipeline output against the classic processing rule output until the results match. If they don't, identify translation gaps and fix them in the base pipeline.
5. Turn off the corresponding classic processing rules
After you have validated your OpenPipeline configuration, turn off the classic processing rules you migrated.
- Go to Settings > Process and contextualize > OpenPipeline and select your configuration scope (Logs or Business events).
- Go to Pipelines > Classic pipeline to view your classic processing rules.
- Turn off the classic processing rules.
Migration completed!
The classic pipeline no longer processes your data. The pipeline group in OpenPipeline contains a base pipeline with the equivalent processing logic of your classic pipeline and a member pipeline to route all records.
Next steps
The migration covers the parity with your classic processing setup. OpenPipeline supports advanced processing capabilities, so you can iteratively extend the base pipeline.
1. Refine processing
- Inspect the OpenPipeline output in Notebooks to identify gaps or opportunities.
- Add or update processors on the base pipeline to address what you observe.
- Verify the result in Notebooks.
2. Split processing by teams or servicesOptional
You can add more member pipelines that perform specific processing, split by team or by service, and hand them to teams.
-
Review which stages are enabled for the base pipeline and the member pipeline placeholder. The new dedicated member pipelines inherit the same stage configuration, so confirm the enabled stages match what each team needs.
-
Create member pipelines for a specific team or service.
-
Create the associated route and position it above the catch-all one.
-
Assign the new member pipelines to the pipeline group.
-
Grant the team scoped access to the new pipeline.
-
Go to Account Management > Identity and Access Management.
-
To grant users access to pipelines, create new policies with
settings:objects:readandsettings:objects:writepermissions scoped to OpenPipeline schemas for log and business event pipelines.Example:
ALLOW settings:objects:write WHERE settings:schemaId IN ("builtin:openpipeline.user.logs.pipelines", "builtin:openpipeline.business.events.pipelines")
For more information, see the Settings API
builtin:openpipeline.<configuration.scope>.pipelinesschema for the configuration scope (bizeventsorlogs). -
-
Optional Transfer ownership of the new pipeline to the team that should manage it.
Repeat for each team or service. The base pipeline should converge to only the rules that are truly generic and shared across all data; each dedicated member pipeline owns its specific processing. For the member pipelines assigned to your group, records that match a specific route are processed by the base pipeline plus the dedicated member pipeline; records that don't match a specific route fall through to the catch-all and are processed by the base pipeline only.
Learn more
-
Data flow in OpenPipeline: The end‑to‑end path data follows from ingest through storage.
-
Processing in OpenPipeline: Pipelines, stages, and processors used to transform data.
-
Owner-based access control in OpenPipeline: Policies and scopes that manage pipeline access level and ownership.
-
OpenPipeline pipeline groups: Group setup for shared and enforced pipeline stages.
-
Configure a processing pipeline: Step‑by‑step pipeline configuration guidance.
-
OpenPipeline processing examples: Examples of OpenPipeline processor configuration that can be compared with the log processing examples to clarify conceptual differences.
Example: Rename attributes
Classic pipeline
USING(INOUT to_be_renamed, content)| FIELDS_RENAME(better_name: to_be_renamed)OpenPipeline
Rename fields processor: Enter the field name that you want to be renamed and the new name.
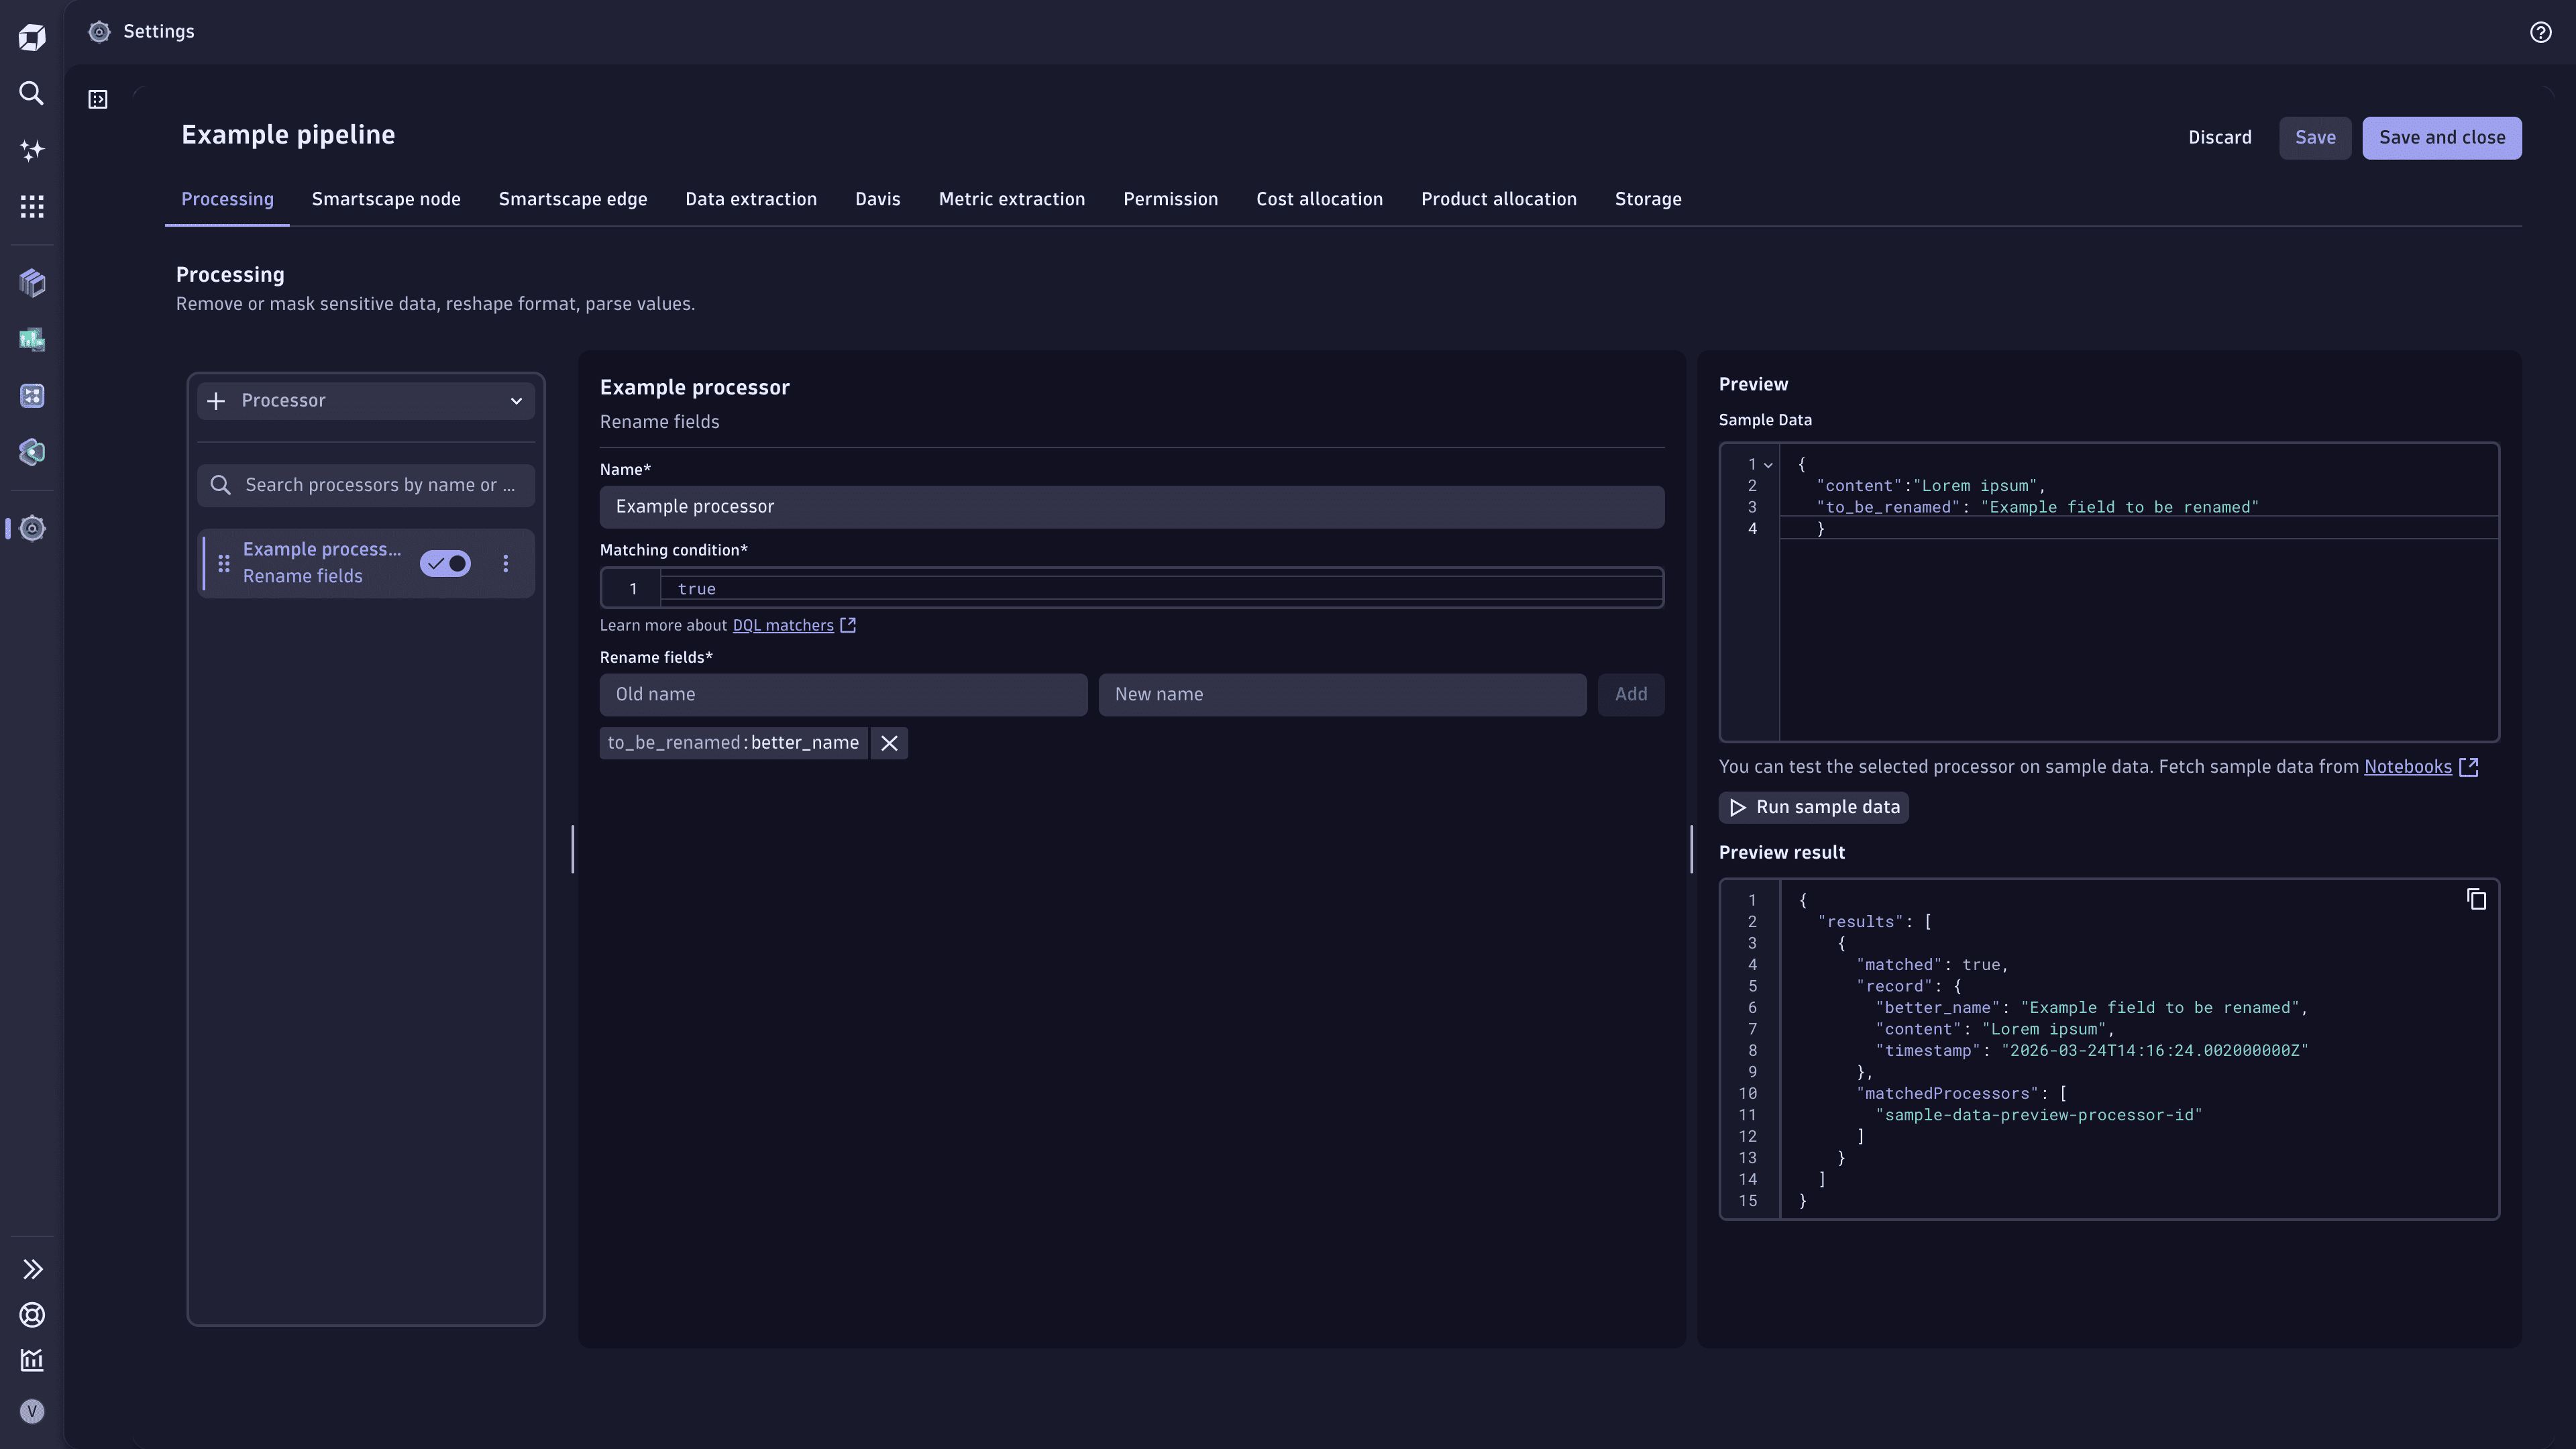 Example processor that renames fields in OpenPipeline
FAQ
Can classic pipelines and OpenPipeline run side by side?
Yes.
Data is processed according to the first matching route. As long as the classic processing rules are in place in your environment, the classic pipeline is accounted for in OpenPipeline and is the default processing mechanism. When you create new pipelines and associated routes, position the new route above the default route so that OpenPipeline processes data accordingly. If some data doesn't match the new route condition, it's still routed by the default route to the classic pipeline.