Install an Environment ActiveGate on Linux
- Latest Dynatrace
- 3-min read
Follow these steps to install an Environment ActiveGate on Linux.
Before you begin
Decide what your ActiveGate purpose will be and review the respective hardware and system requirements. ActiveGates have different hardware and system requirements depending on the purpose for which they are installed:
- Purpose: Route OneAgent traffic to Dynatrace, monitor cloud environments, or monitor remote technologies with extensions.
Hardware and system requirements for routing/monitoring ActiveGates. - Purpose: Run Synthetic monitors from a private location
Synthetic-enabled ActiveGates support a subset of operating systems and are more demanding in terms of hardware and system requirements than are ActiveGates that are used for routing and monitoring. - Purpose: Install the zRemote module for z/OS monitoring
ActiveGates running the zRemote module are more demanding in terms of hardware and system requirements than are ActiveGates that are used for routing and monitoring.
To access and perform the installation of an Environment ActiveGate on Linux within Dynatrace Managed, you need the following permissions:
- Admin user role
- Cluster administrator role
- Deployment admin role
In most cases, you can install an ActiveGate at any time following OneAgent installation. In some cases, however, the installation order matters, because the OneAgent installer needs to know about your ActiveGate installation before the OneAgent can be installed.
If you've already installed OneAgent
In such instances, first install the ActiveGate and then download the OneAgent installer. For example, if you download the OneAgent installer and use it to install Dynatrace in a DMZ or network segment that has no internet access and then subsequently install an ActiveGate, you’ll need to download and install OneAgent again to ensure that the installer provides the proper configuration between OneAgent and ActiveGate. This is because OneAgent needs to be automatically configured during installation to connect to your monitored environment and send monitoring data back to the Dynatrace Cluster via your ActiveGate.
Allow connections through firewall
Ensure that your firewall settings allow communication to Dynatrace.
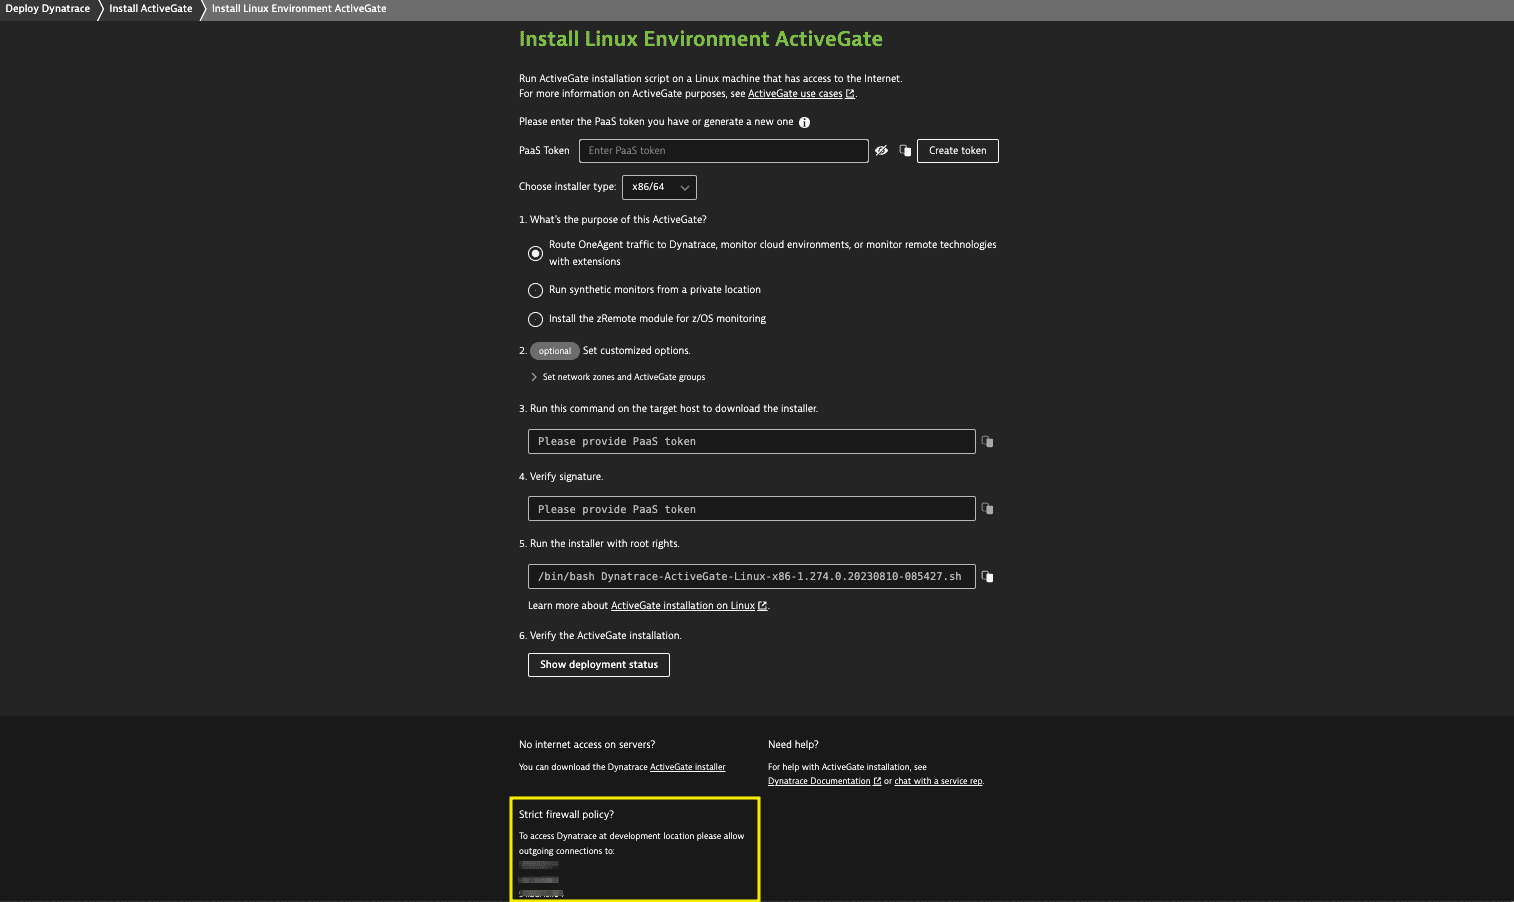
Depending on your firewall policy, you may need to explicitly allow certain outgoing connections. The remote Dynatrace addresses to add to the allow list are given in the footer of the ActiveGate installation page.
ActiveGate normally listens (accepts incoming connections) on port 9999 and talks to Dynatrace (makes outgoing connections) on port 443. For more information on ports usage, see Which network ports does ActiveGate use?
Start installation
Sign in to Dynatrace. In Dynatrace Hub, select ActiveGate > Set up.
On the Install Environment ActiveGate page, select Linux.
Download the installer
How you download your installer depends on your setup and needs. You can choose to download an installer directly to the server where you plan to install an ActiveGate or you can download an installer to a different machine and then transfer the installer to the server.
- Select installer type. ActiveGate supports the x86-64 and s390 CPU architectures.
- Select the ActiveGate purpose.
- If you want your ActiveGate to run synthetic monitors from a private location, see Create a private Synthetic location.
- If you want your ActiveGate to route z/OS traffic to Dynatrace, see Install the zRemote module.
- Provide a PaaS token. This token is required to download the ActiveGate installer from your environment. If you don't have a PaaS token, you can create one right in the UI. The token is automatically appended to the download and installation commands you'll use later.
- Download the installer. There are two options:
- Download via shell command. Copy and run the
wgetcommand. - Select the link to download the ActiveGate installer.
- Download via shell command. Copy and run the
- Verify the signature
Wait for the download to complete. Then verify the signature by copying the command from the second Verify signature text box and pasting the command into your terminal window.
Run the installer
An install parameter (determined by the ActiveGate purpose you selected) is automatically set for the command to run the installer. Make sure you use the command displayed in the Dynatrace web UI that reflects the ActiveGate purpose.
Copy the installation script command from the Run the installer with root rights step and paste it into your terminal.
Customize installation
You can add additional parameters to the installation command to customize your installation. For example, to install ActiveGate in a different directory, use the INSTALL=<path> parameter:
[root@host]# /bin/bash Dynatrace-ActiveGate-Linux-x86-1.0.0.sh INSTALL=/hosted_app/dynatrace
Custom certificate for ActiveGate
We recommend using custom certificates for ActiveGates to increase security.
FIPS compliance
ActiveGate version 1.315+
For Federal Information Processing Standard (FIPS) compliance, you can install ActiveGate in FIPS-compliant mode. For information on prerequisites required for this mode of installation and how to enable it, see FIPS-compliant mode.
Default installation settings
For installation defaults, including default directories, see ActiveGate default settings for Linux.
You've arrived
After your ActiveGate connects to Dynatrace, installation is complete and OneAgent is reconfigured to send monitoring data through ActiveGate.
- To check the status of the installation, select Show deployment status and switch to the Dynatrace ActiveGates tab.
- For troubleshooting help, see Troubleshoot ActiveGate.