Discovery & Coverage
- Latest Dynatrace
- App
- 5-min read
About the app
Whether you're a single Dynatrace Admin supporting dozens of users or part of an Observability Center of Excellence (COE) supporting thousands, ensuring comprehensive observability at scale requires intuitive automation.  Discovery & Coverage allows you to detect blind spots and implement the appropriate level of observability in the right places, even at a large scale.
Prerequisites
Permissions
The following table describes the required permissions.
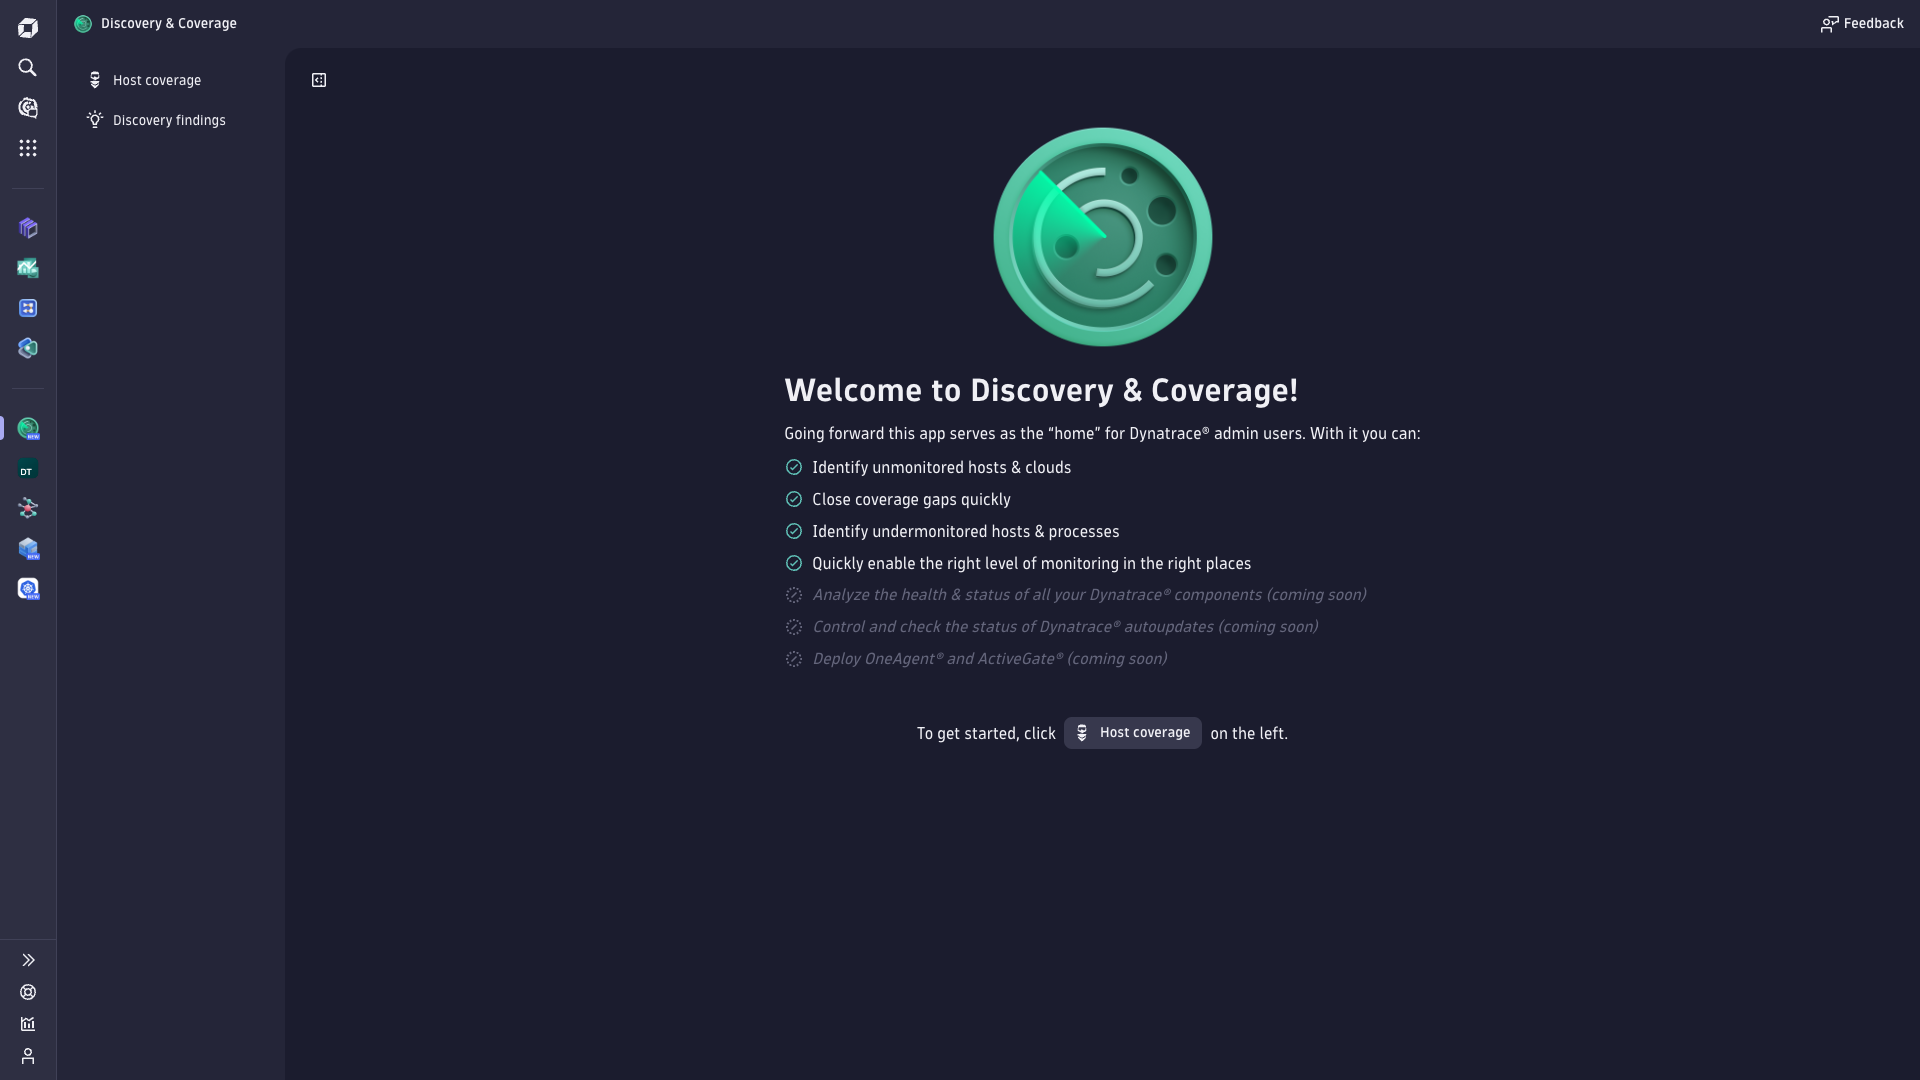
Host coverage
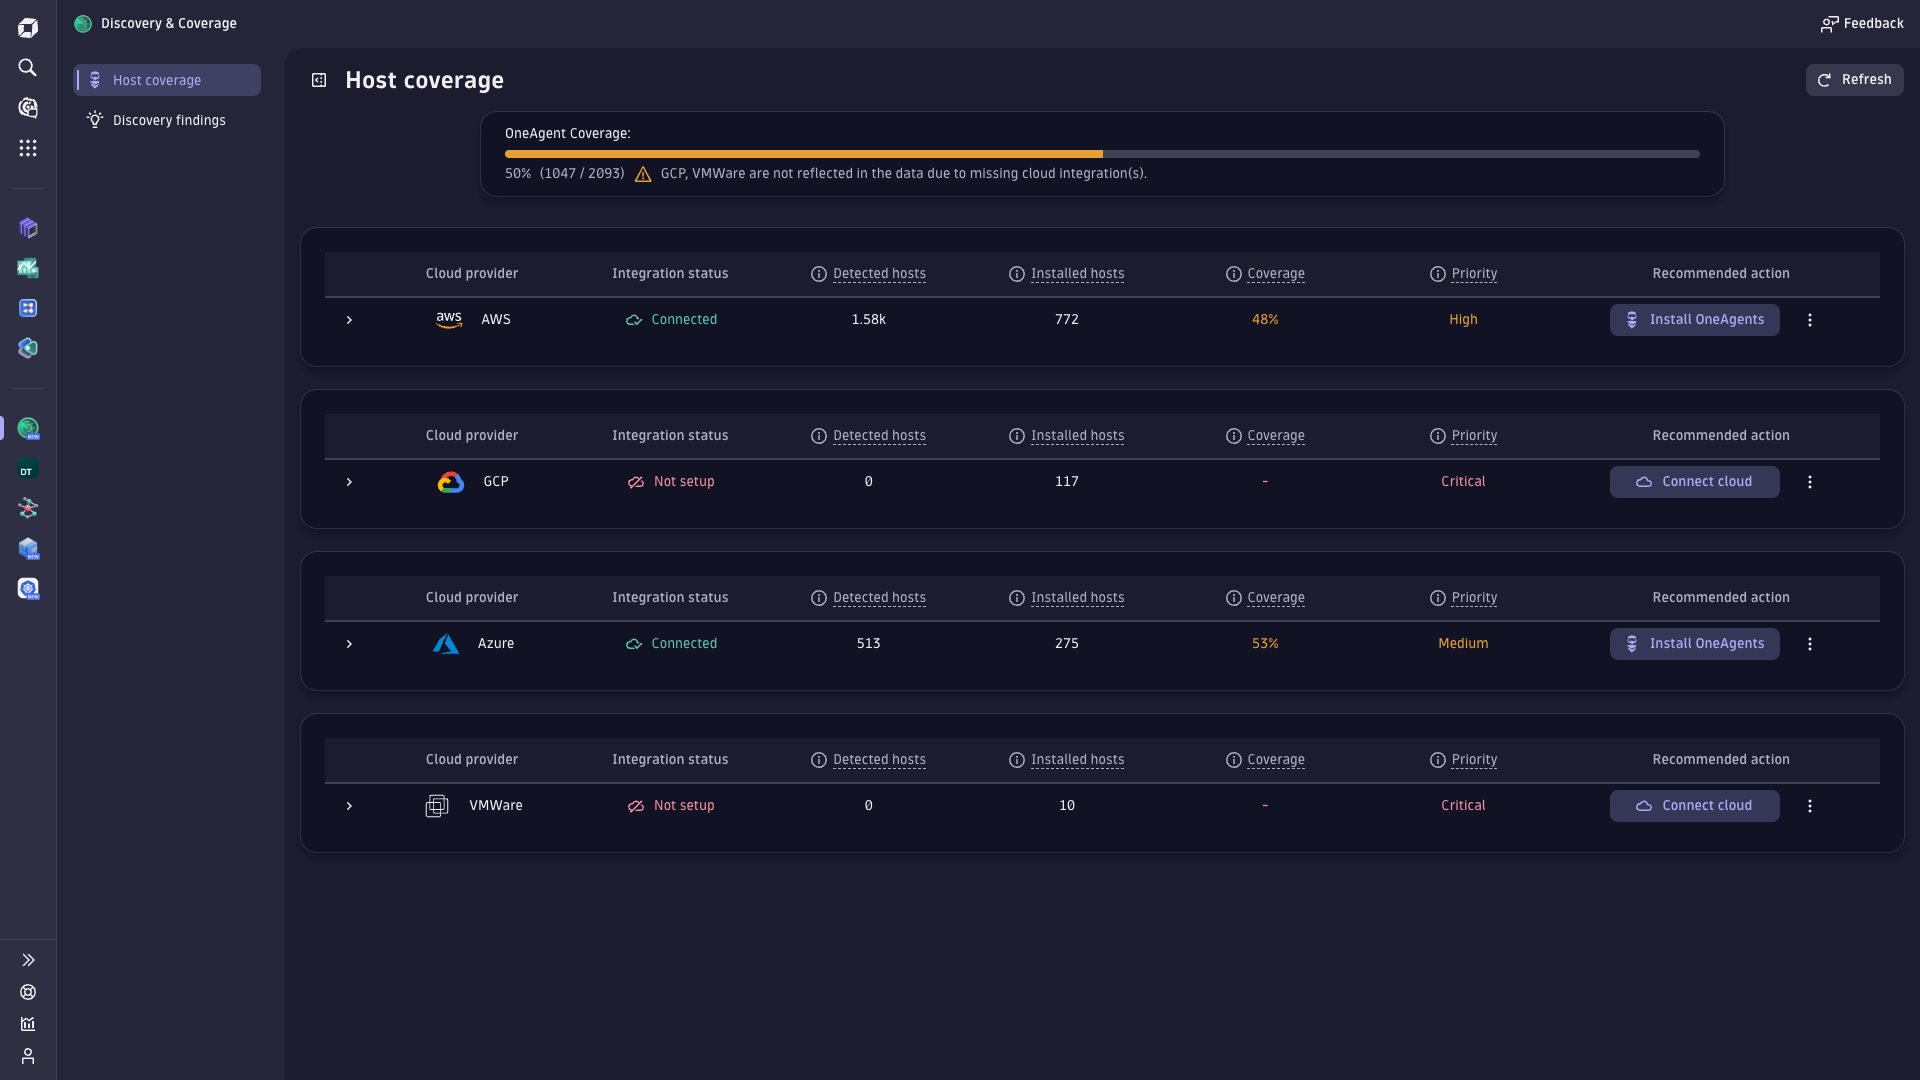
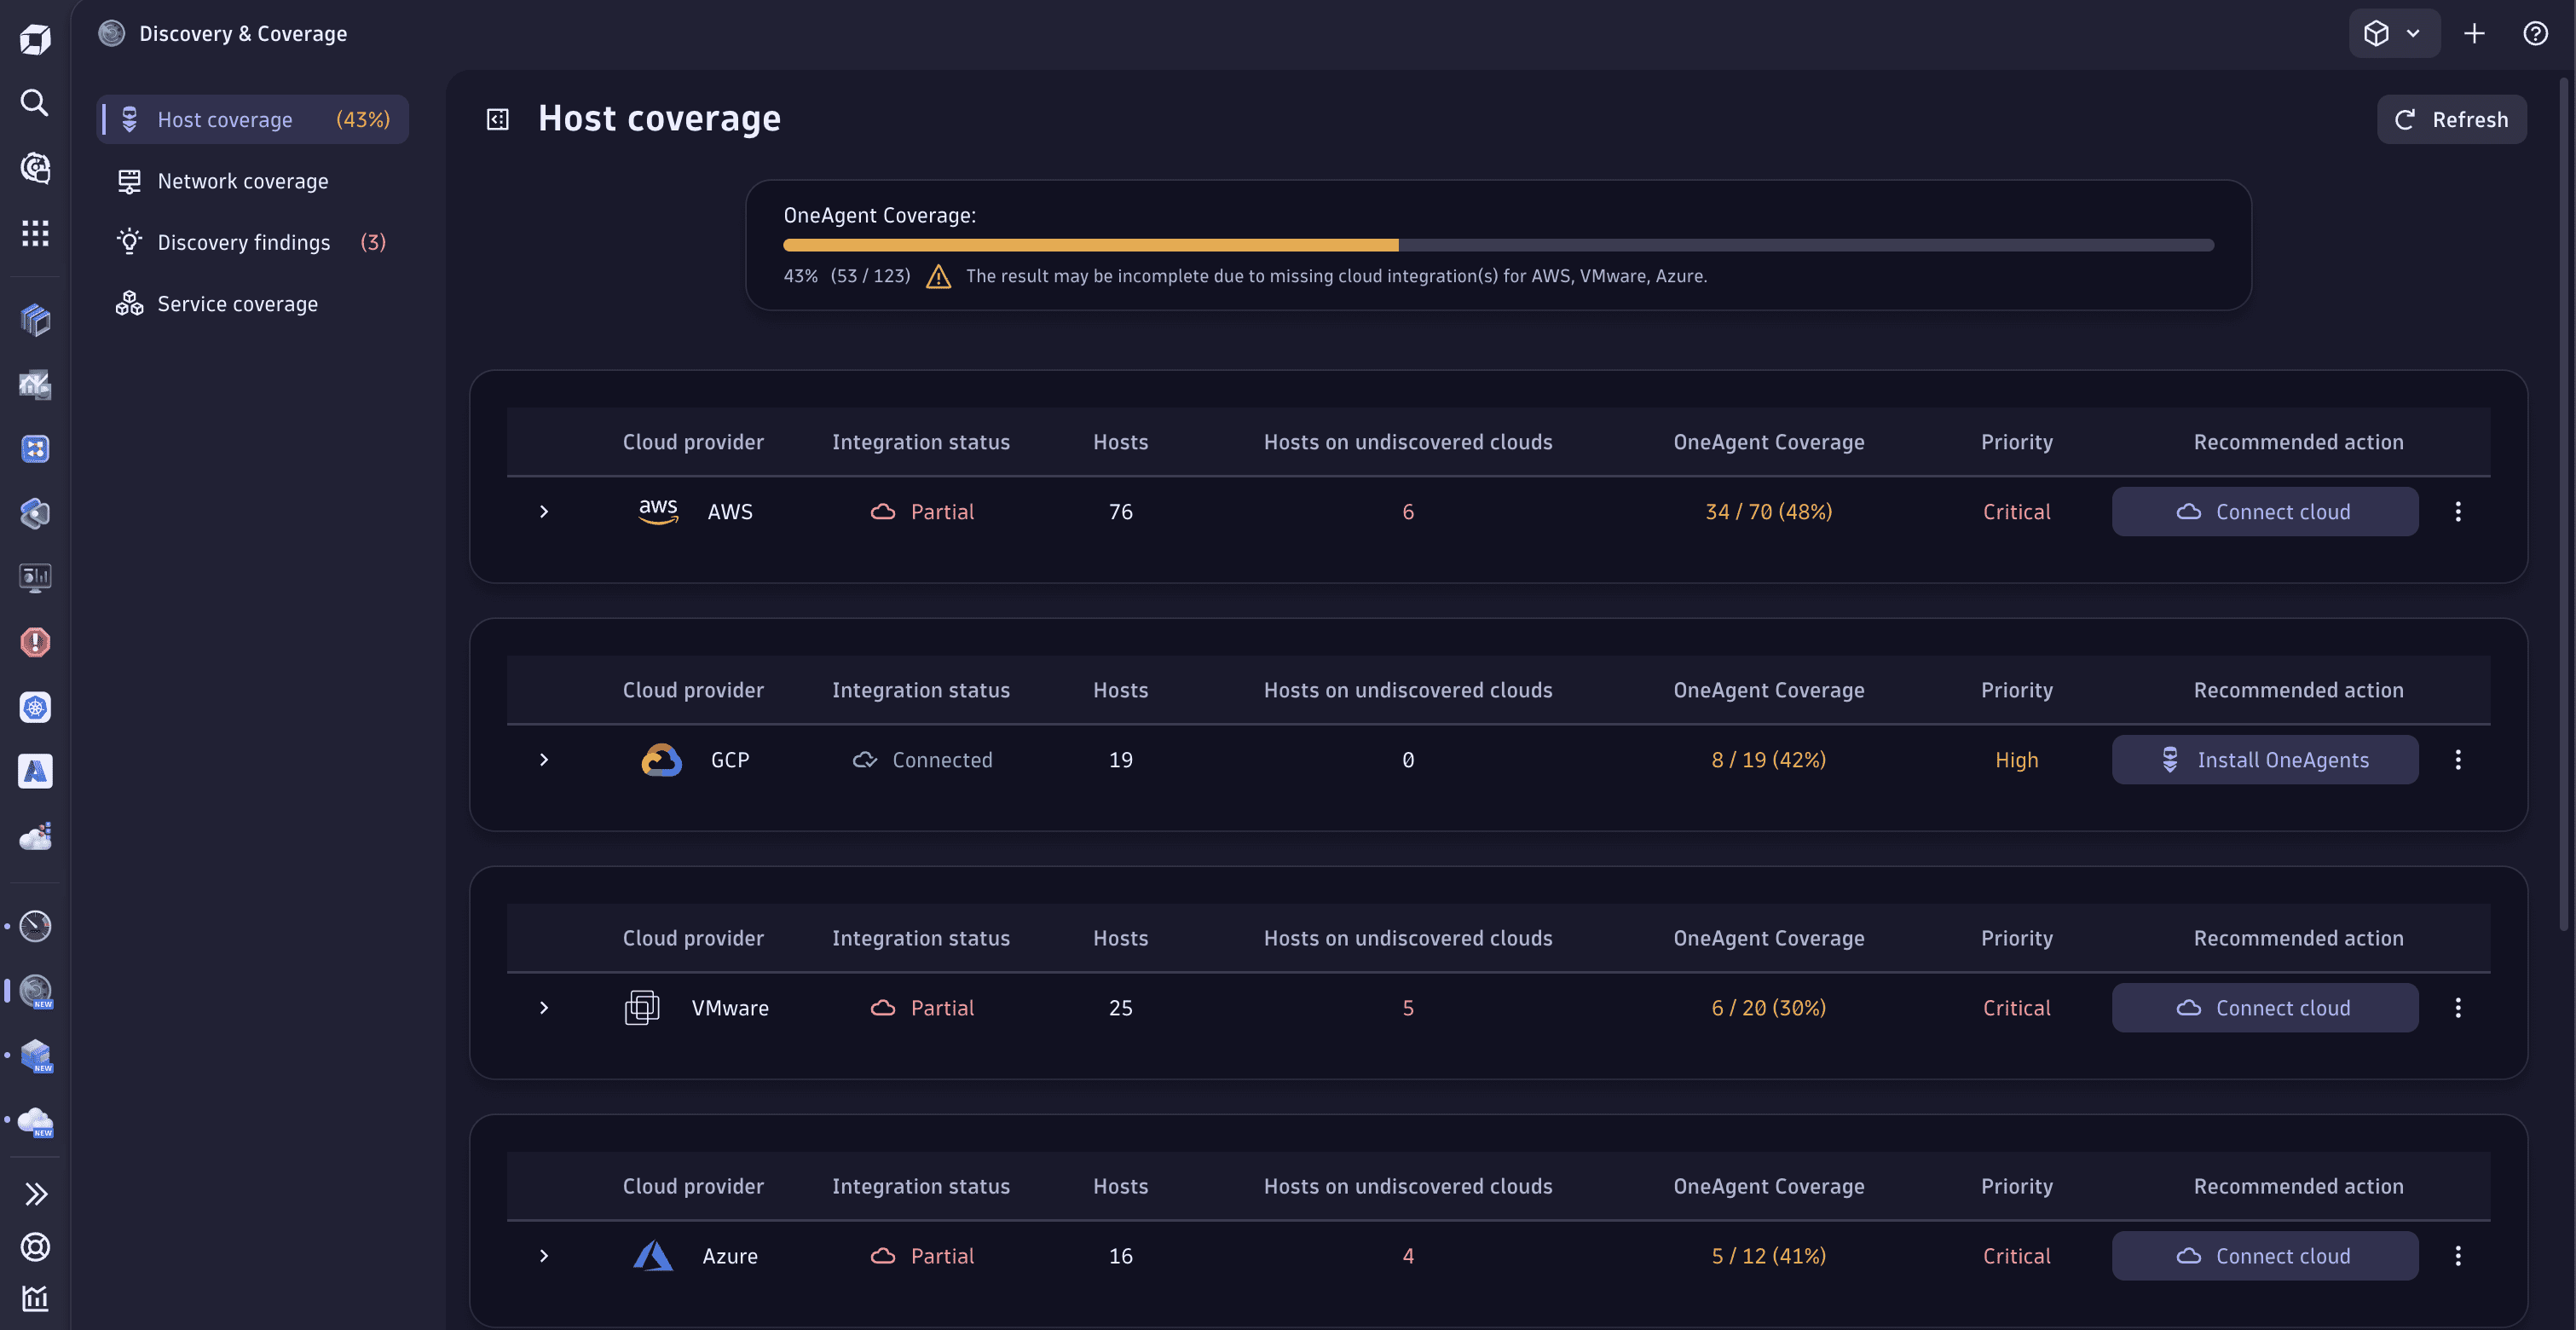
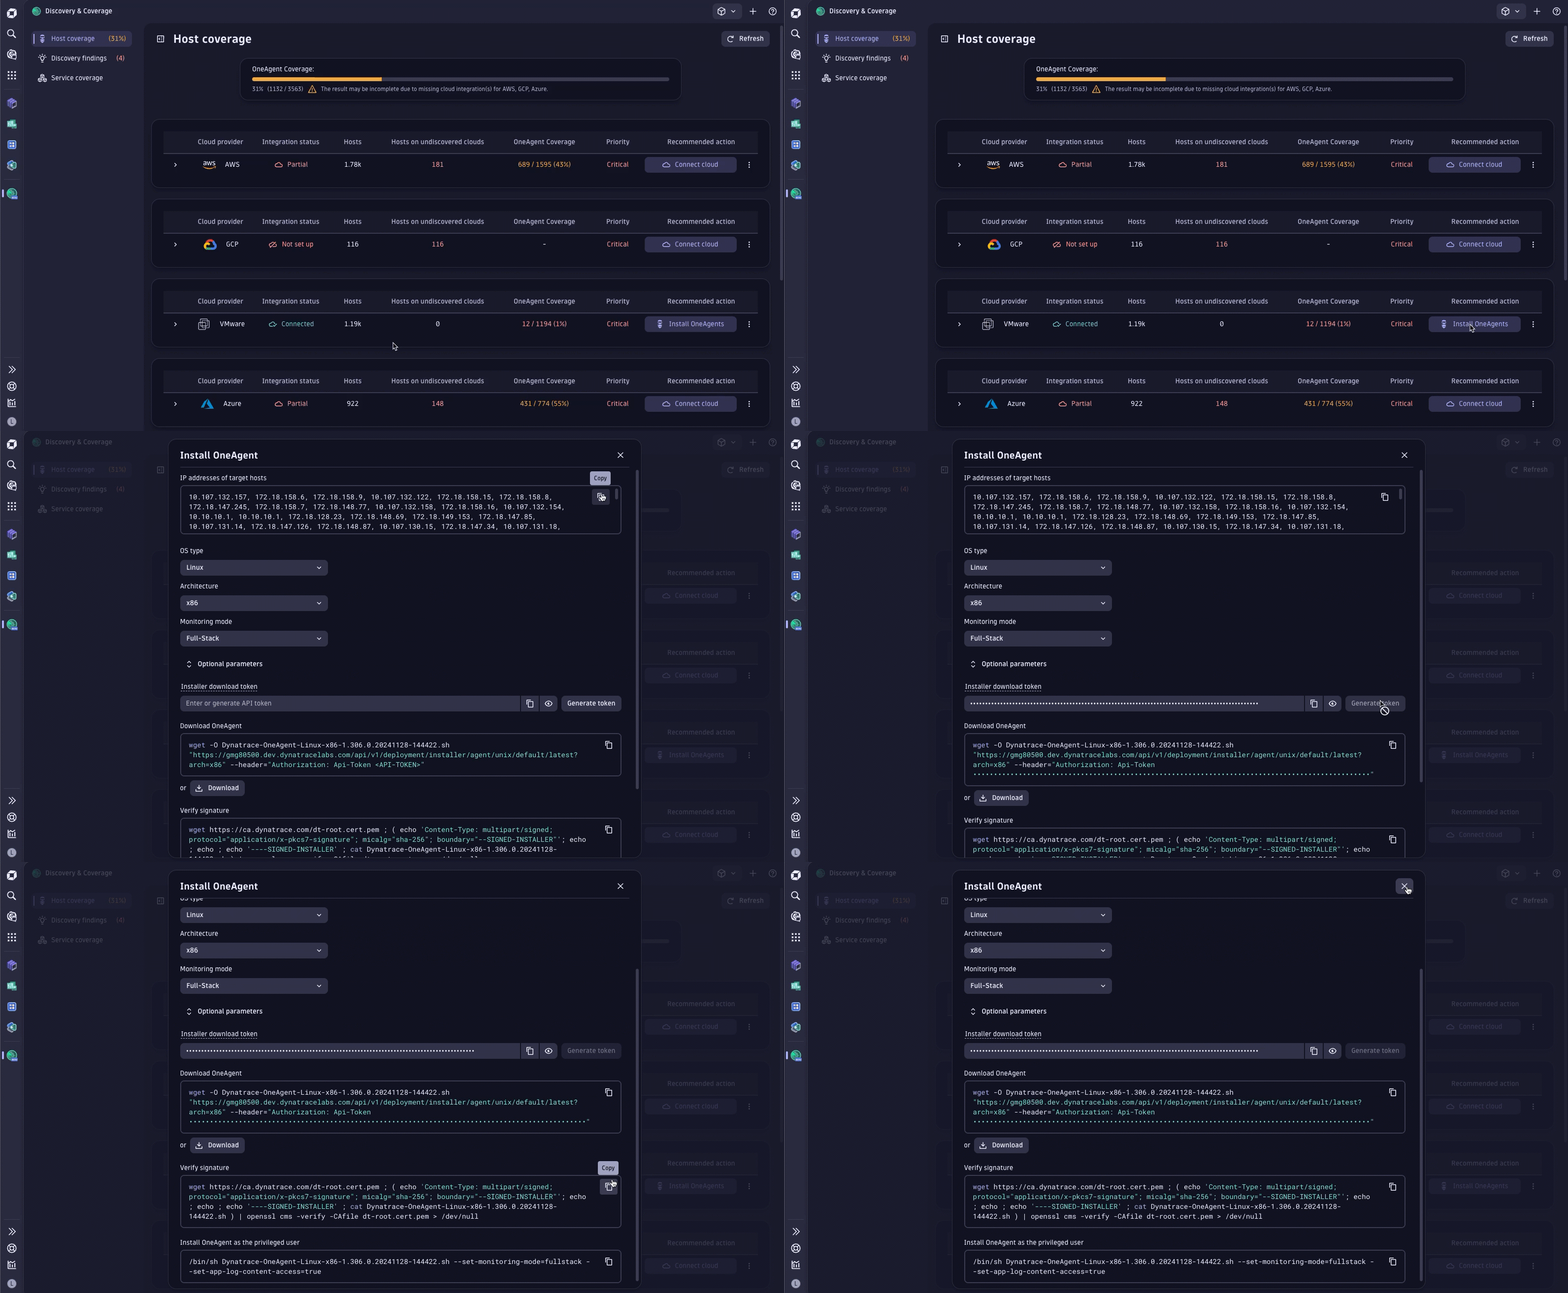
The Host coverage page shows a quick overview of which clouds are connected, how many hosts were discovered, and how many hosts are monitored by Dynatrace. The app automatically calculates the coverage priority for each cloud.
The first step to ensuring complete coverage for your environment is to confirm that all your clouds and hosts are covered.
-
Go to
 Discovery & Coverage.
 -
In the panel on the left, select Host coverage.
This page displays public and private cloud providers: AWS, Azure, GCP, Oracle, VMware, Nutanix, and Hyper-V.
-
Discovery & Coverage uses data from Smartscape to recommend actions. Based on what is currently monitored, the Recommended action column will suggest an action.
-
No action
-
Connect cloud
For example, if OneAgent is installed on a host in a cloud that is not currently monitored, this is shown in the Hosts on undiscovered clouds column, and the recommended action is Connect cloud. This action is Critical because the size of the observability gap can't be known until all clouds are connected.
Connect cloud takes you to the appropriate place to connect the specific cloud, such as
 Clouds or Hub.
 -
Install OneAgents
For example, if cloud monitoring is in place and unmonitored hosts are identified, the recommended action is Install OneAgents, with the priority determined by the size of the observability gap.
Install OneAgents opens an Install OneAgent modal, which includes the IP addresses of the unmonitored hosts.
- To install OneAgent for a subset of unmonitored hosts, expand the row of the cloud provider and use the filters to narrow down the target hosts, for example, by cloud tag.
- These filters can also be used if your hosts have multiple IP addresses; for example, you can filter for private IP addresses only. When filters are applied, the text of the Recommended action button changes to indicate how many OneAgents will be installed.
- You can also use the Segments selector in the upper-right corner of the page to apply global filters.
-
As additional clouds and hosts are added, the OneAgent Coverage bar at the top shows your progress toward complete coverage.
If you're unsure what the correct monitoring mode of a host is, you can start with Foundation & Discovery mode to gain insights into what applications or infrastructure might be on the host and what interdependencies might exist.
Discovery findings
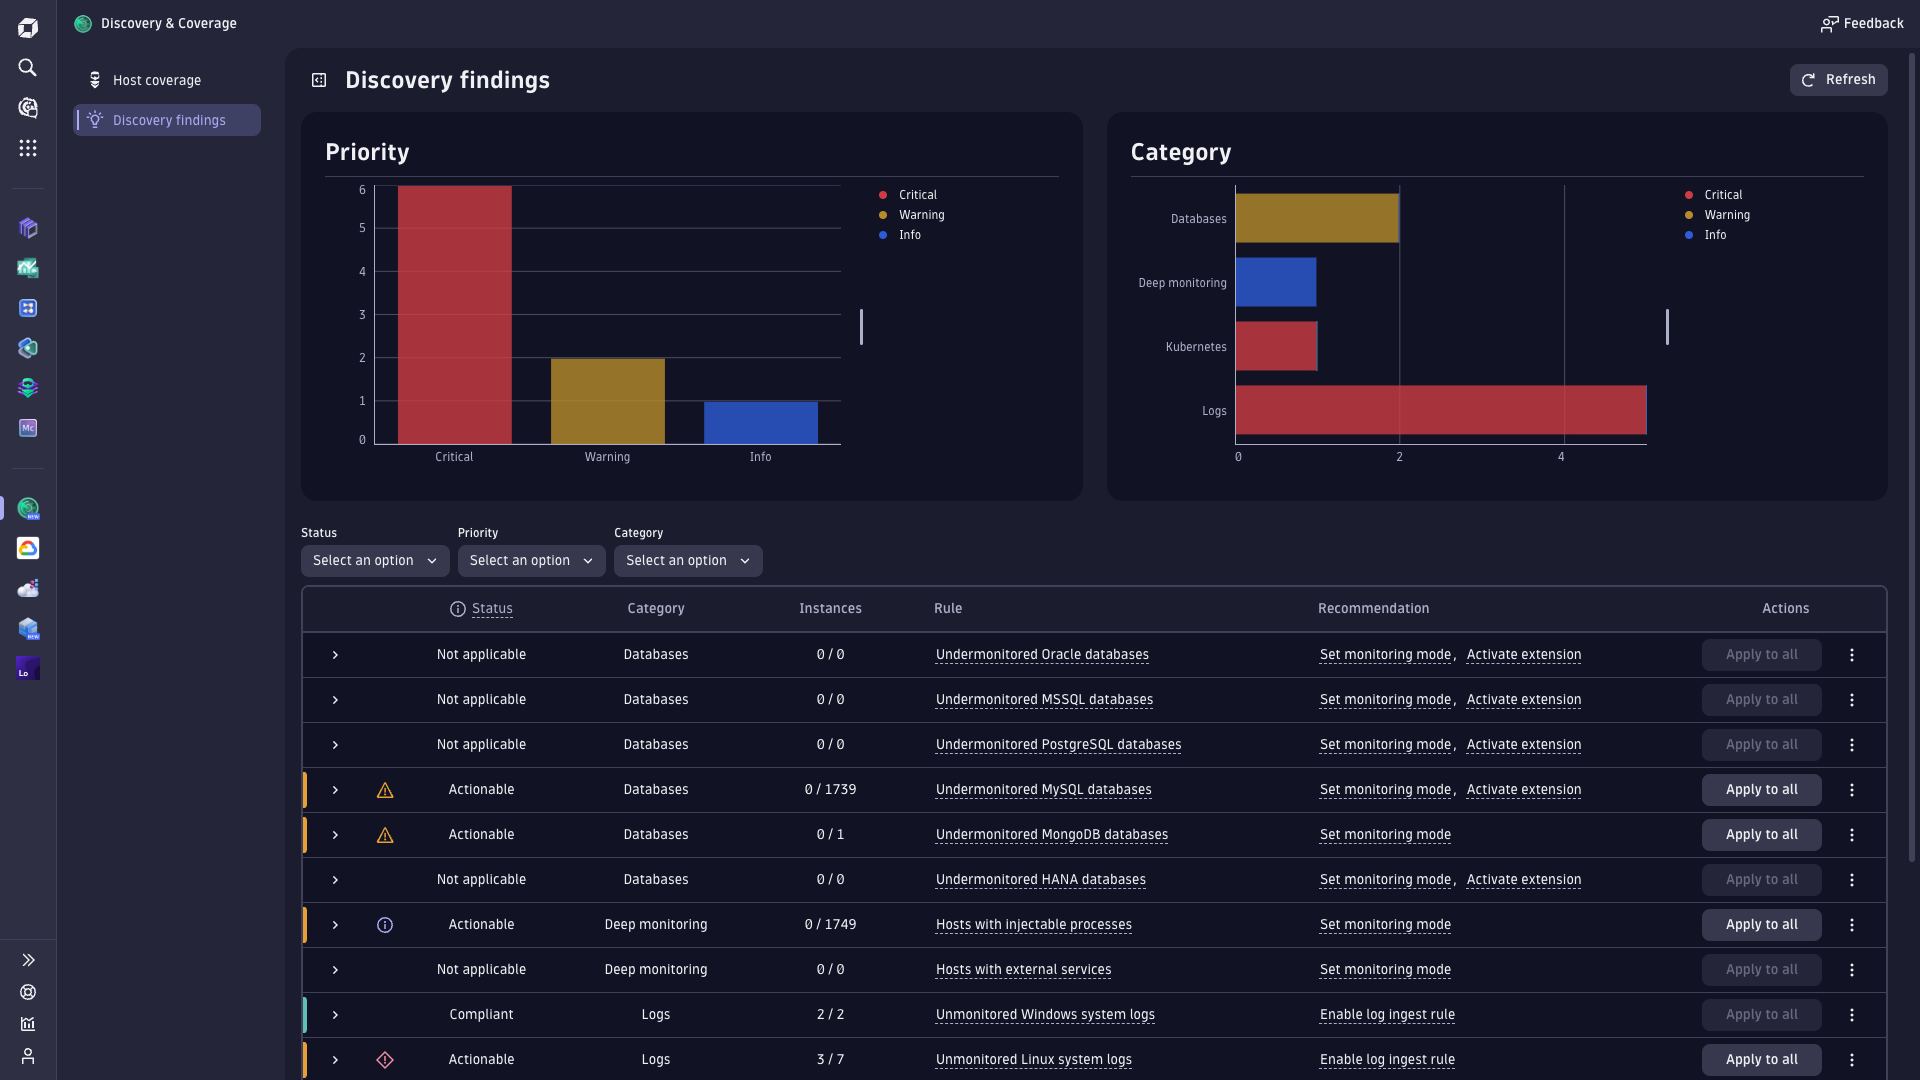
After you have achieved broad coverage using the Host coverage page, select Discovery findings to look at coverage depth.
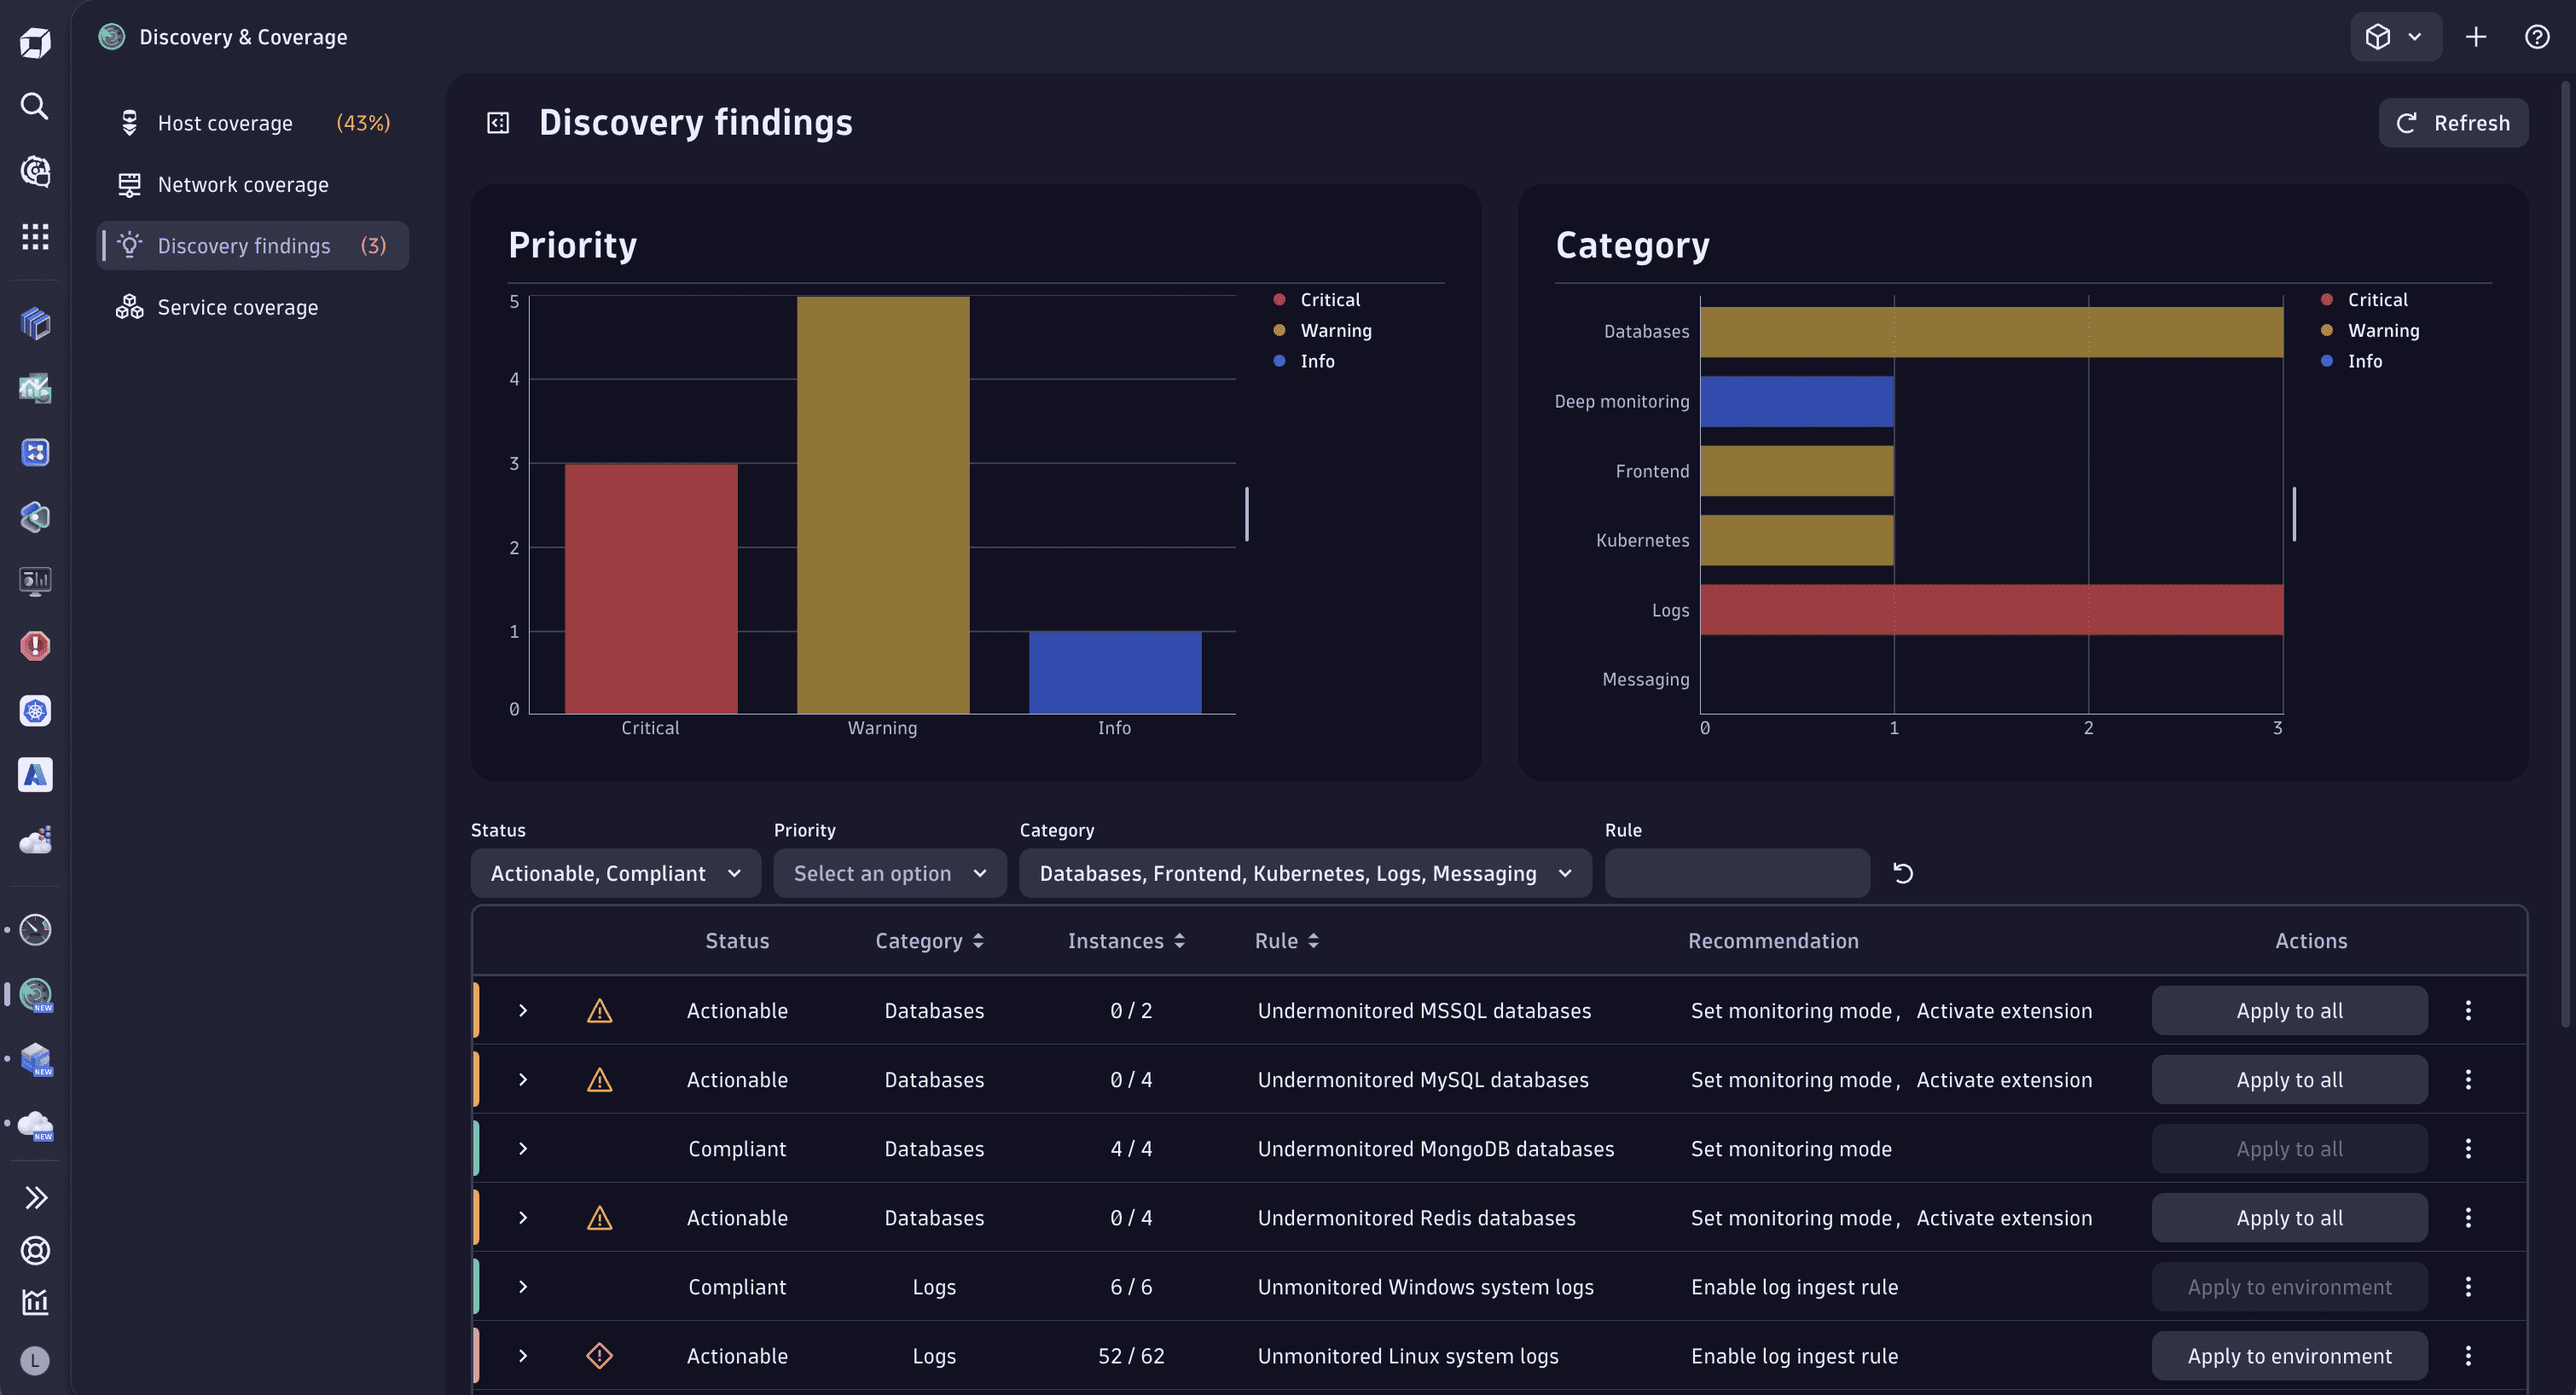
OneAgent populates Smartscape with a wealth of knowledge about the applications and infrastructure on each host. The Discovery findings page uses this information to determine whether the correct level of observability is in the right places.
- The table in the lower part of the page displays best practice rules for each technology.
- The charts in the upper part of the page summarize the data from these rules.
For example, if a database is detected on a host, a best practice rule recommends setting OneAgent to at least Infrastructure Monitoring mode and configuring the appropriate database extension.
Rule details
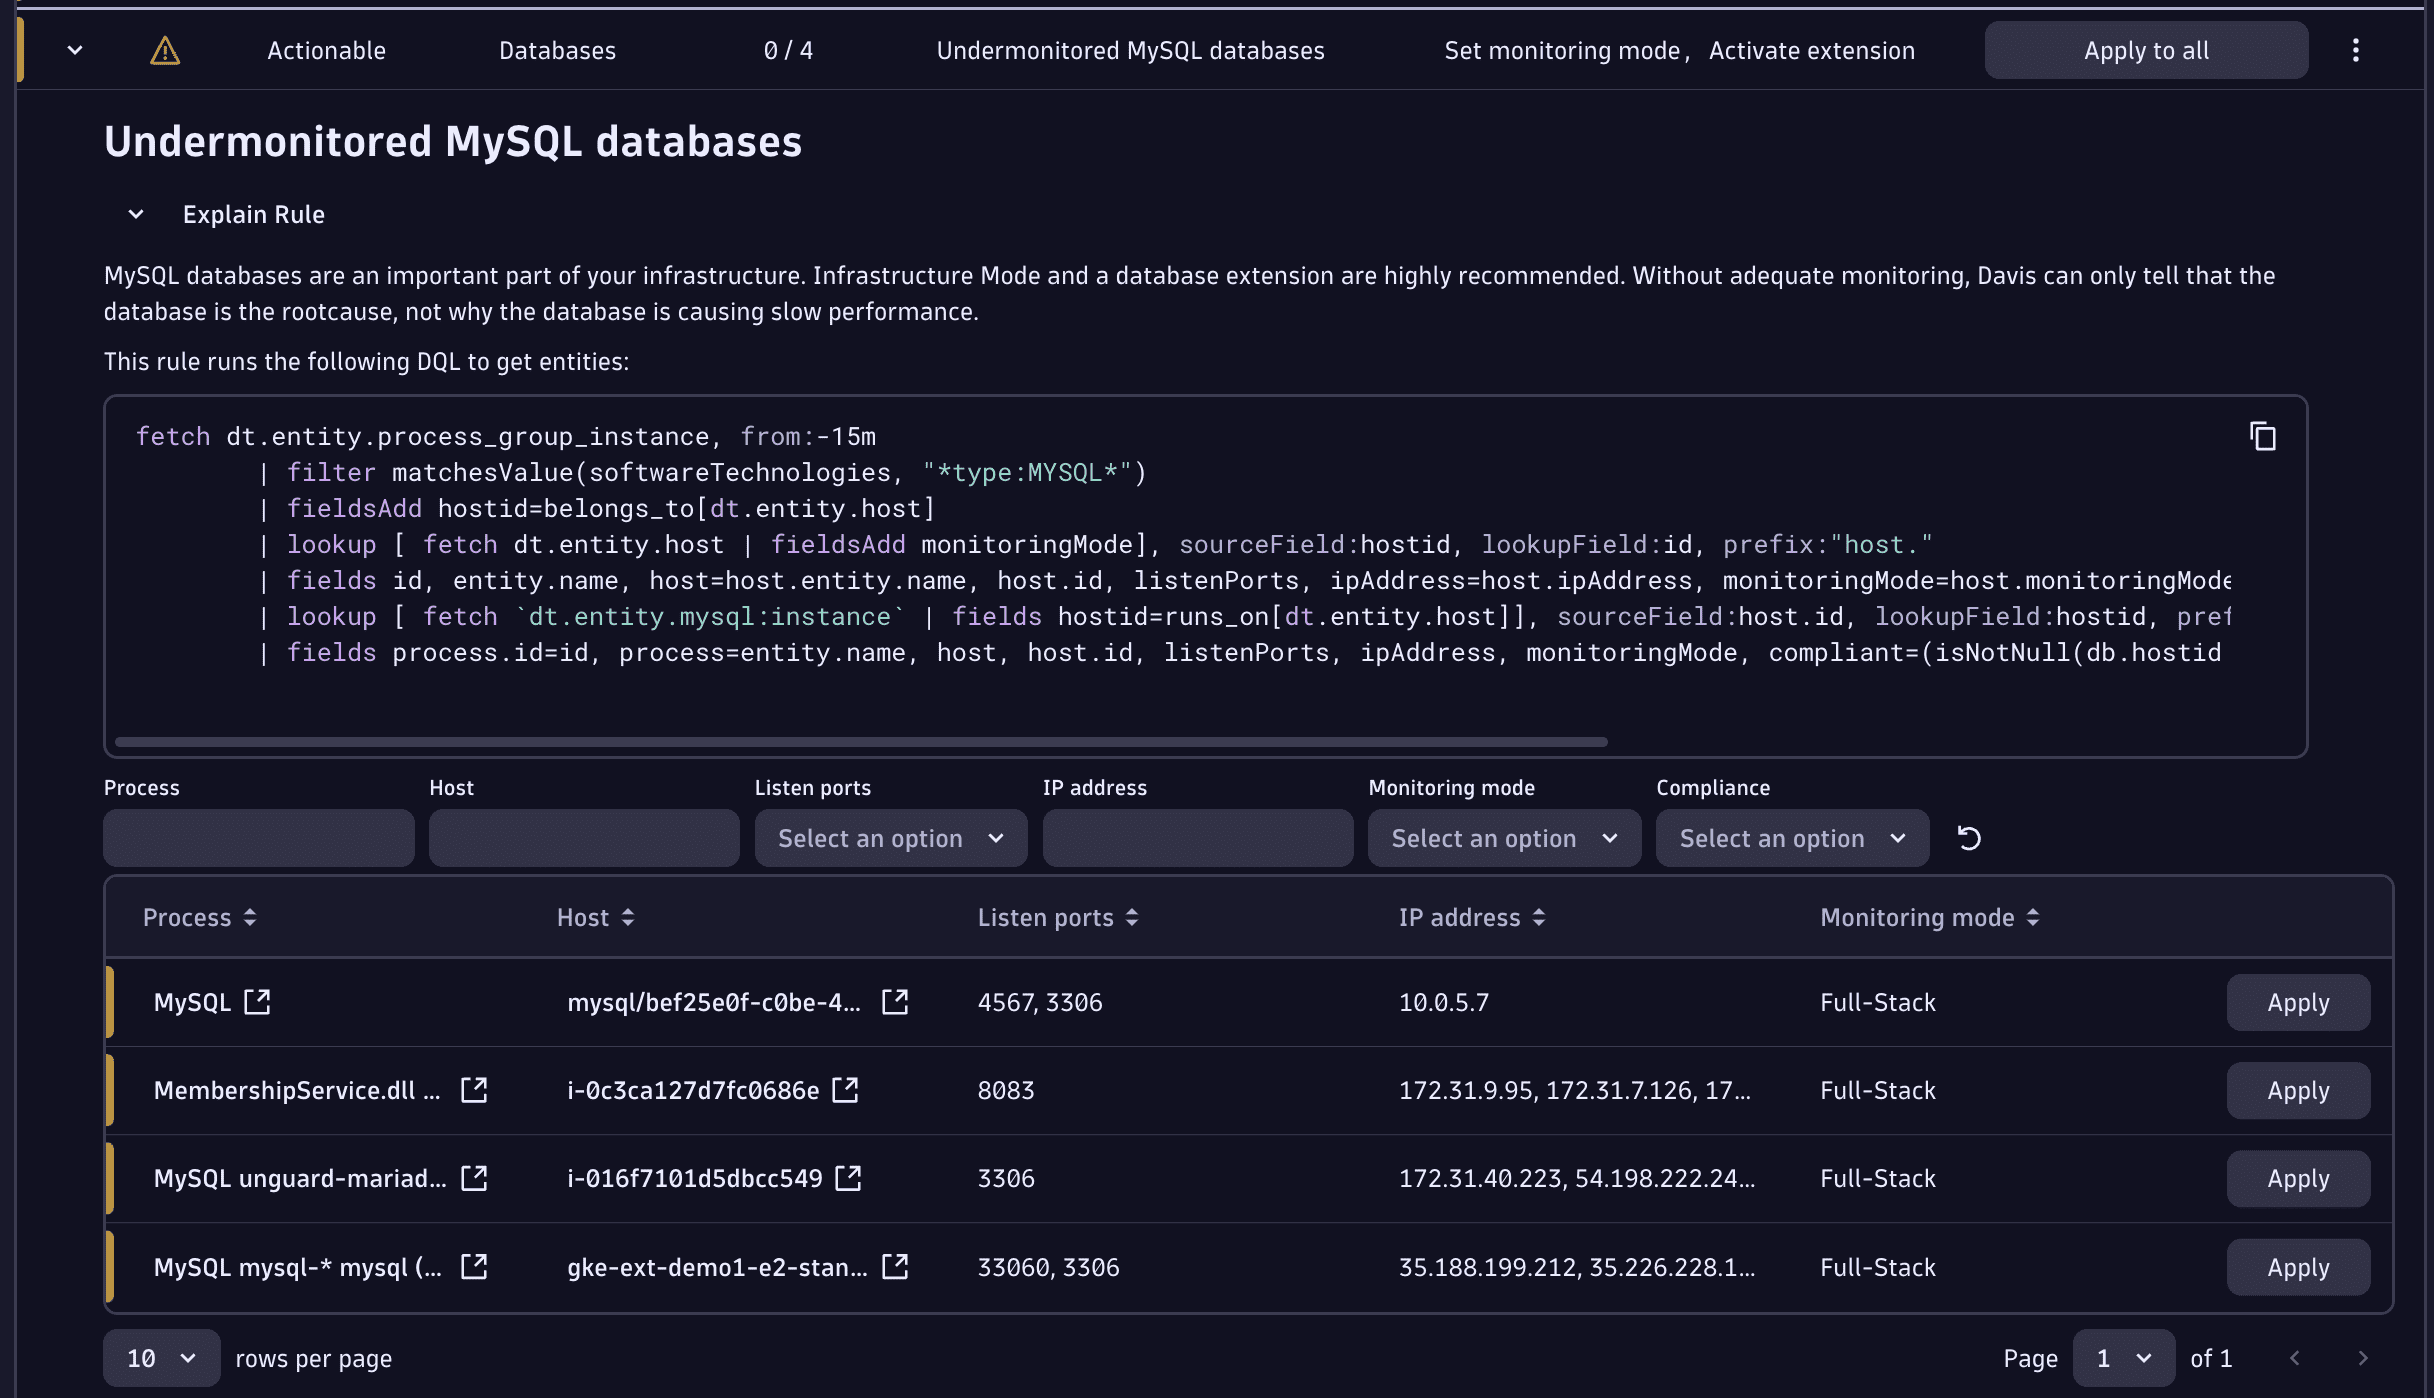
For more information on a best practice rule, select in a table row to expand that row, as in the following example.
The rule-specific table in the expanded row shows each applicable entity.
- Filtering here changes the text of the recommended action button.
- Expand the Explain Rule section for an overview of why the rule is considered best practice. It also shows you the exact DQL query used to retrieve this information from Smartscape. If you want to explore the query further, open the Actions > menu for a specific row and select Open with to pin the query to a dashboard or notebook.
When you select a recommended action, a window summarizes it and lists the required permissions so you can decide whether to Apply or Cancel the action.
If you have additional ideas for best practice rules, please leave your feedback in the Feedback channel for the Discovery & Coverage app page of Dynatrace Community.
Network coverage
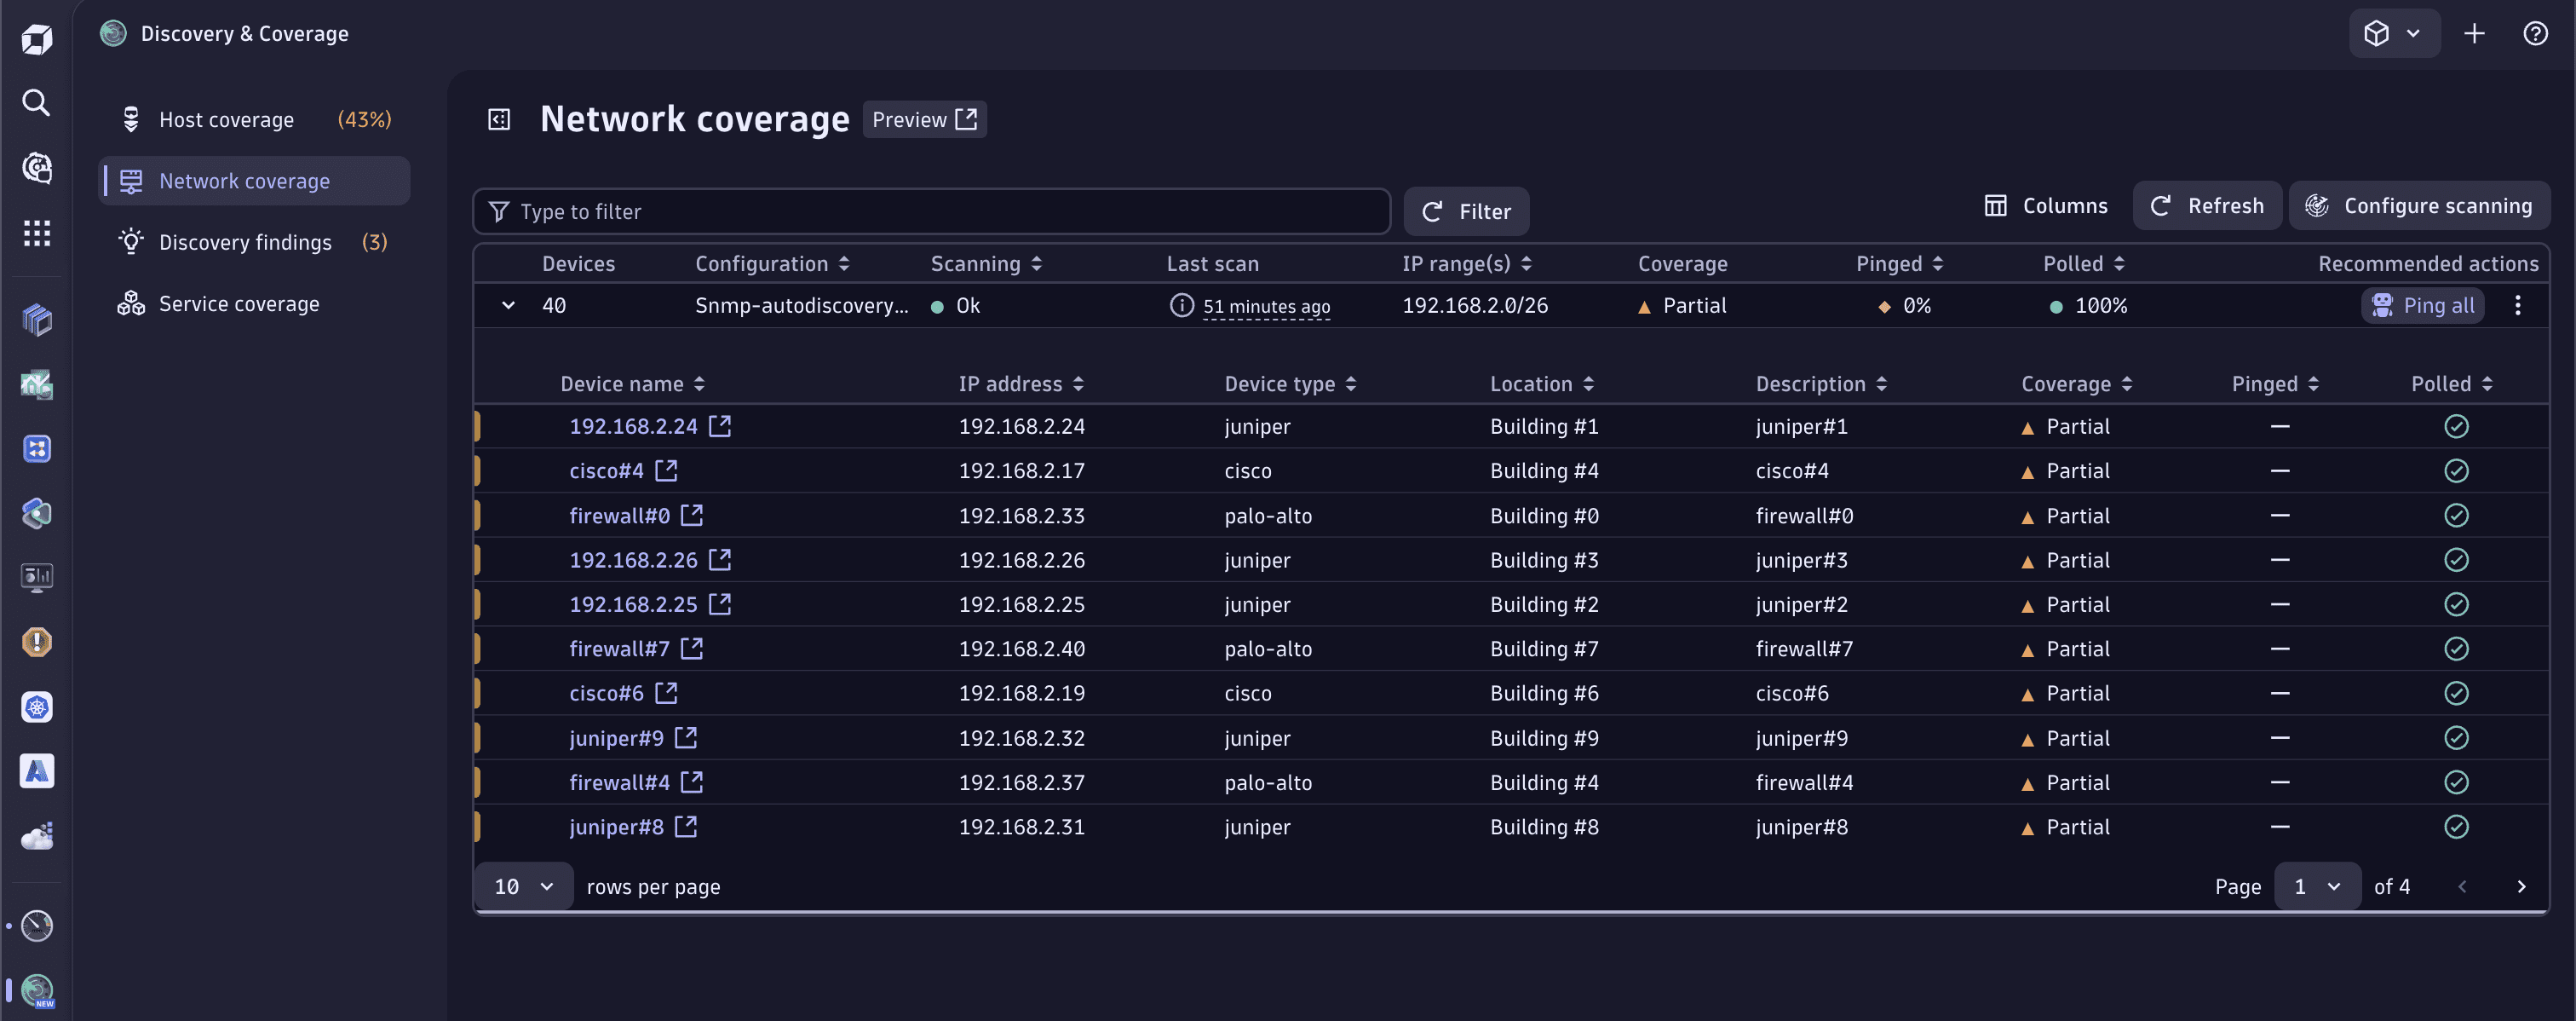
The Network coverage page leverages the SNMP Autodiscovery extension to scan your network for SNMP-based network devices to monitor.
Selecting Configure scanning guides you through the installation and configuration of the extension. Once configured, scanning occurs at regular intervals.
Discovered devices are displayed according to the extension's configuration.
-
Select in a table row to expand that row and display all discovered devices. Coverage is based on the best practice of pinging each device using Network Availability Monitoring and polling the device using the correct SNMP extension.
-
Select Ping all to configure Network Availability Monitoring and Poll all to configure the appropriate SNMP extension.
Service coverage
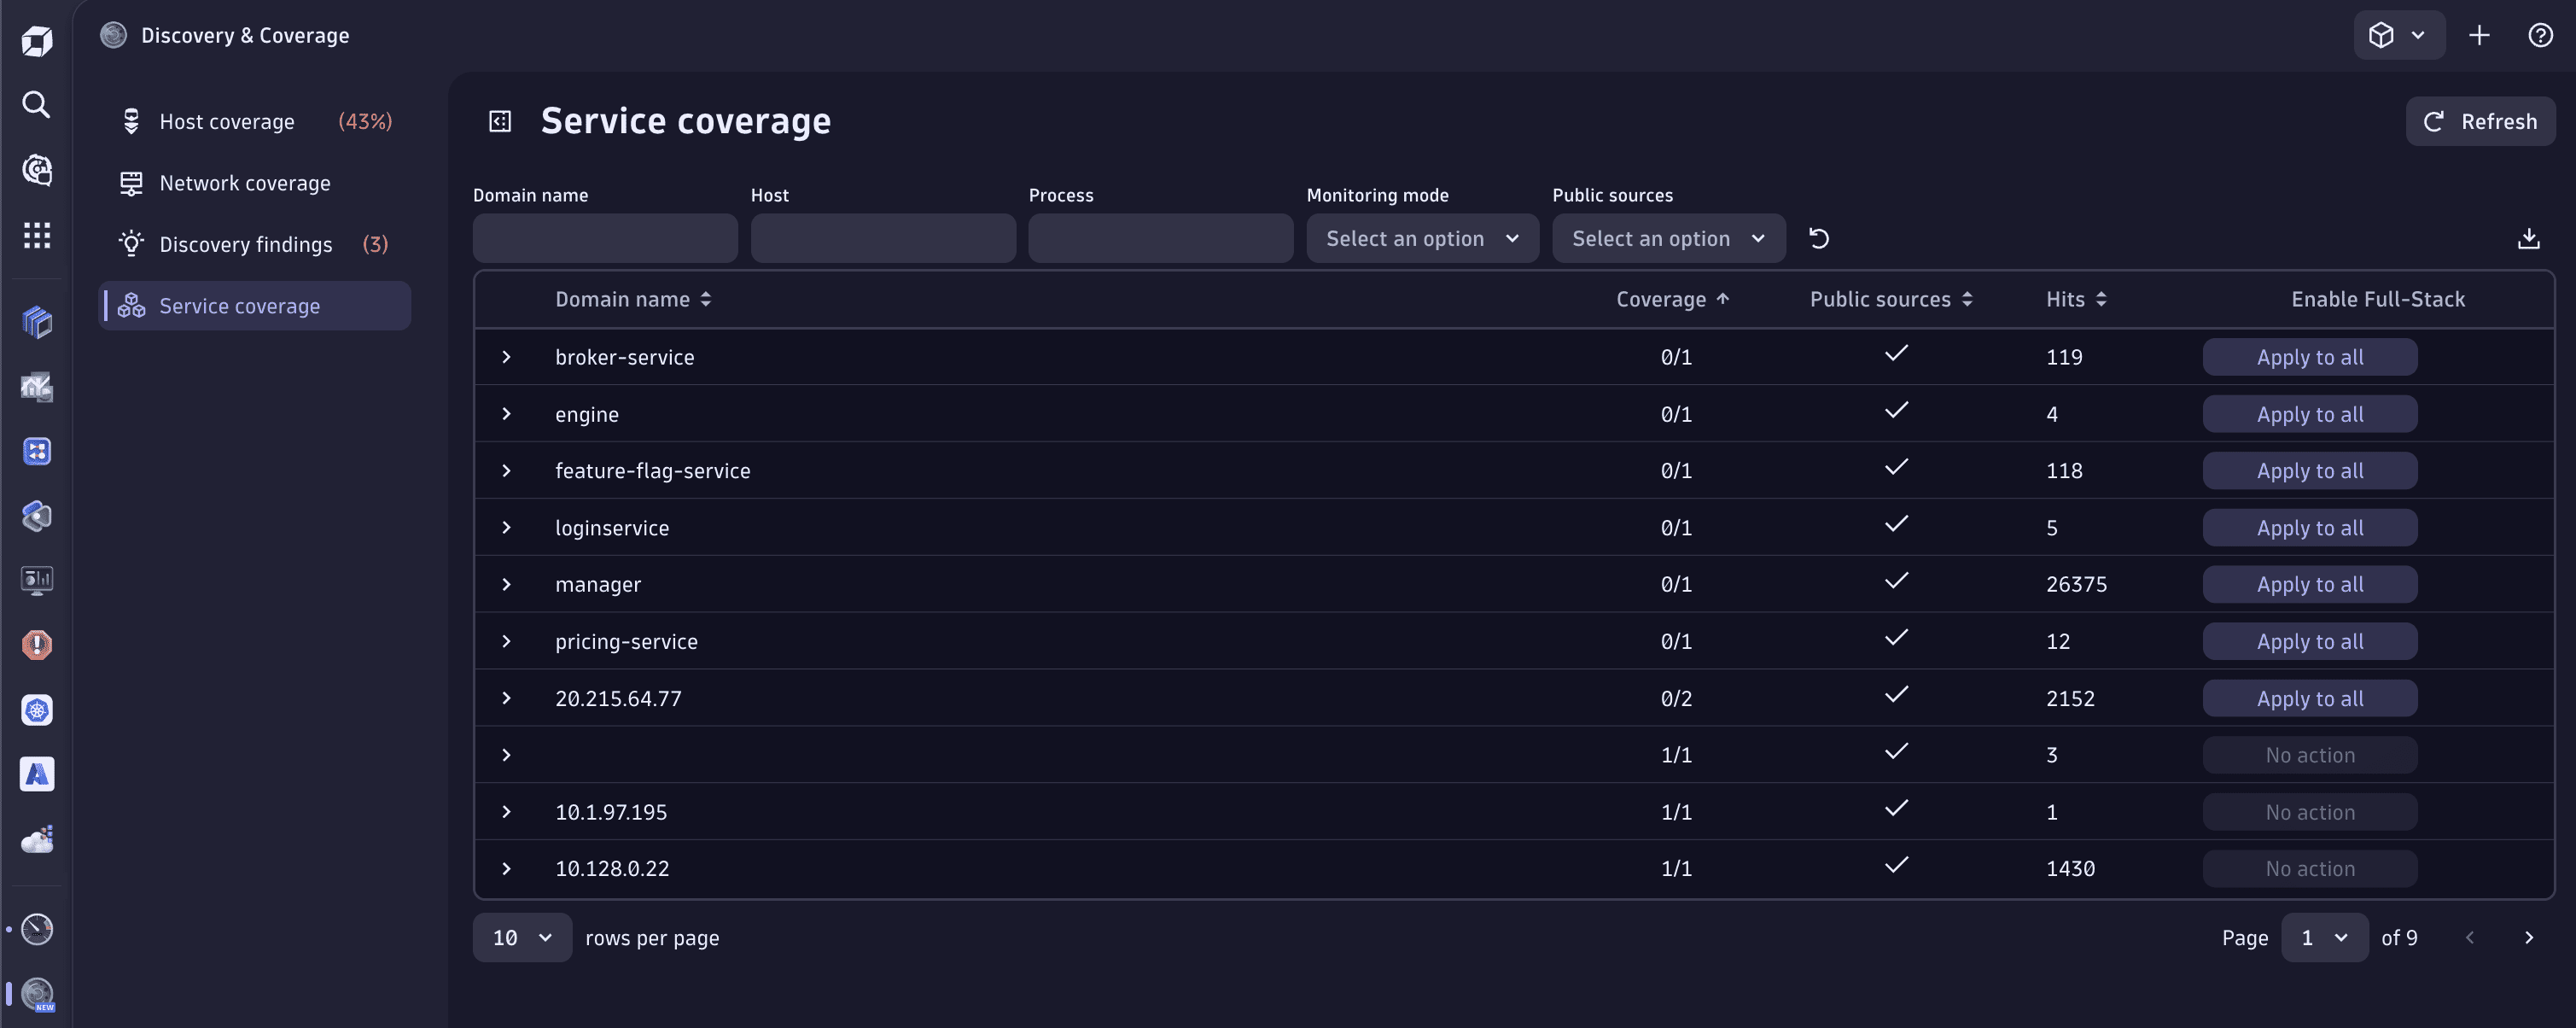
The Service coverage page leverages data from the eBPF Discovery module of OneAgent. This module provides a low-overhead method for determining which URLs are sent to a process, how often, and whether the source is public. This lets you quickly identify any hosts required for your applications and APIs. The eBPF discovery is enabled by default. To disable it, in Settings, search for eBPF Service Discovery.
You can switch OneAgents on the discovered hosts to Full-Stack monitoring mode in the Enable Full-Stack column.
Install OneAgent
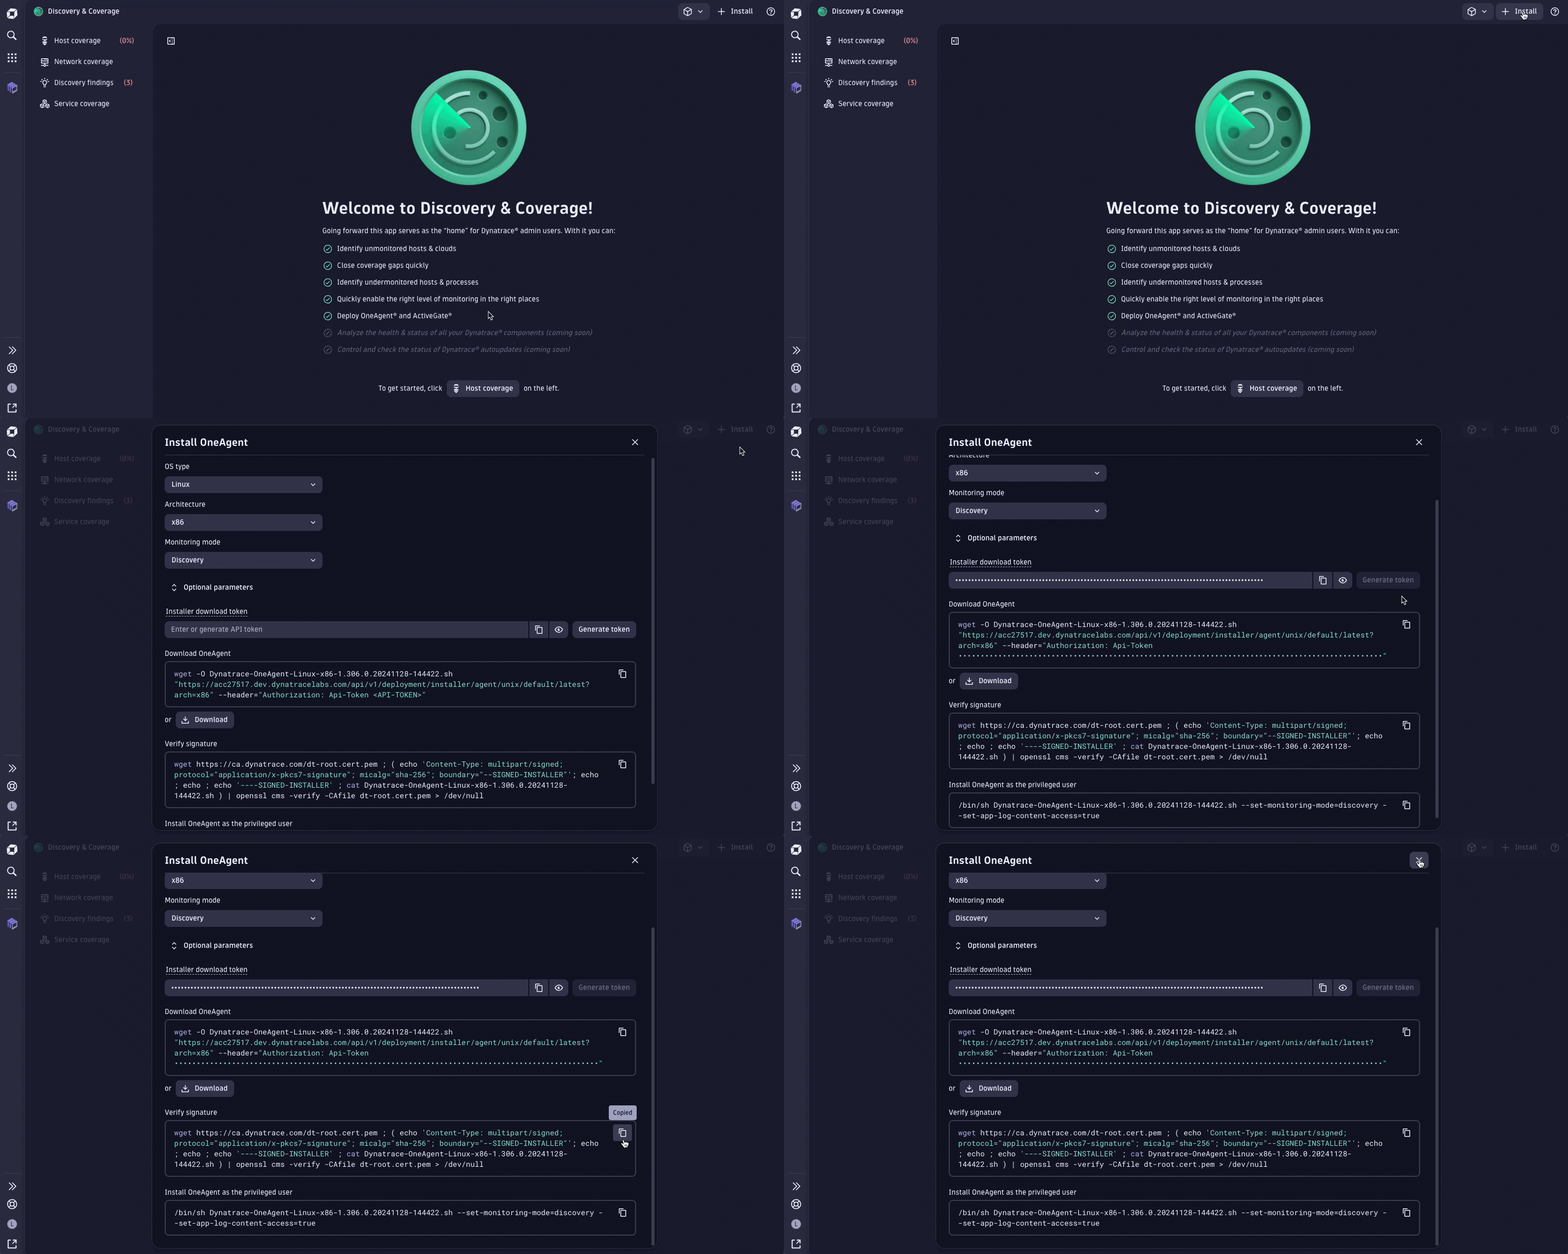
In addition to the host coverage page, you can install a OneAgent by selecting > Install OneAgent in the upper-right corner. For details, see Install OneAgent.
Install ActiveGate
To install an ActiveGate, select > Install ActiveGate in the upper-right corner. For details, see Install ActiveGate.
 Discovery & CoverageInfrastructure Observability