Microsoft Entra ID Connector
- Latest Dynatrace
- 5-min read
Your Dynatrace environment can integrate with Microsoft Entra ID (formerly Azure Active Directory) in automation workflows.
Microsoft Entra ID Connector  enables you to use prebuilt actions in Workflows
  to automate importing teams from Entra ID (based on various triggers) for defining entity ownership and other use cases in Dynatrace.
Microsoft Entra ID Connector connects to the Azure Cloud via the Microsoft Graph API.
Setup
1. Allow External Requests
External requests enable outbound network connections from your Dynatrace environment to external services. They allow you to control access to public endpoints from the AppEngine with app functions and functions in Dashboards, Notebooks, and Automations.
-
Go to
 Settings > General > External requests.
 -
Select New host pattern.
-
Add the domain names.
-
Select Add.
This way you can granularly control the web services your functions can connect to.
You need to add these domain names login.microsoftonline.com and graph.microsoft.com.
2. Grant permissions to Workflows
Workflows requires some permissions to run actions on your behalf. Actions that come bundled with the Connector require other permissions.
To fine-tune permissions granted to Workflows
- Go to Workflows
 and go to Settings > Authorization settings.
 - Select the following permissions besides the general Workflows permission.
app-settings:objects:read
For more on general Workflows user permissions, see User permissions for workflows.
3. Set up integration with Dynatrace
Configure your Microsoft Azure tenant to establish a connection with your Dynatrace environment.
-
Open
portal.azure.comto access your Microsoft Azure tenant. -
Navigate to App registrations to set up a new application.
For the necessary setup steps, see Register a client application in Azure Active Directory.
-
Grant your newly created Azure application the
Group.Read.Allpermission.For more information, see API Permissions and Introduction to permissions and consent.
-
After registering the app, create a new client secret. For details, see Certificates & secrets.
- To create a client secret, make sure that you either have admin permissions or are part of the app owners.
- Make sure you store the client secret Value (not the Secret ID) after creation for establishing the connection to your Dynatrace environment later.
4. Authorize connection
Microsoft Entra ID Connector requires a client secret from Microsoft Azure for authorization.
- Get the following credentials from your application registration in your Microsoft Azure tenant on
portal.azure.com.- Directory (tenant) ID: Available in the Overview menu
- Application (client) ID: Available in the Overview menu
- Client secret: The Value (not the Secret ID) of the client secret from the preceding Set up Microsoft Azure for integration with Dynatrace section
- Return to Dynatrace, go to Settings
 > Connections > Microsoft Entra ID.
 - Select Add item and provide the following information.
- Connection name: Needs to be unique. It will be listed and selectable in the connection field in Microsoft Entra ID Connector.
- Directory (tenant) ID
- Application (client) ID
- Type:
Client secret - Client Secret: This is the Value of the client secret from the Set up Microsoft Azure for integration with Dynatrace section.
- Select Create.
Additional notes
-
To add connection settings, you need the following permissions.
ALLOW settings:objects:read, settings:objects:write, settings:schemas:read WHERE settings:schemaId = "app:dynatrace.azure.connector:microsoft-entra-identity-developer-connection"For details, see Permissions and access.
Get groups from Entra ID in automation workflows
-
Go to Workflows
 and select
 Workflow in the upper-right corner of the page.
-
In the side panel, select the trigger best suited to your needs.
-
On the trigger node, select
to browse available actions.
-
In the Choose action side panel, search for Microsoft Entra ID and select Get groups.
-
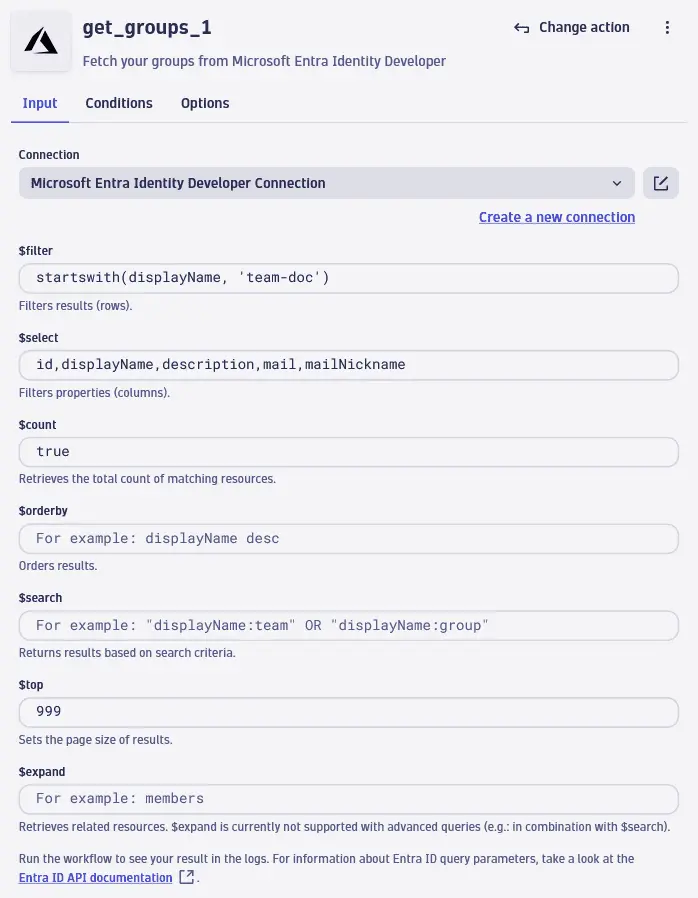
In the action Input, you can target specific groups in $filter if you wish to filter your results. Likewise, in $select, specify which fields you wish to get from Entra ID. The syntax is based on Entra ID API documentation.
Important for importing Entra ID groups as ownership teams:
- You always need to include
idanddisplayNamein$select; these fields are mapped to the imported ownership team's Team identifier and Team name, respectively. - We recommend that you always include the
mailNicknameparameter inget_groups. This field has unique values in Entra ID and is set as a unique, human-readable Supplementary Identifier for your imported ownership team within Dynatrace. - The Object Id from Entra ID, imported via the
idparameter, is set as the unique Team identifier as well as the External ID of the imported ownership team. - The
mailparameter is set as the Email of the imported ownership team.

- You always need to include
-
Optionally, insert the Import teams action (provided by the Ownership app
 ) to store Entra ID group information as ownership teams within Dynatrace Settings. You can then assign these imported teams as owners to any monitored entity in Dynatrace.
 -
To test your workflow, select Run.
Action result
The result of get_groups is a JSON array with each record consisting of a single user group. If $count is set to true when configuring the action, the Results panel shows a count of imported groups.
The directory_id displayed in the results is the Azure tenant ID.
The log of a successful run is shown below.
[INFO] Successfully retrieved connection settings.[INFO] Successfully fetched authentication token.[INFO] Calling Entra-ID groups endpoint with the following query params: $filter=startswith(displayName, 'team-deco')&$select=id,displayName,description,mail,mailNickname&$count=true&$top=999[INFO] Successfully fetched Groups from Entra-ID.