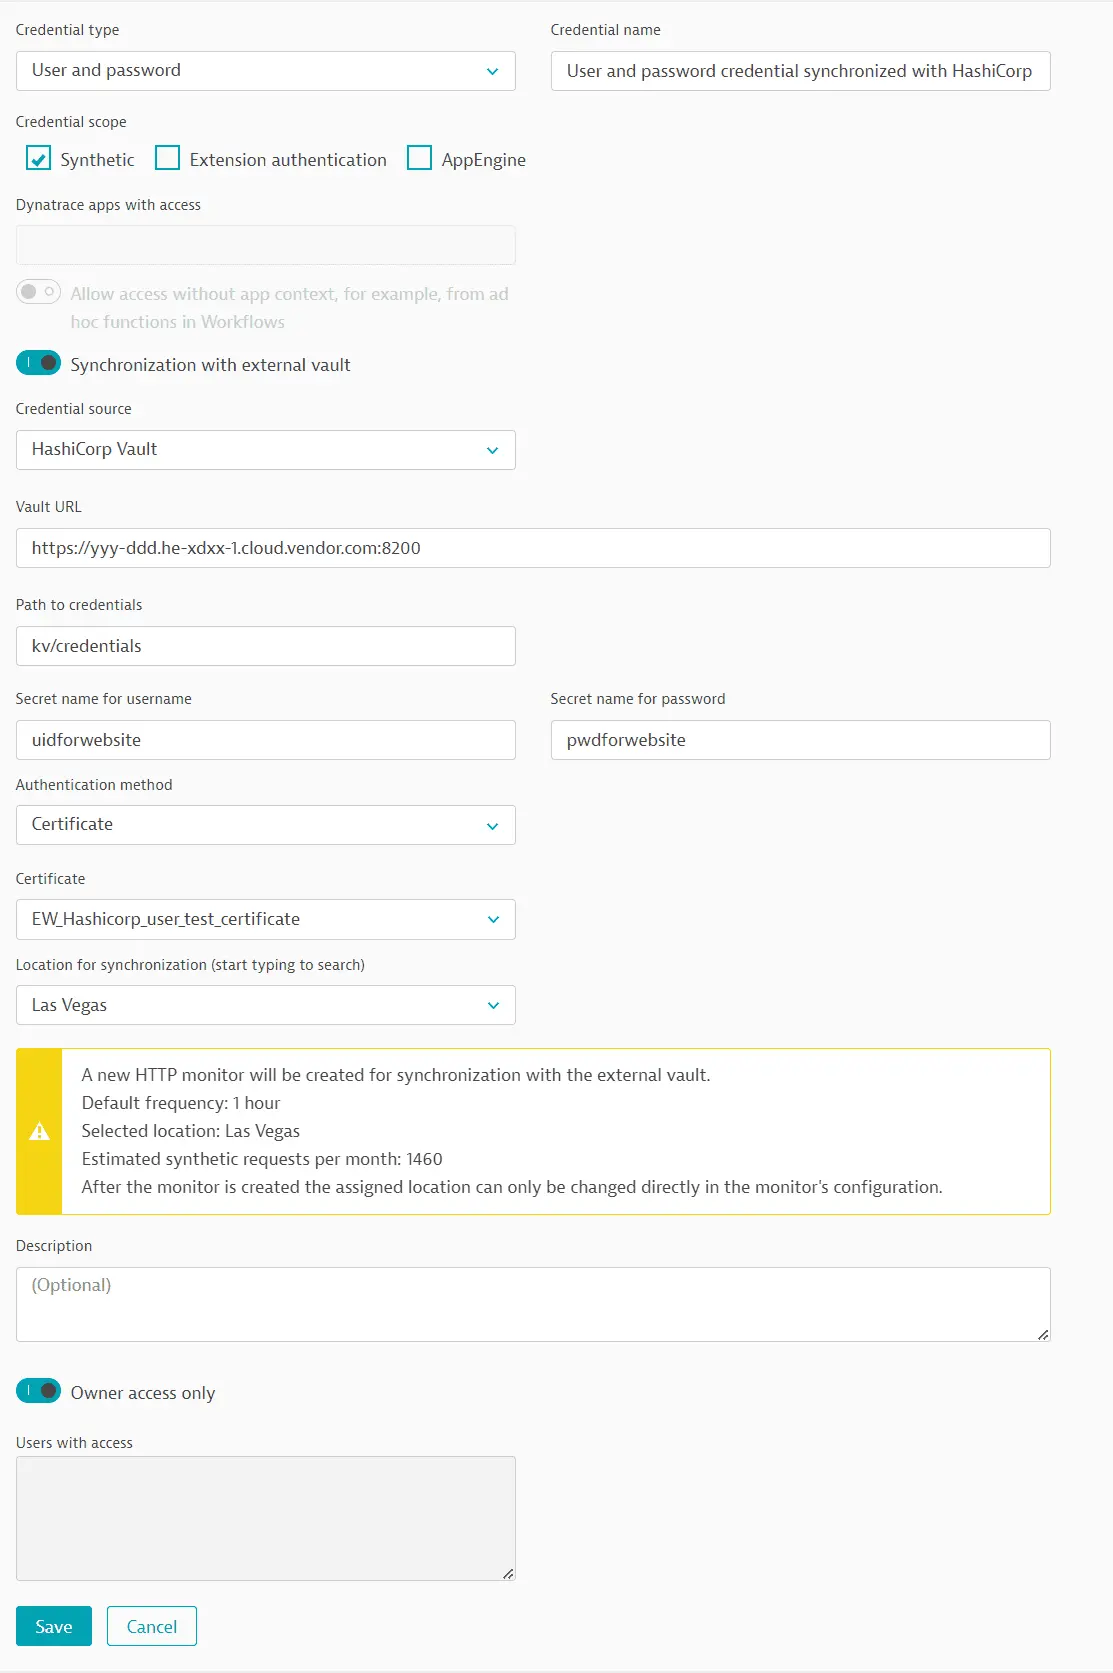
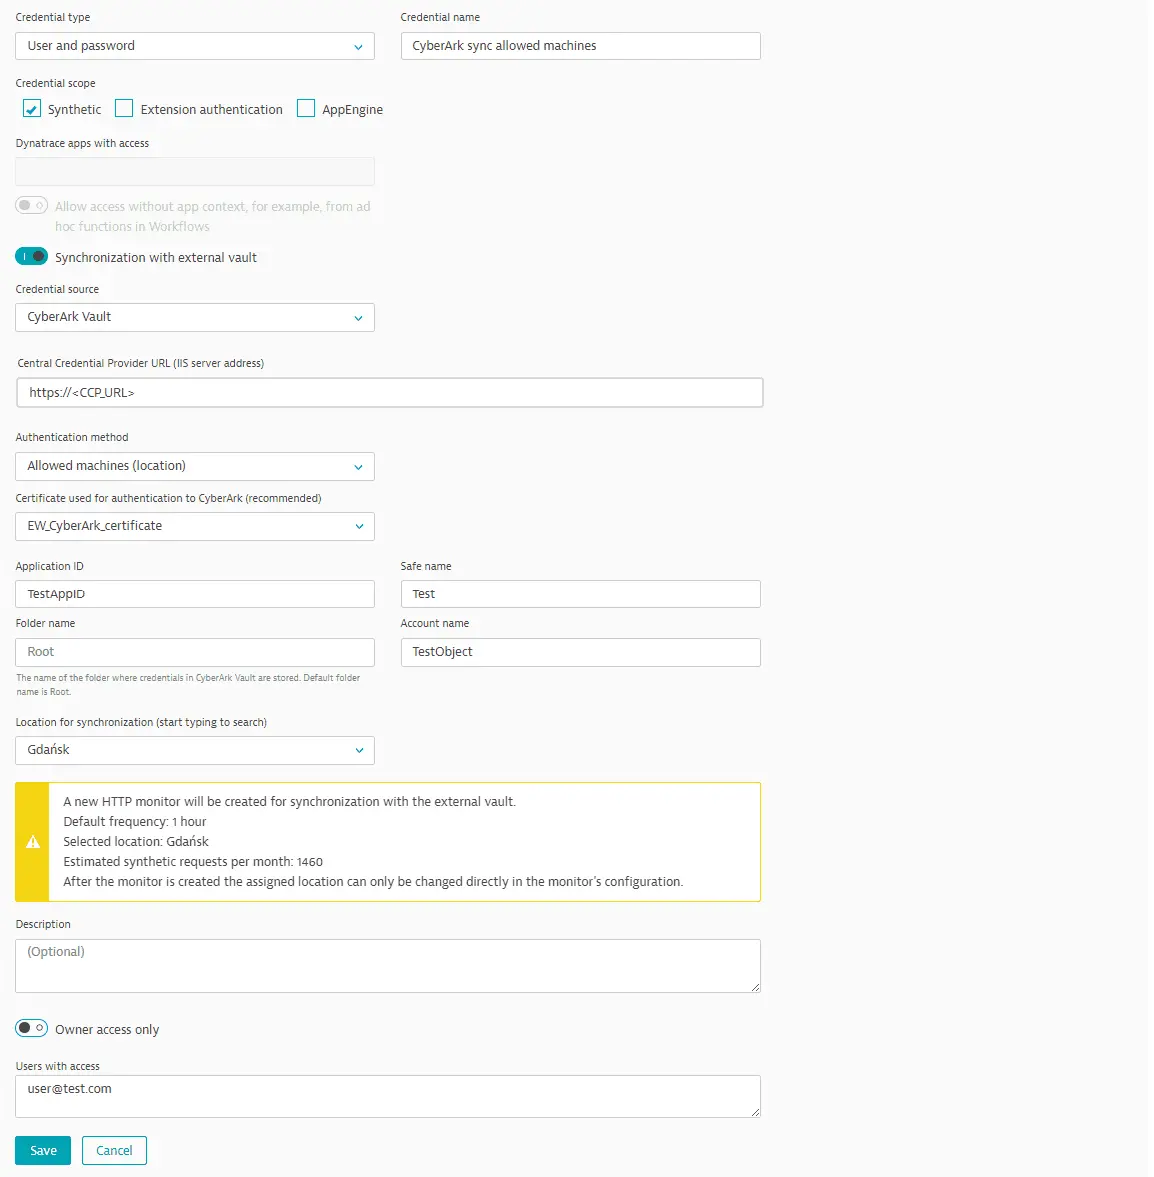
External vault integration
- How-to guide
- 22-min read
Synthetic Monitoring username-password and token credentials in the Dynatrace credential vault can be synchronized with an external vault—Azure Key Vault, HashiCorp Vault, or CyberArk Vault (username-password credentials only). Synchronized credentials contain the keys of external key-value pairs that hold the required values.
When you set up synchronized credentials in the credential vault, Dynatrace automatically creates HTTP monitors specifically for the purpose of synchronization. You can also use the api.saveCredential() or api.saveToken() methods in pre-and post-execution scripts to create your own synchronization monitors.
Autocreated synchronization monitors are named with the credential ID of the synchronized credential and are executed hourly by default from the Amazon US East (N. Virginia) public Synthetic location. Note that the request and response bodies and headers of synchronization monitors are automatically hidden from execution details (Analyze execution details).
Other synthetic monitors can call and use these synchronized credentials for testing API endpoints and websites. The monitors that call these credentials use the synchronized values obtained from the external vaults. Synchronization frequency determines how often these credentials are rotated within the synthetic monitors that call them.
Synchronization process reads the credentials from external vault and saves a copy within the Dynatrace vault.
Azure Key Vault
Username-password or token credentials for use in synthetic monitors can be synchronized with Azure Key Vault key-value pairs containing the username, password, or token value.
Prerequisites
Before setting up credentials synchronized with Azure Key Vault, you need to define the required client (application) ID and client secret as token credentials stored in the Dynatrace credential vault. We recommend naming such prerequisite tokens so that they're easily identifiable as companion credentials for synchronization. If your vault doesn't contain any tokens that you have access to, you'll see a warning.
Set up synchronized credentials
-
In the credential vault, create a User and password or Token credential. You can also overwrite an existing credential.
-
For Credential scope, select Synthetic.
-
Turn on Synchronization with external vault.
-
Select Azure Key Vault (default) as the Credential source.
-
We recommend editing the default Credential name to easily identify your new credential.
-
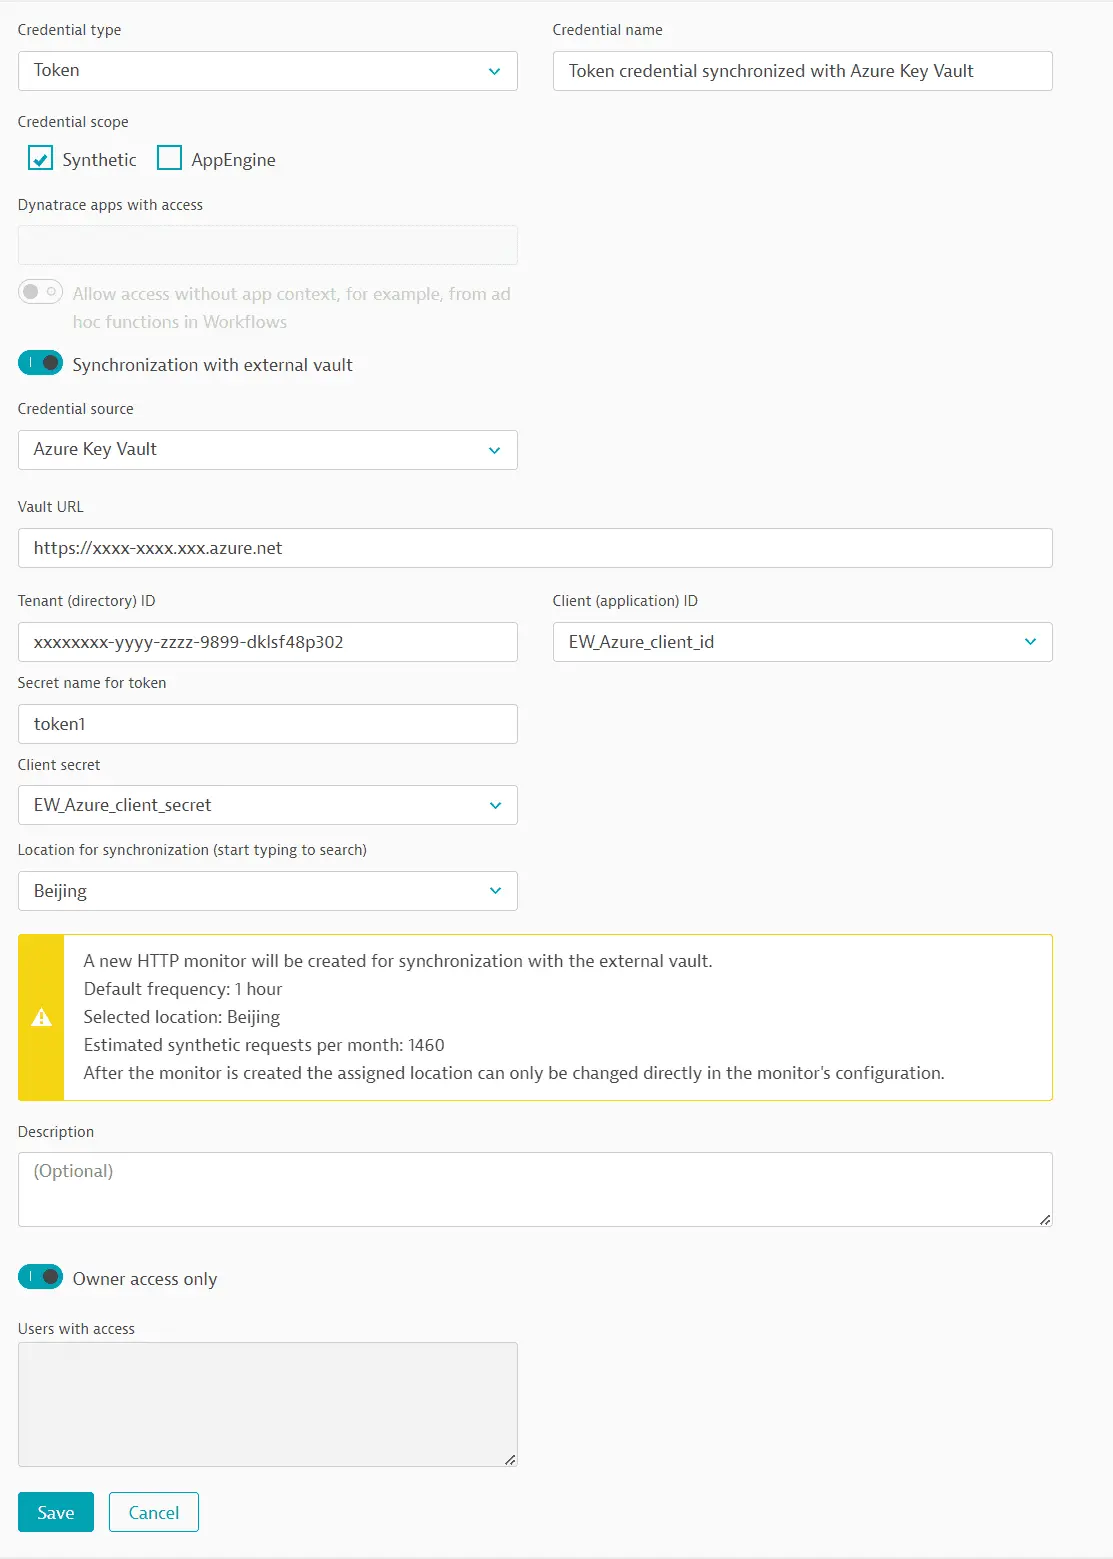
Enter the URL to access the vault (Vault URL) and the Tenant (directory) ID.
-
Select the companion tokens created earlier for the Client (application) ID and Client secret.
-
Enter the name of the Azure Key Vault key.
- In Secret name for username, enter the name of the Azure Key Vault key mapped to the username value; do not enter an actual username.
- In Secret name for password, enter the name of the Azure Key Vault key mapped to the password value; do not enter an actual password.
-
Select a Location for synchronization—you can select any public or private Synthetic location for synchronization monitor execution. You can search for a location by entering the location name in the field.
-
Optional Provide a Description for the credential.
-
Credentials are set to Owner access only by default. (Read more about credential ownership.)
-
Save your credential.
See also Best practices and what happens when you edit or delete synchronized and companion credentials.
Azure Key Vault synchronization monitors
When you have set up your synchronized username-password or token credential, Dynatrace automatically creates and executes an HTTP monitor that synchronizes the credential with Azure Key Vault. This monitor is automatically associated with the synchronized username-password or token credential.
See also Best practices and what happens when you edit or delete synchronization credentials.
The synchronization monitor contains three requests. Azure Key Vault requires splitting the retrieval of the username and password into two separate requests.
- The first request (POST) fetches an access token.
Request configuration details
-
The request URL references the tenant ID as an attribute of the synchronized credential defined above; the tenant ID is not displayed.

-
The client ID and client secret, referenced as attributes of the synchronized credential, are passed as key-value pairs in the request body; the client ID and client secret are not displayed.

-
A client token is returned in the response body. A post-execution script saves the token in a global variable.

-
- The second request (GET) fetches the username value.
Request configuration details
-
The request URL references the vault URL as an attribute of the synchronized credential defined above; the vault URL is not displayed. The request URL also references the key mapped to the username value in Azure Key Vault.

-
The Authorization header contains the access token retrieved in the first request.

-
The username value is returned in the response body. A post-execution script saves the value in a global variable.

-
- The third request (GET) fetches the password value. It also uses
api.saveCredential()in a post-execution script to write the fetched values to the synchronized username-password credential defined above.Request configuration details
-
The request URL references the vault URL as an attribute of the synchronized credential; the vault URL is not displayed. The request URL also references the key mapped to the password value in Azure Key Vault.

-
The Authorization header contains the access token retrieved in the first request.
-
The password value is returned in the response body. A post-execution script saves the value in a global variable. It also uses
api.saveCredential()to write the retrieved values to the synchronized username-password credential.
-
HashiCorp Vault
Username-password or token credentials for use in synthetic monitors can be synchronized with HashiCorp Vault key-value pairs containing the username, password, or token value. You can use either AppRole-based or certificate authentication.
Prerequisites
-
Before using AppRole-based authentication, you need to define the required secret ID as a token credential stored in the Dynatrace credential vault; do not reuse other tokens as the secret ID. If your vault doesn't contain any tokens you have access to, you'll see a warning.
-
Before using certificate authentication, you need to store the required TLS certificate in the Dynatrace credential vault. If your vault doesn't contain any certificates you have access to, you'll see a warning.
We recommend naming such prerequisite tokens and certificates so that they're easily identifiable as companion credentials for synchronization.
Set up synchronized credentials
-
In the credential vault, create a User and password or Token credential. You can also overwrite an existing credential.
-
For Credential scope, select Synthetic.
-
Turn on Synchronization with external vault.
-
Select HashiCorp Vault as the Credential source.
-
We recommend editing the default Credential name to easily identify your new credential.
-
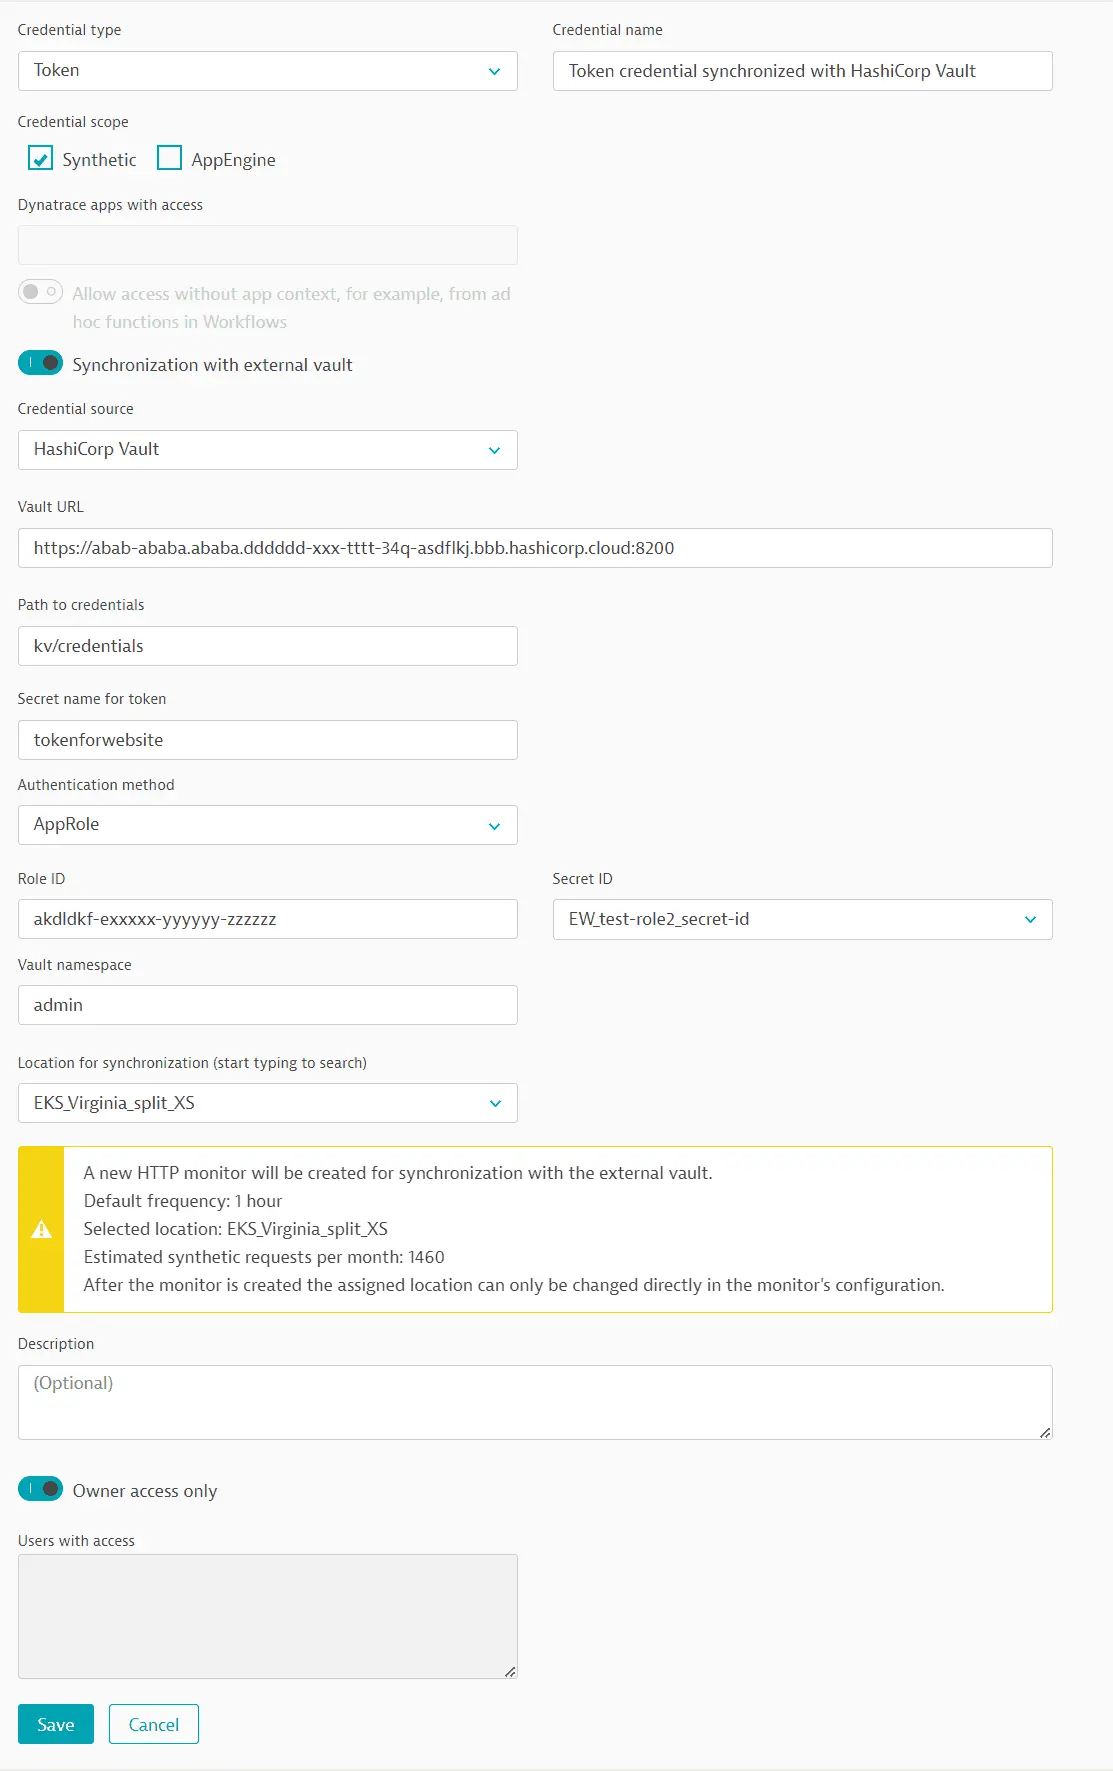
Enter the URL to access the vault (Vault URL) and the Path to credentials (folders must be separated by a forward slash).
The HashiCorp Vault URL for certificate authentication might be different from that used for AppRole-based authentication.
-
Enter the name of the HashiCorp Vault key.
- In Secret name for username, enter the name of the HashiCorp Vault key mapped to the username value; do not enter an actual username.
- In Secret name for password, enter the name of the HashiCorp Vault key mapped to the password value; do not enter an actual password.
-
Perform steps related to Authentication method.
- Select AppRole for the Authentication method.
- Enter the string provided by HashiCorp in Role ID.
- Select the companion token created earlier for the Secret ID.
- Enter the Vault namespace.
-
Select a Location for synchronization—you can select any public or private Synthetic location for synchronization monitor execution. You can search for a location by entering the location name in the field.
-
Optional Provide a Description.
-
Credentials are set to Owner access only by default. (Read more about credential ownership.)
-
Save your credential.
See also Best practices and what happens when you edit or delete synchronized and companion credentials.
When you have set up your synchronized credential, Dynatrace automatically creates and executes an HTTP monitor that synchronizes the credential with HashiCorp Vault.
HashiCorp Vault AppRole synchronization monitors
The autocreated HTTP monitor contains two requests and is automatically associated with the synchronized credential defined above.
- The first request (POST) fetches a client token.
Request configuration details
-
The request URL references the vault URL as an attribute of the synchronized credential; the vault URL is not displayed. The request URL also contains the authentication method
approle.
-
The vault namespace, referenced as an attribute of the synchronized credential, is passed as a request header; the vault namespace is not displayed.

-
The role ID and secret ID, referenced as attributes of the synchronized credential, are passed as key-value pairs in the request body; the role ID and secret ID are not displayed.

-
A client token is returned in the response body. A post-execution script saves the token in a global variable.

-
- The second request (GET) fetches the username and password values. It also uses
api.saveCredential()in s post-execution script to write the fetched values to the synchronized username-password credential defined above.Request configuration details
-
The request URL references the vault URL and the path to credentials as attributes of the synchronized credential; the vault URL and path to credentials are not displayed.

-
A request header contains the client token retrieved in the first request. The vault namespace (not displayed, but referenced as an attribute of the synchronized credential) is also passed as a request header.

-
The username and password values are returned in the JSON response. A post-execution script saves the values in global variables. It also uses
api.saveCredential()to write the retrieved values to the synchronized username-password credential.
-
HashiCorp Vault TLS certificate synchronization monitors
The autocreated HTTP monitor contains two requests and is automatically associated with the synchronized credential defined above.
- The first request (POST) fetches a client token.
Request configuration details
-
The request URL references the vault URL as an attribute of the synchronized credential; the vault URL is not displayed. The request URL also contains the authentication method
cert.
-
The request uses the TLS certificate for authentication.

-
A client token is returned in the response body. A post-execution script saves the token in a global variable.

-
- The second request (GET) fetches the username and password values. It also uses
api.saveCredential()in a post-execution script to write the fetched values to the synchronized username-password credential defined above.Request configuration details
-
The request URL references the vault URL and the path to credentials as attributes of the synchronized credential; the vault URL and path to credentials are not displayed.

-
A request header contains the client token retrieved in the first request.

-
The username and password values are returned in the JSON response. A post-execution script saves the values in global variables. It also uses
api.saveCredential()to write the retrieved values to the synchronized username-password credential.
-
CyberArk Vault
Username-password credentials for use in synthetic monitors can be synchronized with CyberArk Vault key-value pairs containing the username or password. You can use either username and password or host-based authentication to CyberArk Vault. Host-based authentication allows you to predefine hosts (Allowed Machines) in CyberArk Vault that are allowed to access credentials. These hosts are the public or private Synthetic locations you select for synchronization monitor execution and are defined by hostname or IP address. Host-based authentication enables synchronization monitors to bypass fetching an access token from CyberArk Vault.
Prerequisites
-
Before using username and password authentication, you need to define authentication credentials for CyberArk Vault—a username-password pair and, optionally, a certificate credential stored in the Dynatrace credential vault. We recommend naming such prerequisite credentials so that they're easily identifiable as companion credentials for synchronization.
-
Before using host-based authentication, you need to define Allowed Machines by hostname or IP address in CyberArk Vault Application Details. These are the hosts that are allowed to access the synchronized credentials in CyberArk Vault and are the public or private Synthetic locations you select for synchronization monitor execution. Note that when defining allowed machines in CyberArk Vault, the application ID must be the same as provided when you set up a synchronized credential in Dynatrace. Optionally, you can also define a certificate credential stored in the Dynatrace credential vault for authentication to CyberArk Vault. If your vault doesn't contain any certificates you have access to, you'll see a warning.
We recommend naming any prerequisite credentials so that they're easily identifiable as companion credentials for synchronization.
Set up synchronized credentials
-
In the credential vault, create a User and password credential. You can also overwrite an existing credential.
-
For Credential scope, select Synthetic.
-
Turn on Synchronization with external vault.
-
Select CyberArk Vault as the Credential source.
-
We recommend editing the default Credential name to easily identify your new credential.
-
Enter the Central Credential Provider URL (HTTPS) to access the vault.
-
Perform steps related to Authentication method.
- Select Username and password for the Authentication method.
- Select the companion username-password created earlier for CyberArk authentication from the Username and password for Central Credential Provider list.
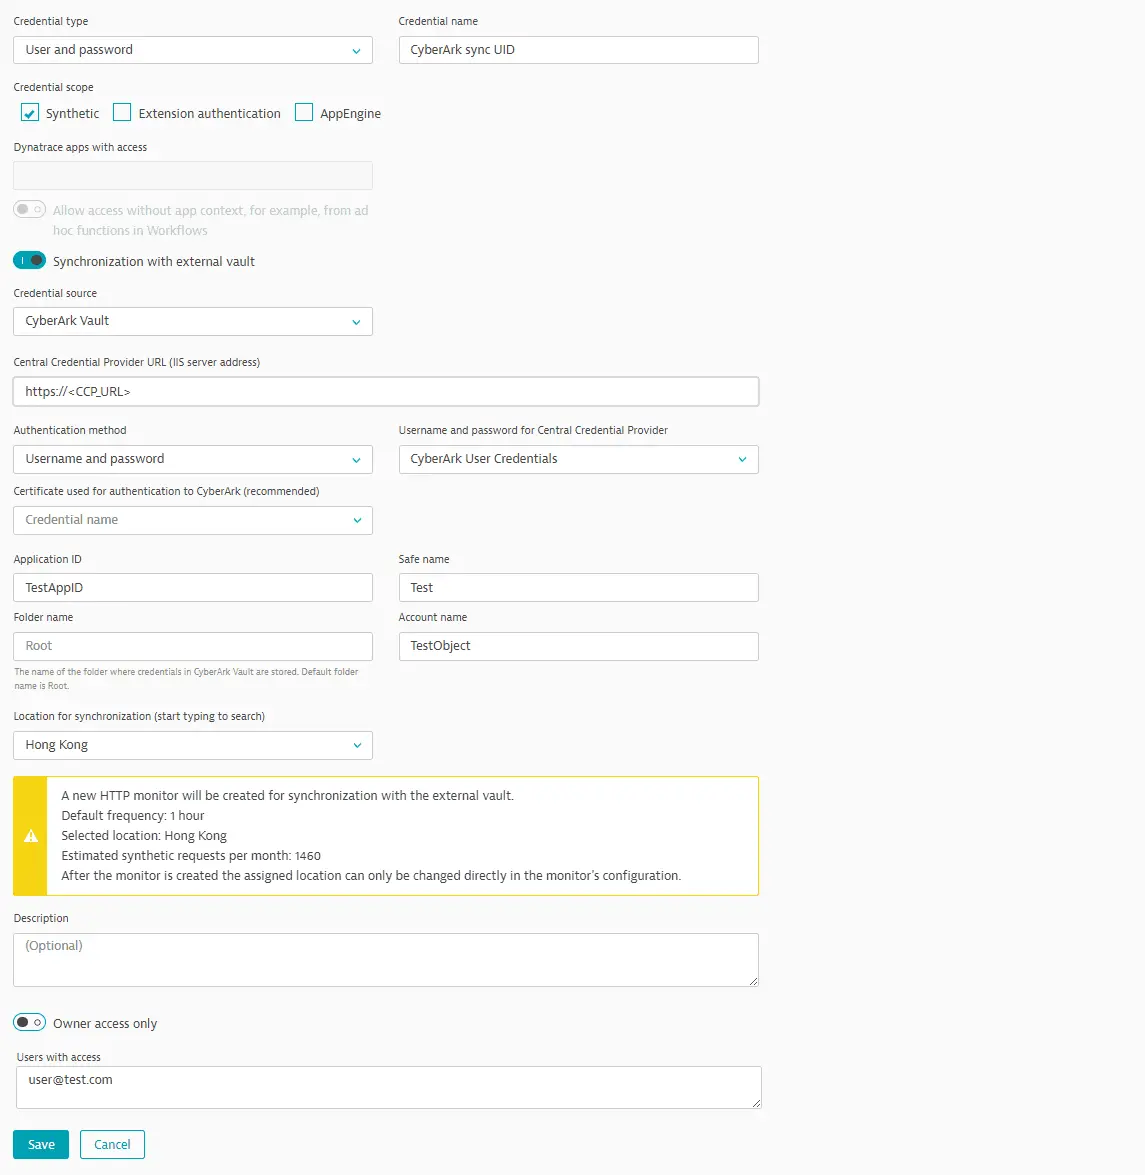
-
Recommended Select a Certificate used for authentication to CyberArk application from the list provided.
-
Enter additional fields for identifying the CyberArk Vault key-value pair.
- Application ID—This must be the same as the application ID when defining allowed machines in CyberArk Vault—see Prerequisites above.
- Safe name
- Account name—The name of the object that stores the username and password to retrieve and synchronize with the Dynatrace credential vault; this is not the name of the account logged into CyberArk Central Credential Provider.
- Folder name Optional—The name of the folder where the credentials are stored in CyberArk Vault; the default folder name is
Root.
-
Select a Location for synchronization—you can select any public or private Synthetic location for synchronization monitor execution. You can search for a location by entering the location name in the field.
-
Optional Provide a Description for the credential.
-
Credentials are set to Owner access only by default. (Read more about credential ownership.)
-
Save your credential.
See also Best practices and what happens when you edit or delete synchronized and companion credentials.
When you have set up your synchronized credential, Dynatrace automatically creates and executes an HTTP monitor that synchronizes the credential with CyberArk Vault.
CyberArk Vault synchronization monitors (username-password authentication)
The autocreated HTTP monitor contains two requests and is automatically associated with the synchronized credential defined above.
- The first request (POST) fetches an access token.
Request configuration details
-
The request URL references the Central Credential Provider URL as an attribute of the synchronized credential defined above; the central credential provider URL is not displayed.

-
The request body references the username-password credential selected for CyberArk Vault authentication (Username and password for Central Credential Provider); the authentication username and password are not displayed.

-
Additionally, the first request contains any authentication certificate specified in Certificate used for authentication to CyberArk.

-
A token is returned in the response body. A post-execution script saves the token in a global variable.

-
- The second request (GET) fetches the username and password values from CyberArk Vault. It also uses
api.saveCredential()in a post-execution script to write the fetched values to the synchronized username-password credential defined above.Request configuration details
-
The request URL references the Central Credential Provider URL as an attribute of the synchronized credential; the central credential provider URL is not displayed. The request URL also references (but doesn't display) the Application ID, Safe name, Account name, and Folder name.

-
The second request also contains any authentication certificate and the access token retrieved in the first request in the Authorization header.

-
The username and password values are returned in the response body. A post-execution script saves the values in global variables. It also uses
api.saveCredential()to write the retrieved values to the synchronized username-password credential.
-
CyberArk Vault synchronization monitors (host-based authentication)
Because the autocreated HTTP monitor can bypass fetching an access token, it contains a single GET request to fetch the username and password values from CyberArk Vault. It also uses api.saveCredential() in a post-execution script to write the fetched values to the synchronized username-password credential defined above. The synchronization monitor is automatically associated with the synchronized credential.
Request configuration details
- The request URL references the Central Credential Provider URL as an attribute of the synchronized credential; the central credential provider URL is not displayed. The request URL also references (but doesn't display) the Application ID, Safe name, Account name, and Folder name.

- The request also contains any authentication certificate specified during credential setup.

- The username and password values are returned in the response body. A post-execution script saves the values in global variables. It also uses
api.saveCredential()to write the retrieved values to the synchronized username-password credential.

Best practices and caveats
If creating a synchronization monitor manually, be sure to select Do not store and display request and response bodies and header values in execution details in any requests that fetch client tokens or credential values from external vaults. Failing to do so will expose the sensitive information when you Analyze execution details in HTTP monitor details.
- Automatically created synchronization monitors may be edited. To edit an autocreated synchronization monitor, you must have access to the credentials referenced in the monitor. You might need to make edits if the external vault vendor makes changes. For example, you might need to edit request URLs if Microsoft changes the API version for fetching client tokens from Azure Key Vault.
- In general, however, we recommend that you limit your changes to execution frequency or locations.
- When changing location, be careful not to pick private Synthetic locations that don't have external network access.
- When changing location to a private Synthetic location, ensure that the proxy configuration isn't blocking access to required resources.
- We recommend editing the default names of synchronized credentials, companion credentials (for example, TLS certificates for HashiCorp Vault), and synchronization monitors for easy identification.
- We do not recommend reusing companion credentials (for example, for the HashiCorp secret ID token) required for synchronization monitors in other synthetic monitors for testing purposes.
Edit or delete synchronized and companion credentials
- Once created, synchronized credentials are no longer editable by anyone; they can only be overwritten. In order to overwrite a synchronized credential, you need to provide new synchronization details; do not provide actual username, password, or token values.
- When you overwrite a synchronized credential, Dynatrace-created synchronization monitors are automatically updated.
- Be sure to maintain the same ownership for all credentials within a synchronization monitor (that is, the synchronized credential and companion credentials).
- You cannot delete companion credentials referenced by a synchronization monitor unless you disable or delete the synchronization monitor.
- If you delete a synchronized credential, its autocreated synchronization monitor is deleted as well.
- If there's more than one synchronization monitor, you need to delete or disable such monitors before you can delete a synchronized credential.
- Any synthetic monitor that uses the (deleted) synchronized credential for testing is disabled.
 Synthetic Classic


