Assign ownership teams to monitored entities
- How-to guide
- 9-min read
You can assign team owners to any monitored entity in Dynatrace using the main team identifier or supplementary identifiers (defined when setting up a team). This makes it easier to find the responsible team instantly and contact them if any issue arises with an entity, for example, if the entity is affected by a vulnerability.
You can apply ownership using several methods such as Kubernetes labels and annotations, host metadata, environment variables, and tags (including via the Dynatrace Custom tags API).
Supported methods of applying ownership
The following methods for applying ownership and entity types are supported.
-
Deployment or configuration metadata Recommended
Method Entity types Kubernetes labels and annotations All Kubernetes objects Host metadata via oneagentctlorhostcustomproperties.confHosts Environment variables Processes -
Tags (manual, automated, and via API)—all monitored entities
We highly recommend that you use the preferred method for applying ownership based on entity type, as described in the sections that follow.
Our recommendations are based on the most efficient methods to ensure that entities have adequate ownership coverage. See Best practices for entity ownership for more information.
Format for applying ownership information
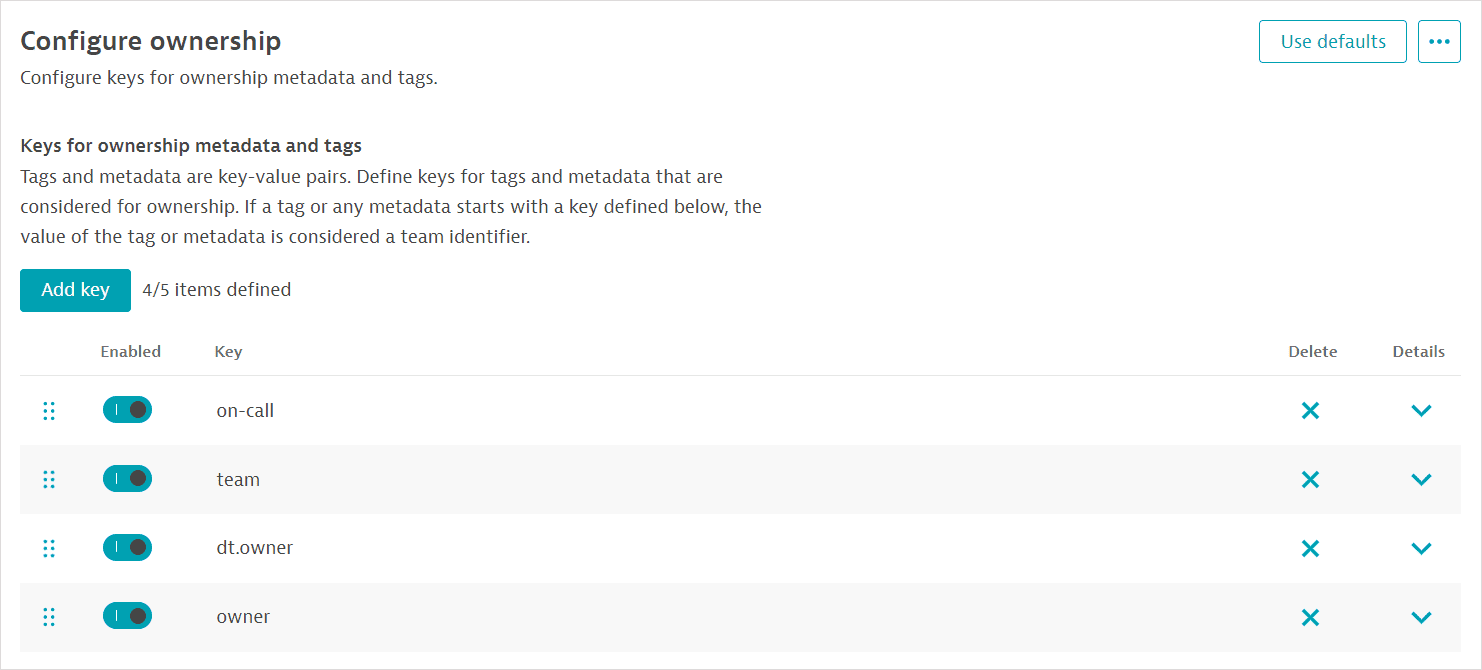
Regardless of the method used, ownership information is applied to entities in key-value pairs. The default keys owner and dt.owner are available in every monitoring environment—see Settings > Ownership > Configuration. You can, however, change or delete the default keys and define your own.
The value is always the unique team identifier specified when creating a team. You can also use supplementary identifiers. (See Create and manage teams for entity ownership for more information on defining these values.)
An entity can have more than one ownership team. You can effect this by applying multiple key-value pairs, as shown in the sections that follow.
Custom keys for ownership information
You can define up to a maximum of five keys for applying ownership information.
- Go to Settings > Ownership > Configure.
- Select Add key.
- Enter the key (Enabled by default).
- Save changes.

When you disable or delete a key, entities assigned to teams via such keys will no longer display or hold ownership metadata. However, such keys will appear as regular tags applied to the entities.
Additional requirements for ownership keys
- You can define a maximum of five and a minimum of one key.
- You can use any of your defined keys as a prefix in key-value pairs. For example, for the keys
owneranddt.owner, you can useowner-1anddt.owner-test.
Kubernetes labels and annotations
You can specify team ownership for different Kubernetes objects such as Deployments, Pods, Services, or namespaces. To ensure that Kubernetes objects have adequate ownership coverage, which is especially important for short-lived entities like Pods, provide ownership information as Kubernetes labels or annotations with key-value pairs in the deployment specification file, for example, deployment.yaml.
We recommend defining ownership for the Deployment and all other objects for which you want ownership coverage. See also Best practices for entity ownership.
-
Setting a team identifier as a label or annotation for the Deployment, CronJob, Job, DaemonSet, or StatefulSet provides team ownership information for the respective
CLOUD_APPLICATIONentities. Note that this ownership is not propagated to theCLOUD_APPLICATION_INSTANCE.In this example, dual ownership is set via two labels for the Deployment. Each label has a unique key. Unique keys are a requirement in Kubernetes labels and annotations.
apiVersion: apps/v1kind: Deploymentmetadata:name: demolabels:dt.owner-1: my-team-1 # Dual team ownership defined for the Deploymentdt.owner-2: my-team-2spec:The sample code below shows an annotation for ownership at the Deployment level.
apiVersion: apps/v1kind: Deploymentmetadata:name: demoannotations:dt.owner: my-team # Ownership defined for the Deployment -
Set labels for Pods to specify ownership for the respective
CLOUD_APPLICATION_INSTANCEentity. Specify ownership for each Pod.apiVersion: apps/v1kind: Deploymentmetadata:name: demospec:replicas: 3selector:matchLabels:app: demotemplate:metadata:labels:app: demodt.owner: my-team # Ownership defined for the Podspec:The sample code below shows the manifest for a Pod that has the annotation
dt.owner: myTeam.apiVersion: v1kind: Podmetadata:name: annotations-demoannotations:imageregistry: "https://hub.docker.com/"dt.owner: my-teamspec:containers:- name: nginximage: nginx:1.14.2ports:- containerPort: 80 -
For a process, specify ownership using key-value pairs with the
DT_CUSTOM_PROPenvironment variable, which is defined for the container.In environment variables, you can provide multiple values for the same key. In this example, dual ownership is defined using the key
owner.apiVersion: apps/v1kind: Deploymentmetadata:name: demospec:replicas: 3selector:matchLabels:app: demotemplate:spec:containers:- name: demoimage: demo:1.0.0env:- name: DT_CUSTOM_PROP ## Environment variablevalue: "owner=team-automation owner=team-dev" # Dual ownership for the process; team IDs are team-automation and team-dev. -
Kubernetes labels for a Service
apiVersion: v1kind: Servicemetadata:name: my-servicelabels:dt.owner: team-a # Ownership defined for the Servicespec:selector:app.kubernetes.io/name: MyAppports:- protocol: TCPport: 80targetPort: 9376 -
Kubernetes labels for a namespace
apiVersion: v1kind: Namespacemetadata:name: my-namespacelabels:dt.owner: team-a # Ownership defined for the namespace
Host metadata
For hosts, we recommend using host metadata as the primary method of applying ownership.
Read more about defining tags and metadata for hosts and the OneAgent oneagentctl command-line interface.
You can also apply ownership to hosts using tags.
Via oneagentctl
OneAgent version 1.189+ For hosts with OneAgent version 1.189+, use the oneagenctl command-line interface after installation to set a metadata property for an individual host. Run oneagentctl with administrator or root privileges from these default locations.
- Windows:
%PROGRAMFILES%\dynatrace\oneagent\agent\tools - All Unix-like systems:
/opt/dynatrace/oneagent/agent/tools
This example for Unix-like systems uses --set-host-property to set ownership with the key-value pair owner-1=team-automation, where team-automation is the main team identifier or a supplementary identifier.
./oneagentctl --set-host-property owner-1=team-automation
Via hostcustomproperties.conf
OneAgent version 1.187 and earlier For hosts on OneAgent 1.187 and earlier, create or edit the hostcustomproperties.conf OneAgent configuration file at these locations.
- Windows:
%PROGRAMDATA%\dynatrace\oneagent\agent\config - All Unix-like systems:
/var/lib/dynatrace/oneagent/agent/config
This example for Unix-like systems sets host ownership with the key-value pair dt.owner-1=team-automation, where team-automation is the main team identifier or a supplementary identifier.
cat hostcustomproperties.conf dt.owner-1=team-automation
Process environment variables
For processes, we recommend specifying ownership in key-value pairs via the DT_CUSTOM_PROP environment variable.
We do not recommend using tags to apply ownership to processes or process groups.
Read more about defining process group metadata, for example, setting up the DT_CUSTOM_PROP environment variable for IIS and Windows.
export DT_CUSTOM_PROP dt.owner=DemoTeam
See Format for applying ownership information on all existing key-value options or to create your own.
Tags
Use tags to apply ownership only for entities that aren't covered by the methods described above. These are typically entities like frontend applications that are stable and fewer in number.
Tagging methods
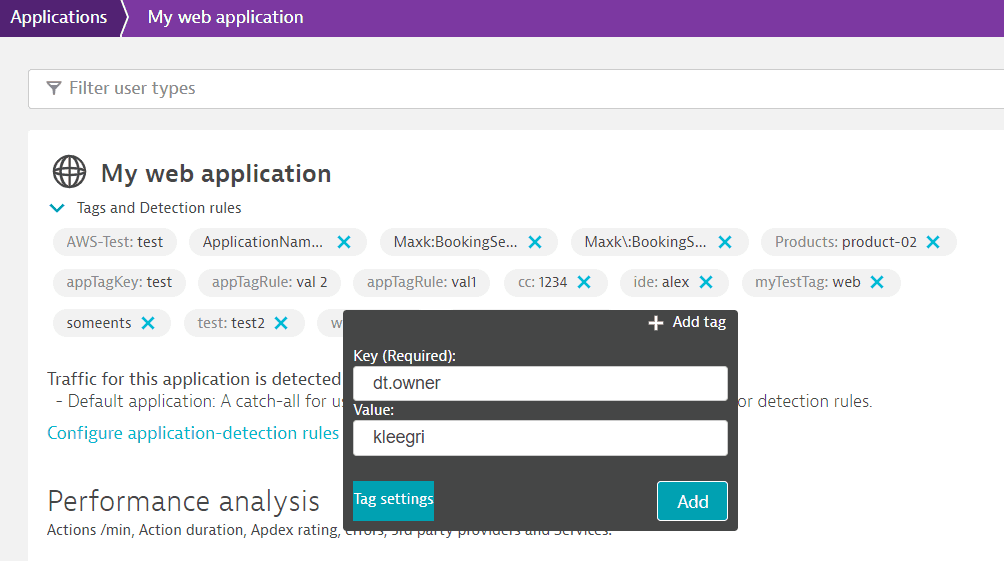
You can use tags to apply ownership in key-value pairs to any monitored entity—read more about tagging.

- Manual tags using the defined keys or key prefixes (like
owneranddt.owner) are simple to apply via the web UI. - You can also set up automatic tagging rules via the web UI.
- We recommend using the Custom tags API over automatic tagging rules to apply ownership to entities. The Custom tags API enables you to conveniently apply tags to a large group of entities within a single API call, executed immediately.
Note that manually applied tags can be removed manually. Automatically applied tags can’t be removed manually from individual services, process groups, process group instances, applications, or hosts.
See Best practices for entity ownership for more information on the benefits and limitations of tagging for assigning owners to entities. See also Best practices for scaling tagging and management-zone rules.
Permissions
You require all the following permissions to add, change, or remove ownership via the Custom tags API.
- The
entities.writetoken permission - The
settings.readtoken permission or the IAM policyALLOW settings:objects:read WHERE settings:schemaId = "builtin:ownership.teams";
For adding, changing, or deleting tags via the web UI, you need the Manage monitoring settings permission at the environment or management-zone level.
View ownership information in the web UI
Ownership information is only available for unified analysis pages.
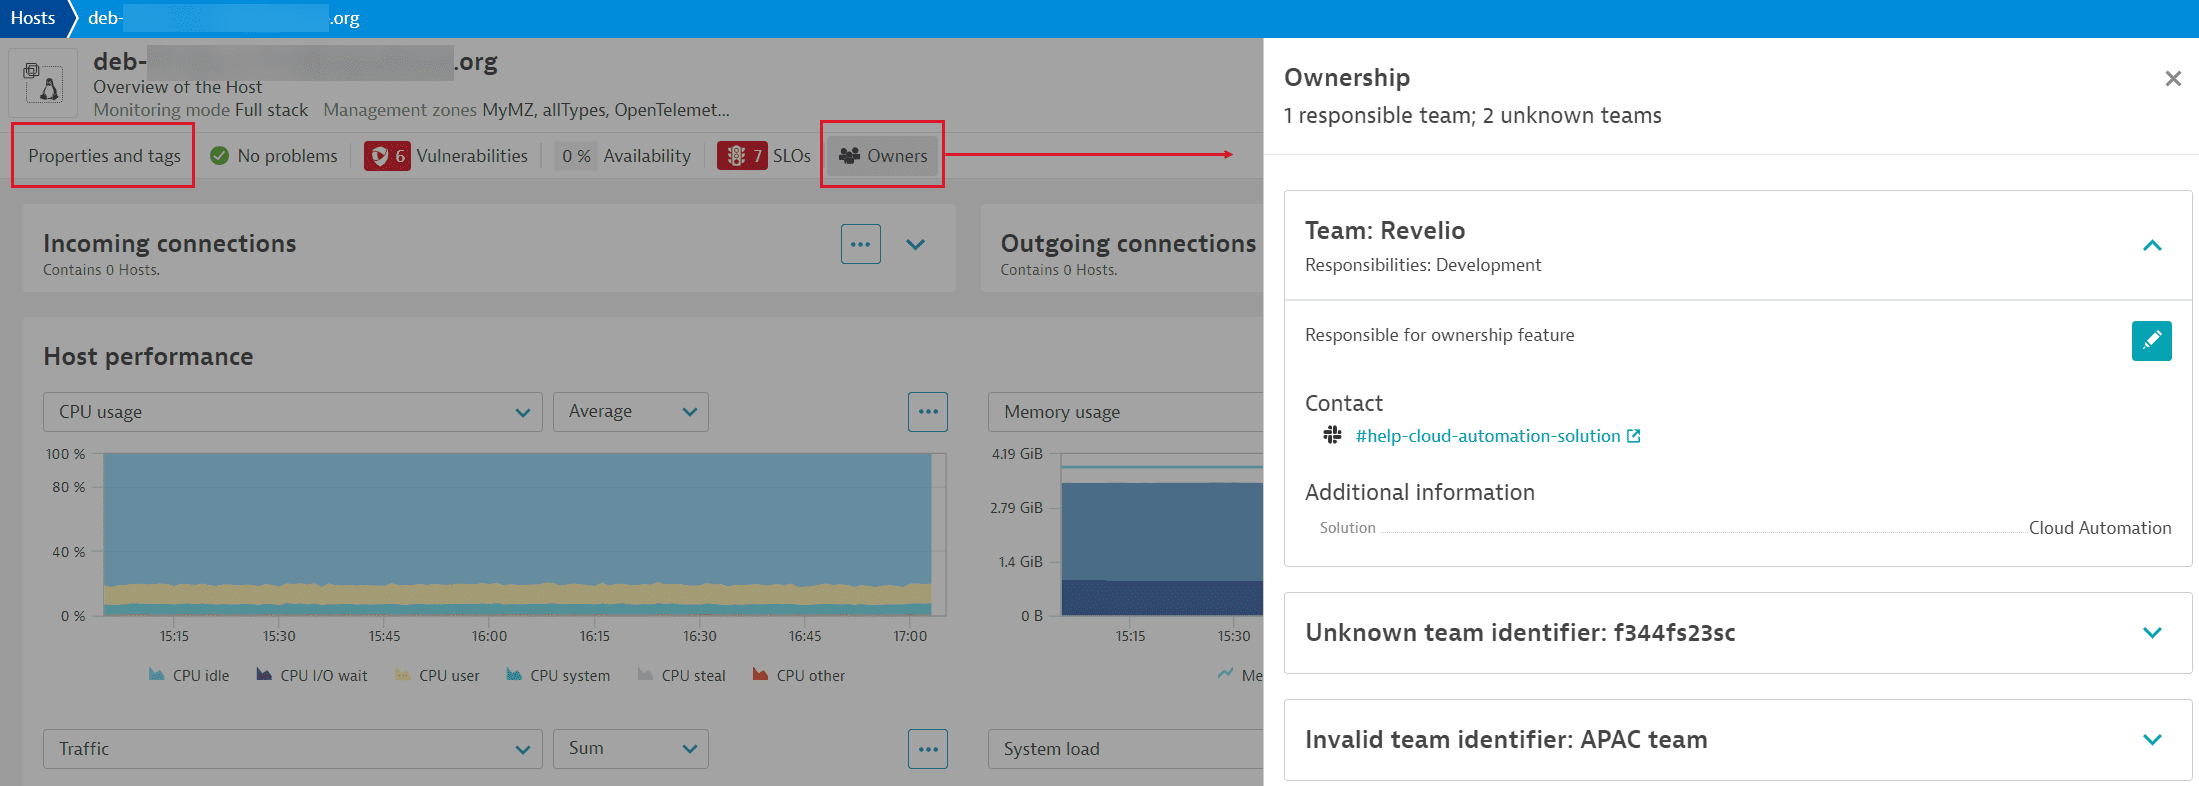
For hosts and all Kubernetes entities, select Owners on the entity details page to view ownership information.
This example shows a Kubernetes workload mapping to the CLOUD_APPLICATION entity. Expand a team name to view its details. Select in the Ownership card to edit team details in Settings.

This example shows ownership information for a Kubernetes Pod.

On the Hosts page, you can search for hosts with ownership—filter by Tags with the key prefixes you have defined, for example, owner and dt-owner. Note that ownership key-value pairs must be applied to at least one host for the key to be available in the Tags filter. This method of searching for ownership is available on all entity group pages that can be filtered by tags.

In the example host details page below, the host has three team owners. One of the owners is marked Unknown team identifier. This is because even though the team identifier has been applied to the host (for example, via oneagentctl or a manual tag) in a key-value pair, the team doesn't exist. Invalid team identifier means that the team or supplementary ID was applied to the host in the wrong format.
Select Properties and tags to view all tags applied to the host.

Select next to the unknown team and then select Add team to define team information in Settings. The entity is then automatically updated with the team definition.
