Set up Cost Allocation
- Latest Dynatrace
- Explanation
- 12-min read
This page walks you through configuring Cost Allocation in your Dynatrace environment. For an overview of what Cost Allocation is and which capabilities support it, see Allocate. Once you've configured tags, see Analyze Cost Allocation data to read and export the data.
Overview
Cost allocation maps Dynatrace consumption to cost centers, products, or other organizational dimensions you choose. Tags applied at the OneAgent, Kubernetes, or telemetry-ingest layer flow through Grail as dt.cost.costcenter and dt.cost.product attributes that you analyze in dashboards, notebooks, or DQL, or export for chargeback. Setup involves choosing an allocation model, registering allowed values, and applying tags to your data sources.
Use cases
- Allocate host-based DPS consumption to a cost center, a product, or both.
- Allocate Kubernetes workloads to teams via namespace metadata.
- Enrich ingested logs, traces, metrics, and events with allocation tags.
- Allocate query, workflow, and Standard Function Calls costs via a user-mapping lookup table.
Prerequisites
-
To view or edit Cost Allocation information, your Dynatrace account needs at least one of the View account and View and manage account and billing information permissions as indicated in the table below.
What you want to do View account View and manage account and billing information View Cost Allocation Allow List
Edit Cost Allocation Allow List
View usage/costs extract in Account Management
More information about these permissions is available at Upgrade role-based permissions to Dynatrace IAM policies.
-
Additionally, the default policy "Read System Events" needs to be assigned to the relevant user group. The actual policy statement is provided in the code block below.
//Grail read dataALLOW storage:buckets:read WHERE storage:table-name = "dt.system.events";ALLOW storage:system:read;If you will be using lookup tables to access Grail data, you will additionally need the permissions described in Lookup data in Grail.
Set up Cost Allocation
This section describes how to set up Cost Allocation in your Dynatrace environment.
For tips on how to allocate shared costs, where a single host is used by multiple cost centers or products, see Handling shared costs.
Choose an allocation model
Decide which organizational dimensions you want to track before applying any tags. Changing the model later is possible but requires re-tagging and doesn't apply retroactively.
| Model | Best for | Tag strategy |
|---|---|---|
By team or department | Showback, organizational accountability | Use |
By application | Product-level P&L, service costing | Use |
By both | Full flexibility and chargeback granularity | Use both tags |
Start simple. A single dt.cost.costcenter model covering your main teams is enough to deliver value. You can add dt.cost.product later.
Identify allowed cost centers and products
To configure Cost Allocation you need to explicitly define the cost centers and products to which costs are allocated. Up to 250 cost centers and 250 products can be defined.
The definitions are managed in two separate allow lists: the Cost center allow list and the Product allow list. You can configure these either via Account Management or via the Dynatrace API, as described below.
Changes to the allow lists are not applied retroactively. If you remove a cost center or product from its allow list, historical reports will still show the usage and costs associated with the value before it was removed.
Via Account Management
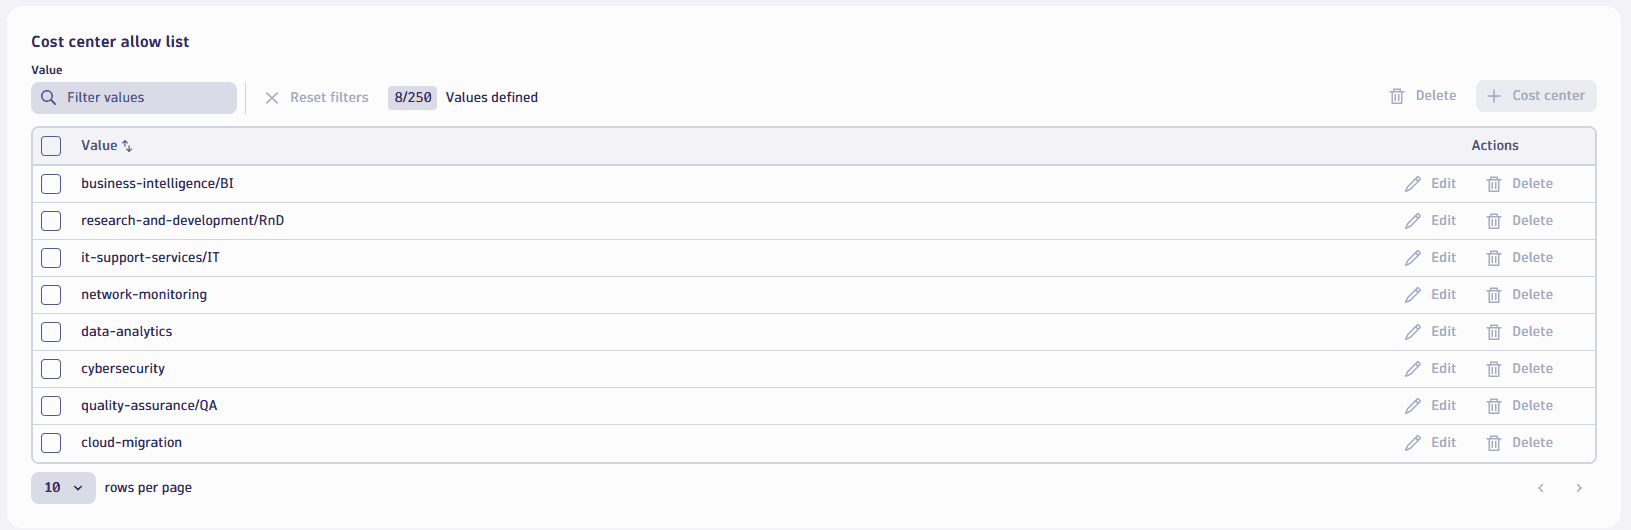
To find the two allow lists, go to Account Management > Subscription > Cost management > Cost allocation. The allow lists are visible in the Cost center allow list and Product allow list sections.
To add a new cost center or product, select Cost center and follow the steps.
Via the API
Both the cost center and product allow lists can be configured via the Account Management API as described in Dynatrace Platform Subscription API - manage cost allocation.
Configure Cost Allocation for host-based deployments
To set up Cost Allocation in a host-based deployment, configure OneAgent according to the steps in Set up Cost Allocation for OneAgent deployments.
Cost Allocation is configured at the host level. One host can be allocated to a maximum of one cost center and one product.
Configure Cost Allocation for Kubernetes deployments
To set up Cost Allocation in a Kubernetes-based deployment, configure Kubernetes according to the steps in Set up Cost Allocation for Kubernetes deployments.
Cost Allocation is supported for different Kubernetes deployment models.
Configure Cost Allocation for telemetry ingest
With Dynatrace, you can enrich telemetry data with Cost Allocation attributes (dt.cost.costcenter, dt.cost.product) as metadata.
Telemetry enrichment with Cost Allocation attributes is possible for all supported ingest methods, whether logs, traces, metrics, or events.
For ingested logs, Cost Allocation is also available for retained data (Log - Retain and Log - Retain with Included Queries). Both retain models use the settings that you already set up for ingest, so you don't need to do any additional configuration.
You can use these attributes to allocate usage to your user-defined products and cost centers.
- They're stored in Grail and are available through
 Dashboards,
  Notebooks, Account Management, and the Dynatrace API.
 - They're defined in the Dynatrace Semantic Dictionary.
For more information on how to enrich telemetry data according to your use case, see Ingest data into Dynatrace.
How to get started
No matter which method you use to ingest data, here's how to get going with Cost Allocation telemetry enhancement:
-
Get an inventory of your ingest channels. List all the ways your organization sends logs and traces into Dynatrace. This could be via OneAgent, the log ingest API, cloud forwarders, log shippers, OpenTelemetry, Bindplane, or any one of the supported ingest methods.
-
Review the documentation for your ingest method. Check the official Dynatrace documentation to find method-specific configuration and enrichment options.
-
Map metadata opportunities: Identify your specific cost centers and products and then explicitly define them in Account Management. For more information, see Identify allowed cost centers and products.
Integrate Cost Allocation metadata
Don’t worry about perfection on day one. Start tagging now, even if it's just for one ingest channel. You can refine and expand to other ingest channels and telemetry types as your FinOps maturity grows.
Analyze Cost Allocation data with the DPS Cost Allocation Overview Dashboard dashboard. Identify other ingest channels that you could consider enhancing with Cost Allocation data.
-
For each ingest channel:
- Review how metadata can be added. Depending on your ingest method, this could be via OneAgent configuration, API payload, cloud tag mapping, Kubernetes annotations, or Bindplane Dynatrace Enrichment Processor.
- Implement tagging in your pipelines, scripts, or agent settings.
-
Test your setup:
-
Send sample data and verify that Cost Allocation tags are present in Grail.
-
Use the DPS Cost Allocation Overview Dashboard dashboard to confirm that these tags are visible in Grail.
Usage tracking for logs and traces is written every 15 minutes. So, it might take up to 15 minutes until you will see any results.
-
-
Document your approach: Record which channels and tagging methods you use. This will help with future audits and troubleshooting.
Configure user-based Cost Allocation for queries, Automation Workflow, and Agentic AppEngine
This section describes how to configure Cost Allocation for queries, workflows, and functions. The relevant rate card categories are
Cost Allocation for queries, workflows, and functions is currently only supported at the environment level. Because of this, related data isn't included in exported data.
Consumption related to each of these categories is triggered by a specific Dynatrace user.
Therefore, to allocate costs related to these categories, you'll map the user to the relevant Cost Allocation attributes (whether dt.cost.costcenter or dt.cost.product).
To do this, follow the steps below.
1. Prerequisites
Make sure that you have the following permissions:
- To set up this configuration: You need read, write, and delete permissions for Grail lookup tables. For more information, see Lookup data in Grail.
- To use the dashboard: You need read permissions for Grail lookup tables.
2. Get the dashboard and notebook
The Cost Allocation dashboard and notebook are available as JSON files, which you can download from the Dynatrace GitHub repository.
Then upload/import the files to your Dynatrace environment, see Upload a dashboard and Import a notebook.
3. Map users to Cost Allocation metadata
In the notebook that you imported, set up the mapping between users and attributes.
-
Create a list of users whose account activity you want to map to a given cost center or product.
The Quickstart: Retrieve a list of active Dynatrace users card provides a list of all users who are active in the relevant environment.
Each user is identified with an email and a unique user ID.
-
Create a list of all cost centers and products that costs should be allocated to.
The Fetch already used cost centers and Fetch already used products cards provide a list of all tags that are configured in your environment.
-
For each user, create a JSON object that defines the
user.email,user.id,dt.cost.costcenter, anddt.cost.product. Make sure that this object matches the JSON syntax shown in the code block below.{"user.email": "abc@de.fg","user.id": "00000000-0000-0000-0000-000000000000","dt.cost.costcenter": "a","dt.cost.product": "1"} -
Once you've created JSON objects for each user, paste these into the Store user mapping within lookup table card. Note that you may need to select Show input to enter the JSON contents.
-
Once you've entered all relevant JSON objects, select Run to upload the lookup table to your environment.
4. Configure rate-card prices in the dashboard
To access the dashboard you imported, go to Dashboards and find the Cost Allocation with extended lookup tables dashboard.
Then, in the dashboard, set your prices for all the relevant rate card capabilities. Do this by re-configuring the respective value for each rate-card item, which is visible in the price column as shown in the screenshot.
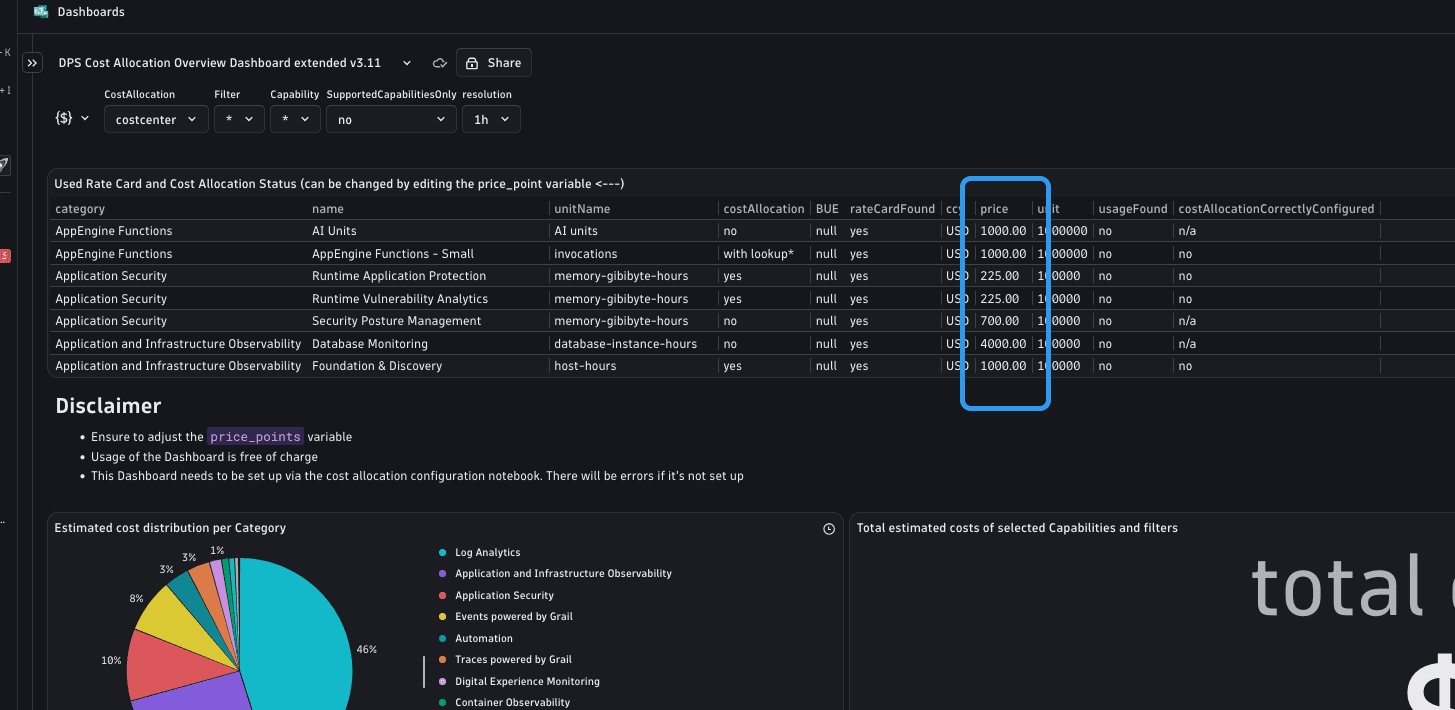
Alternatively, you can also set the prices in the dashboard's JSON file, and then re-upload the dashboard.
Prices are defined within the price-points variable, with the price key, as shown in the code block below.
{"version": 2,"key": "price_points","type": "text","visible": false,"editable": true,"defaultValue": [{"key": "FOUNDATION_AND_DISCOVERY","name": "Foundation & Discovery","price": "1000.00","Category": "Application and Infrastructure Observability","unitName": "host-hours","priceUnit": "100000","currencyCode": "USD"},...]}
5. Use the dashboard
Once you've configured the user mappings and the rate card prices, you can use the Cost Allocation with extended lookup tables dashboard to see costs related to queries, workflows, and functions.
If you see a The tabular file <file> doesn't exist. error message in your dashboard, the userdata lookup table is improperly configured.
Repeat the steps in Map users to Cost Allocation metadata and try again.
Best practices
This section provides best practices for setting up Cost Allocation.
Cost center and product names
How you name your cost centers and products is up to you. We recommend:
- For cost centers: Use the organizational level to which the costs belong.
- For products: Use the application or product group to which the costs belong.
Values can be provided as text or numerical strings.
If you have both, we recommend to use both the text-based name and the ID, separated by a comma (,) or slash (/).
This lets you separate the name and ID after a data export.
Examples:
| Host | Cost center | Product |
|---|---|---|
Host 1 |
|
|
Host 2 |
|
|
Host 3 |
|
|
Handling shared costs
If your host shares services, Cost Allocation doesn't support costs billed to separate cost centers or products. However, you can create a cost center or product for that host and then allocate its costs outside of Dynatrace.
- Create a cost center or product for both entities, such as
dt.cost.product="Webpage_MobileApp"for a host that should be allocated to both the webpage product and the mobile app product. - When you want to analyze past data, retrieve the data from Account Management and import them into an Excel or Power BI board.
- You can take the host's total costs and split them according to your requirements.
DPS licensing consumption and related costs are based on 15-minute increments. Reports are generated daily, so you won't be able to see usage accrued in the previous <24 hours.
Next steps
Once tags are flowing, see Analyze Cost Allocation data to read your Cost Allocation data with the DPS Cost Allocation Overview Dashboard dashboard, run DQL queries, and export to finance tools.
 Dynatrace Platform Subscription