Create and edit Dynatrace dashboards
- How-to guide
- 2-min read
- Published Jul 19, 2017
The dashboards discussed here are classic dashboards created using the dashboarding functionality integrated with previous Dynatrace.
- For more about classic dashboards, see Dashboards Classic.
- For more about dashboards created with the Dashboards app in the latest Dynatrace, see Dashboards.
- To improve your dashboard experience, you can upgrade existing dashboards from Dashboards Classic to the Dashboards app in the latest Dynatrace.
To create, edit, or delete a classic dashboard, go to  Dashboards Classic.
Create a dashboard
To create a dashboard, you can start with a new (empty) dashboard or clone an existing dashboard and then edit the clone.
Create an empty dashboard
- Go to
 Dashboards Classic.
 - Select Create Dashboard.
- Enter a name for your dashboard and select Create. The new dashboard opens in edit mode.
- Optional To add a tile, drag it from the Tiles pane to the dashboard, or pin a tile to the dashboard.
- Optional To configure dashboard-specific settings, select the Settings tile.
- Select Done.
The new dashboard is displayed as it will appear to you and people with whom you share it, though other people will not see the Edit button if you don't give them edit permission.
Now you're ready to edit the dashboard: add, edit, and delete tiles.
Clone an existing dashboard
You can't customize or share dashboards for which you have only viewing permission, but you can clone them and then modify and share the clones.
Clone someone else's dashboard to save yourself work.
Clone a Dynatrace preset dashboard to start with a more elaborate dashboard example.
- Go to
 Dashboards Classic.
 - In the table of dashboards, select More (…) > Clone for the dashboard you want to copy.
- The copy opens in edit mode.
- The original dashboard is unaffected.
Edit the cloned dashboard.
Edit a dashboard
To edit a dashboard
- Go to
 Dashboards Classic.
 - Select the name of a dashboard to display that dashboard.
- Select Edit in the upper-right corner of the dashboard. The dashboard opens in edit mode.
- If you don't see an Edit option, you don't have permission to edit that dashboard.
- Use the Tiles tab to change the content of your dashboard. You can add, edit, and delete tiles as described below. When you edit a tile, your changes to the tile configuration settings are reflected instantly in the tile displayed on your dashboard.
- Use the Settings tab to change the dashboard timeframe or management zone, and to change report subscription settings.
Add a tile
- Go to
 Dashboards Classic.
 - Select the name of a dashboard to display that dashboard.
- Select Edit in the upper-right corner of the dashboard. The dashboard opens in edit mode.
- If you don't see an Edit option, you don't have permission to edit that dashboard.
- Drag a tile type from the Tiles pane to your dashboard.
To see a description of a tile, drag it to your dashboard and then refer to the description on the tile configuration panel.
Edit a tile
- Display the dashboard.
- Hover over the tile, select the tile menu in the upper-right corner, and select Edit tile.
The tile configuration settings are displayed. - Change the configuration as needed.
To be sure you're making the changes you want, keep an eye on the tile while you change the configuration settings. Tile configuration changes (such as a custom timeframe) are reflected in real time as you make them. - When you're finished, select Done.
Delete a tile
- Go to
 Dashboards Classic.
 - Select the name of a dashboard to display that dashboard.
- Select Edit in the upper-right corner of the dashboard. The dashboard opens in edit mode.
- If you don't see an Edit option, you don't have permission to edit that dashboard.
- Select the unwanted tile.
- Select Delete and then confirm your action.
- To delete multiple tiles, drag a selection rectangle around the unwanted tiles, select Delete x tiles, and then confirm your action.
Configure dashboard settings
To configure basic dashboard settings, edit the dashboard and, on the Edit dashboard pane, select the Settings tab.
Default filters
You can set the default timeframe and default management zone for a dashboard. For details, see Dynatrace dashboard timeframe and management zone settings.
Reports
If you enable dashboard reports, subscribers will receive a link to view your dashboard without signing in. For details, see Subscribe to Dynatrace dashboard reports.
Title size
You can set the title size to small, medium, or large for all tiles displayed on your dashboard.
Consistent entity colors
Use the Consistent entity colors switch to determine whether the same entity, when displayed on two or more of a dashboard's tiles, is shown in the same color. Note that this applies only to tiles created with Data Explorer.
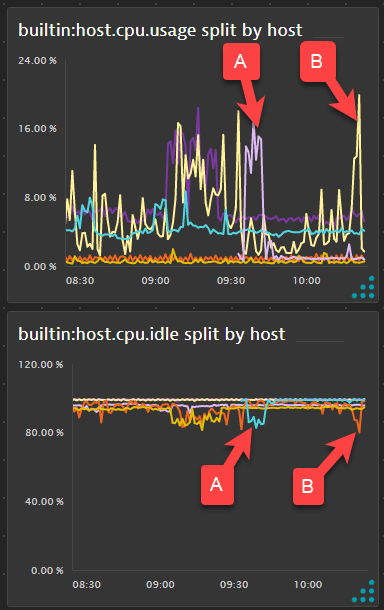
In the example below, hosts A and B are represented on two different charts. Consistent entity colors is turned off, and the colors are not consistent from chart to chart. (Host A is one color on the first chart and another color on the second chart.)

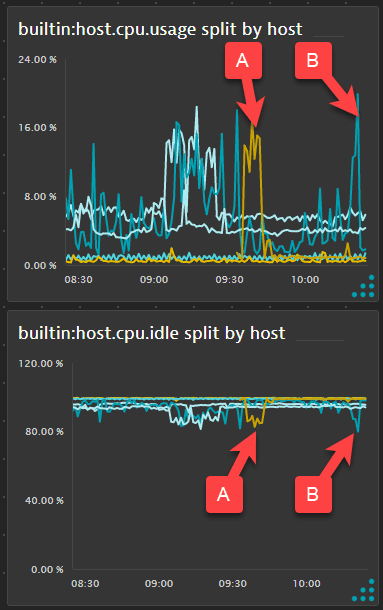
If we turn on Consistent entity colors for the dashboard, hosts A and B have consistent colors from chart to chart: host A has color X on both charts, and host B has color Y on both charts.

Configure more
To access detailed dashboard settings, select Configure more.
Delete a dashboard
To delete an entire dashboard (not just a tile)
- Go to
 Dashboards Classic.
 - In the table of dashboards, select More (…) > Delete for the dashboard you want to delete.
- If you don't see a Delete option, you don't have permission to delete that dashboard.
- Confirm the deletion to remove the dashboard.