Dynatrace offline on hardened systems
At Dynatrace, we work hard to ensure that our Dynatrace Managed and Offline versions function on hardened systems. This can be challenging due to the numerous different secure configurations our customers have. To ensure that Dynatrace can run on at least a base hardened system, we have worked internally, and with our more secure customers to validate installations on STIG-hardened systems. This gives us a baseline to work with if we encounter issues with installation on customer-hardened system.
The following description of our configuration and installation processes is an overview for customers who want to run Dynatrace on their hardened systems. We also discuss our installation best-practices for securing Dynatrace.
Security Technical Implementation Guides (STIGs)
The Security Technical Implementation Guides (STIGs) are the configuration standards for secure installation and maintenance of computer software and hardware introduced by the Defense Information Systems Agency (DISA) in support of the United States Department of Defense (DoD). The guides include recommended administrative processes to reduce exploitation possibilities. STIG scanning software is used to implement and validate proper configuration.
We recognize there are many different security standards, but the DISA STIG is accepted by most organizations as a solid baseline for system hardening.
High-level installation and testing steps:
- Initial operating system configuration.
- Application of Red Hat Linux STIG hardening scripts.
- Installation of Dynatrace Managed and secure setup.
- Reapplication of Red Hat Linux STIG hardening scripts.
- Run an OSCAP report to ensure that all possible CAT I-III (some items are not applied and will be documented in the appendix).
- Basic operation testing.
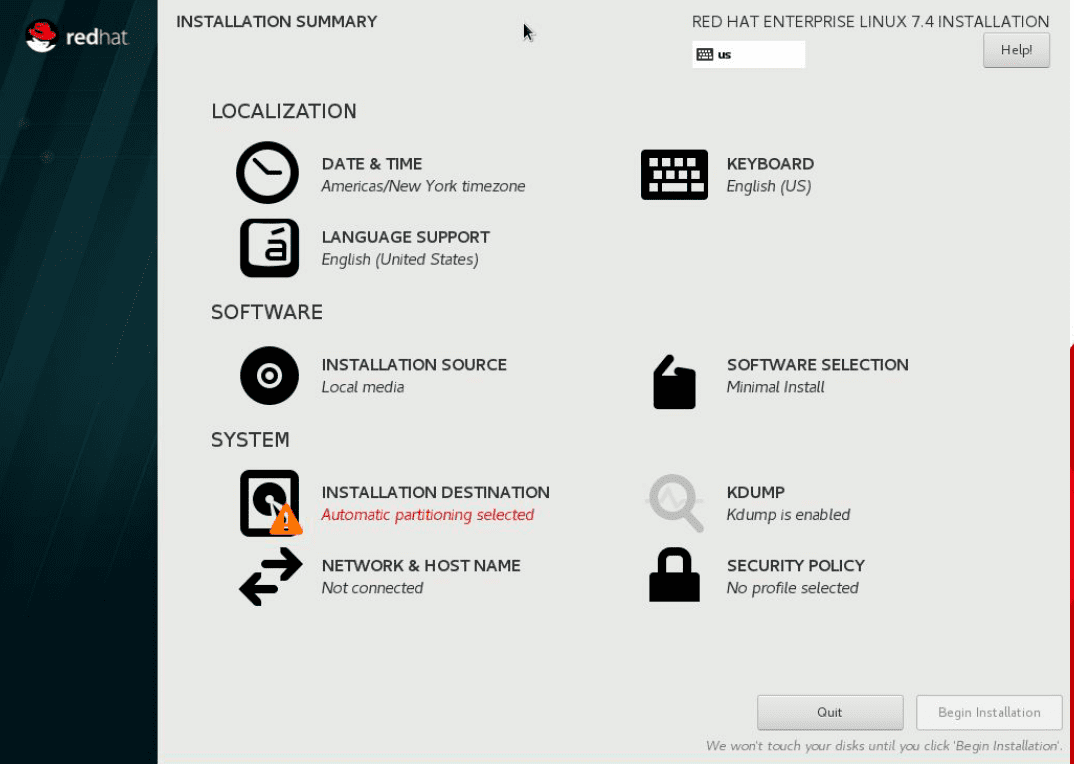
Initial operating system configuration
We use a kickstart file to set up the initial OS. You can also use the Anaconda GUI to accomplish the same. The following are the basic steps:
-
Launch the Red Hat Linux installation or run your kickstart setup.
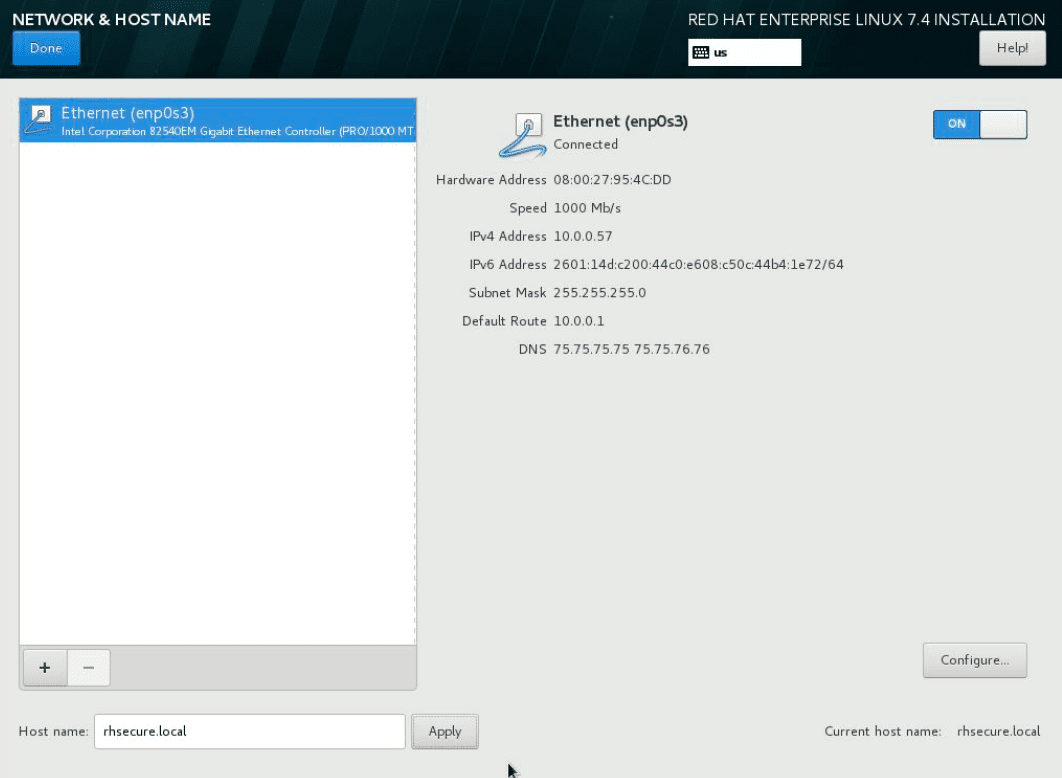
-
On the NETWORK & HOST NAME screen, configure your network settings.
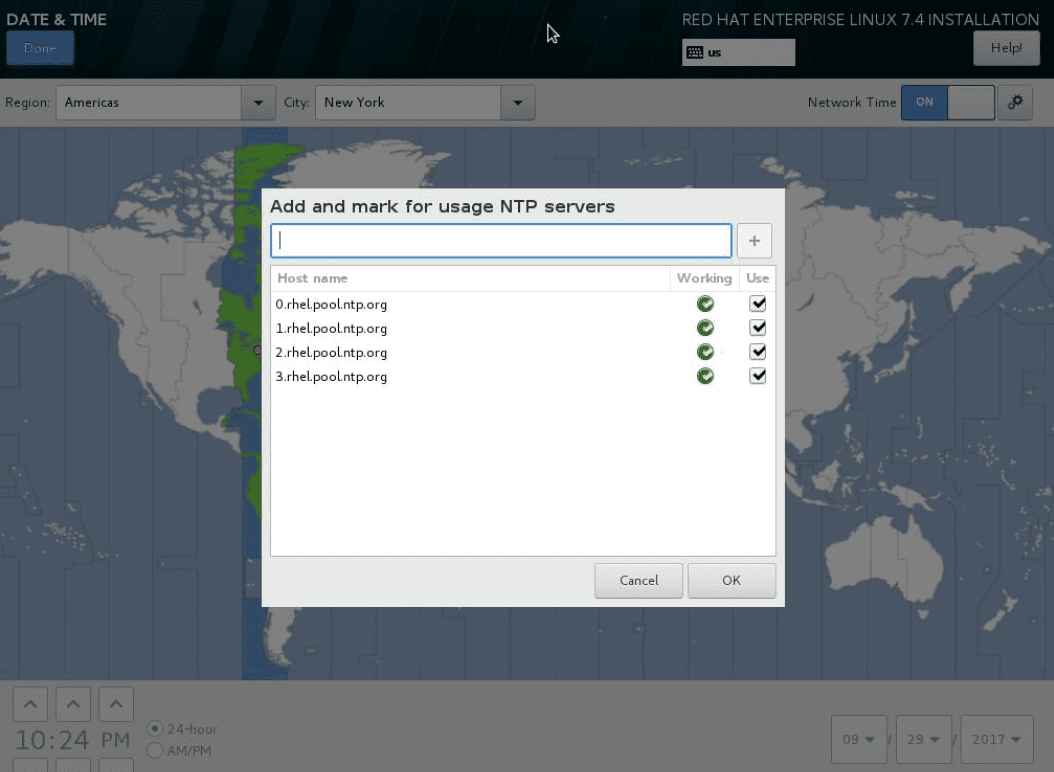
-
On the DATE & TIME screen, enable NTP and optionally specify custom time servers.
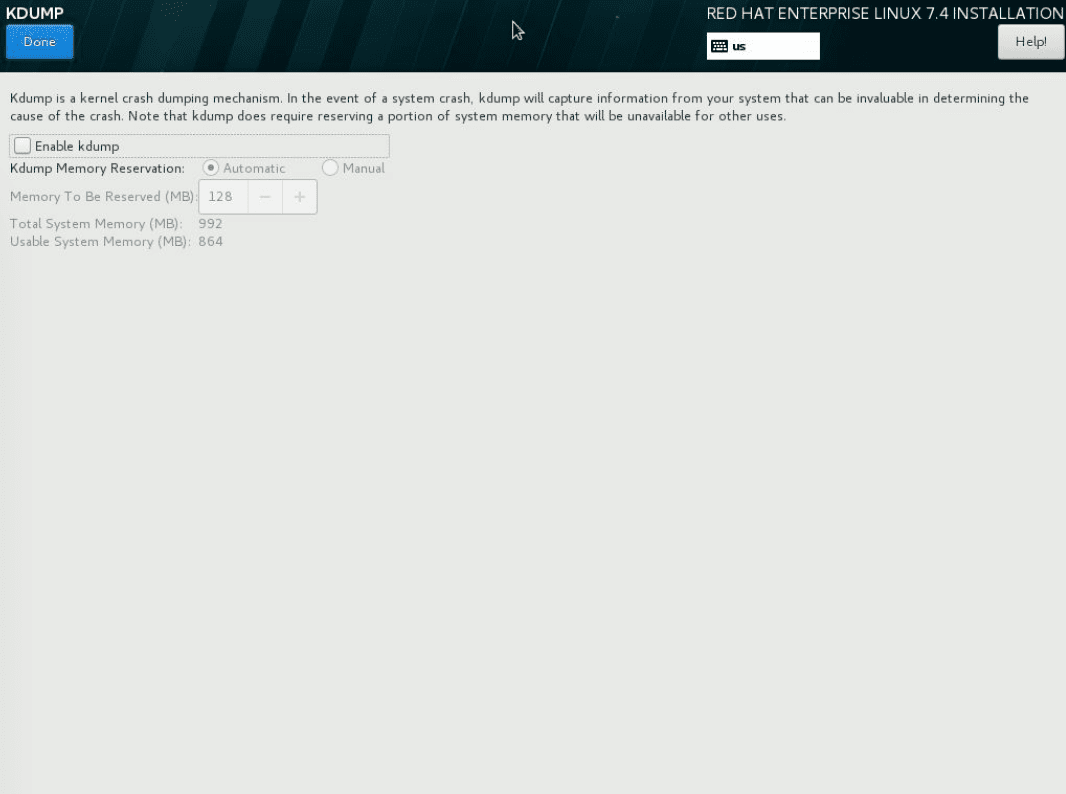
-
On the KDUMP screen, disable the kdump.
-
On the SECURITY POLICY screen, select the DISA STIG security policy.
This will add or remove packages required to satisfy the DISA guidelines.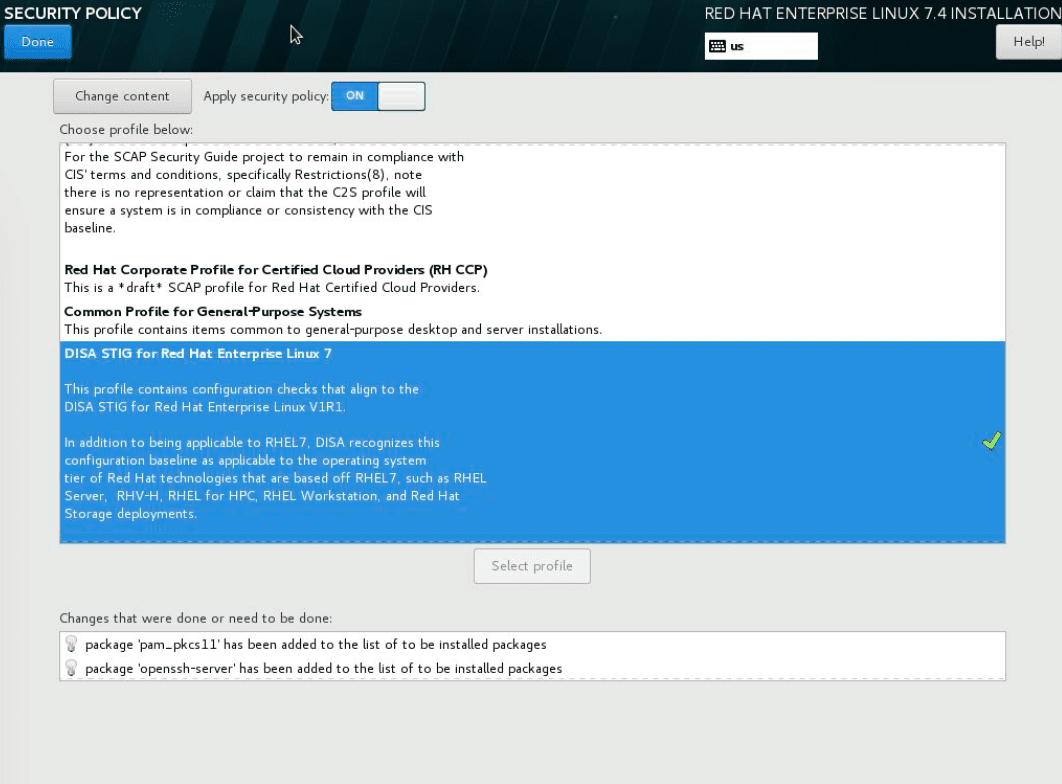
-
Setup the STIG required disk partitioning.
Drive sizeSelect the drive size appropriately. You can use the Dynatrace Managed hardware and system requirements sizing guide as a reference.
We recommend the following per STIG rules:
/
/boot
/home
/tmp
/var
/var/tmp
/var/log
/var/audit/log# Create primary system partitions (required for installs)part pv.211 --fstype="lvmpv" --ondisk=sda --size=182868part /boot --fstype=xfs --size=1451# Create a Logical Volume Management (LVM) group (optional)volgroup rheldtm --pesize=4096 pv.211# Create particular logical volumes (optional)logvol / --fstype=xfs --size=81920 --name=root --vgname=rheldtm# CCE-26557-9: Ensure /home Located On Separate Partitionlogvol /home --fstype=xfs --size=4044 --fsoptions="defaults,nosuid" --name=home --vgname=rheldtm# CCE-26435-8: Ensure /tmp Located On Separate Partitionlogvol /tmp --fstype=xfs--name=tmp --vgname=rheldtm --size=2861 --fsoptions="nodev,noexec,nosuid"# CCE-26639-5: Ensure /var Located On Separate Partitionlogvol /var --fstype=xfs --name=var --vgname=rheldtm --size=81920 --fsoptions="nodev"logvol /var/tmp --fstype=xfs --size=9048 --name=var_tmp --vgname=rheldtm --fsoptions="nodev"# CCE-26215-4: Ensure /var/log Located On Separate Partitionlogvol /var/log --fstype=xfs --name=var_log --vgname=rheldtm --size=1024 --fsoptions="nodev"# CCE-26436-6: Ensure /var/log/audit Located On Separate Partitionlogvol /var/log/audit --fstype=xfs --name=var_log_audit --vgname=rheldtm --size=1020 --fsoptions="nodev"logvol swap --fstype="swap" --name=lv_swap --vgname=rheldtm --size=2048 -
At this point you can encrypt your disk by setting a LUKS password.
Do not lose the password or the drive will be inaccessible!
-
Set your
rootpassword and begin installation.
To successfully run our hardening scripts we recommend that you register your Red Hat Enterprise Linux. For testing purposes you can use a free developers license. See How to register and subscribe for information on how to register.
Application of Red Hat Linux STIG hardening scripts
Next, we run an Ansible hardening script to bring the OS to STIG compliance. There are many sources available that provide these basic scripts. We used a custom Ansible script but you can use any script available. You can find a list in the appendix of all configuration changes
<ADD Appendix and Github scripts?>
Installation of Dynatrace Managed and secure setup
To set up a cluster, follow the instructions described for Dynatrace Managed. The only difference is that, instead of providing the license key as an installation parameter, you should use:
sudo /bin/sh dynatrace-managed-installer.sh --license-file license.lic
Dynatrace Managed secure setup best practices
The following steps represent best practices Dynatrace recommends for securing your installation.
Best practices overview:
Authentication
Local Security Database (default) - By default, Dynatrace ships with a local user database.
LDAP – You can use your external LDAP resource for authentication.
Single sign-on – Follow these instructions for integration with your single sign-on provider:
Authorization
Set up appropriate groups and assign permissions based on the least required privileges needed.
Dynatrace provides a set of a pre-defined permissions that can be applied to groups. Once a group is defined, you can add users to the group. Added users inherit the permissions of the groups they are assigned to. Any group can be modified to fit your needs. You can even create new groups and assign permissions to them.
Network Ports:
The following provides a list of needed ports and which ports should be opened.
Encryption
It is recommended that you encrypt all data at rest.
Dynatrace encrypts all data in transit using TLS 1.2. We recommend to force TLS 1.2 by making the following configuration change:
-
Modify the
nginx.conffile located in the/opt/dynatrace-managed/nginx/conf/folder.The file may be in a different location if you do not use the install directory defaults.
-
Add the following line after the existing SSL configurations:
ssl_protocols TLSv1.2;
RUM Security
To harden real user monitoring follow these steps:
FIPS 140-2 Compliance
If your environment requires FIPS 140-2 compliance Dynatrace provides a 140-2 compliance via a stand alone NGINX implementation with OpenSSL running in FIPS mode allowing for FIPS compliant communication. To enable it, run the installer with the –fips-enabled=true flag (this works for new installations and upgrades) This flag instructs all OneAgents to use the NGINX endpoint (running on port 443)
Management zones
If the Dynatrace built-in cluster- and environment- level permissions are not granular enough, you may want to consider implementing management zones. With management zones, each customizable management zone comprises a set of monitored entities in your environment, whether they are hosts that share a common purpose, a specific application, a staging environment, or services of a certain technology. Users can be granted access to entire environments, a specific management zone, or a subset of related management zones.
See the following for more details:
Set your SSL Certificate:
Reapplication of Red Hat Linux STIG hardening scripts
To ensure no changes from the installation of Dynatrace Managed reversed any hardening settings, we rerun the above Ansible scripts described earlier.
Run Open SCAP (OSCAP) Report
As part of our Ansible script, we run an OSCAP report to verify final hardening of the system before we begin validation of the system. If you are running the report manually, these basic steps can be followed to generate the report.
If Open SCAP is not installed on the target system run the following command:
yum install openscap-scanner
You should also install the latest STIG profiles:
yum install scap-security-guide
Run a standard SCAP report:
The following is an example. You can modify the report to meet your needs.
oscap xccdf eval --profile xccdf_org.ssgproject.content_profile_stig-rhel7-disa --results-arf /tmp/scap_reports/arf.xml --report /tmp/scap_reports/report.html /usr/share/xml/scap/ssg/content/ssg-rhel7-ds.xml