Containerized, auto-scalable private Synthetic locations on Kubernetes
- Latest Dynatrace
- How-to guide
Dynatrace version 1.264+
Containerized, auto-scalable private Synthetic locations on Kubernetes and its commercial distribution OpenShift are an alternative to deploying Synthetic-enabled ActiveGates on separate hosts or virtual machines and then assigning them to private locations for the execution of synthetic monitors.
Unlike individual Synthetic-enabled ActiveGates that are deployed and assigned to private locations (and then tracked via utilization metrics) containerized locations are deployed as a whole, with a minimum and maximum number of ActiveGates as the necessary input parameters.
Kubernetes and OpenShift aren't just additional supported ActiveGate platforms along with Windows and Linux; with this offering, containerized private Synthetic locations:
- Are auto-scalable (based on utilization metrics and the maximum/minimum number of ActiveGates specified).
- Are easy to manage and maintain.
- Support the synthetic monitoring of cloud-native solutions that require container-based application development.
- Can be deployed faster while minimizing downtime.
- Are automatically tracked for resource utilization as a part of auto-scaling operations.
You can manage Kubernetes/OpenShift locations via the Dynatrace web UI and the existing Synthetic - Locations, nodes, and configuration API v2. Additional Early Access endpoints in this API facilitate the deployment of Kubernetes locations; the new endpoints help you generate the commands that need to be executed on the Kubernetes cluster.
You can execute scheduled as well as on-demand executions of all types of synthetic monitors on containerized locations.
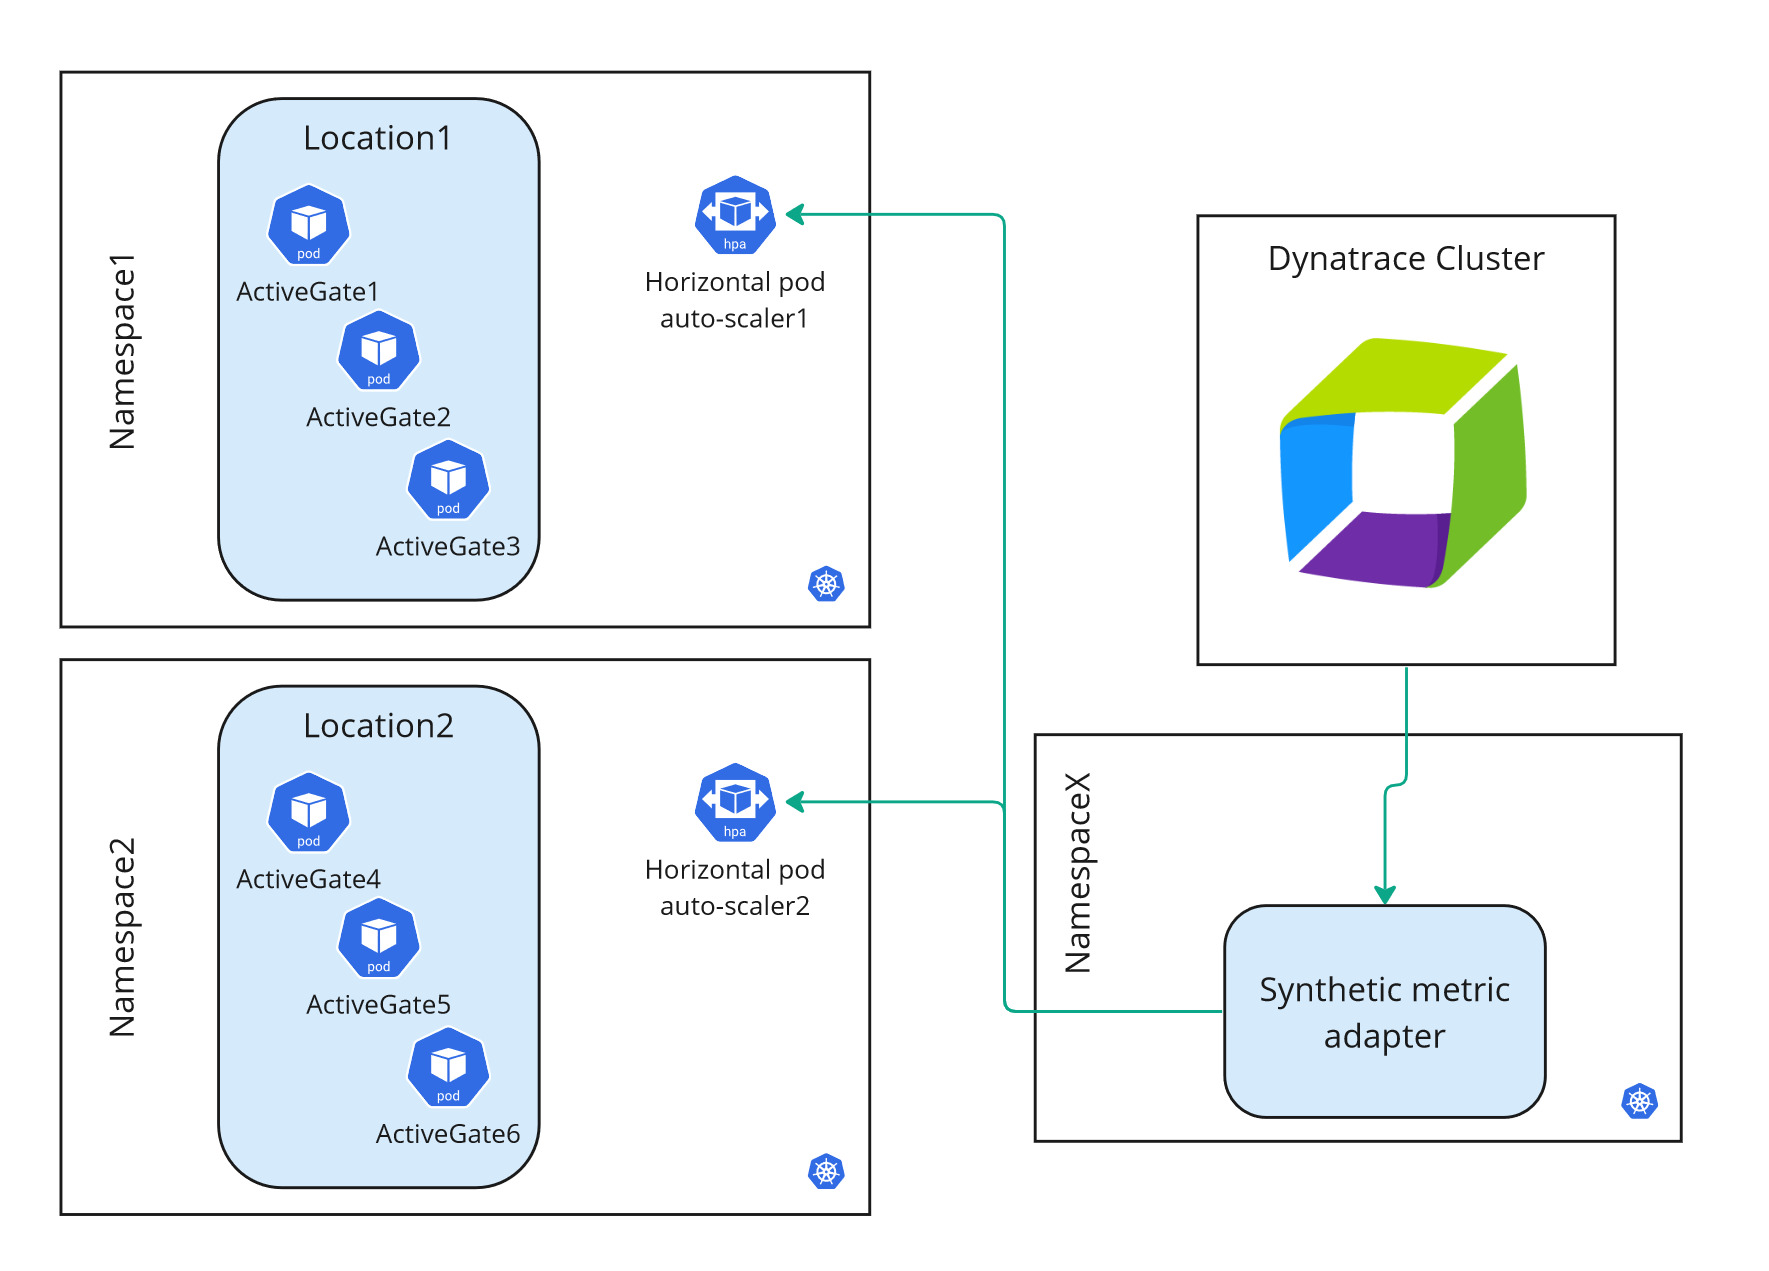
Architecture
Containerized private Synthetic locations are deployed as a whole.
-
Each location has multiple Synthetic-enabled ActiveGates configured as pods. You specify a minimum and maximum number of ActiveGates when setting up a location.
-
The StatefulSet is considered the location.
-
You can have one or more locations per namespace. See Requirements and Recommendations and caveats below.
-
You can have one or more auto-scalable locations per Kubernetes cluster.
Locations are scaled automatically by adjusting the number of ActiveGates per location by the following additional parts of the containerized location architecture.
-
-
The Synthetic metric adapter requests and receives utilization metrics for the containerized ActiveGates from the Dynatrace Cluster.
-
There is one Synthetic metric adapter per Kubernetes cluster.
-
The metric adapter is configured to communicate with a single Dynatrace environment.
-
To install a Synthetic metric adapter, you need super-user roles in Kubernetes—see Install a containerized location below.
-
-
The horizontal pod auto-scaler scales a location by adjusting the number of ActiveGates based on the utilization data it receives from the Synthetic metric adapter.
There is one horizontal pod auto-scaler per location.
Requirements
Containerized private Synthetic locations are supported with Dynatrace version 1.264+ on Kubernetes 1.22-1.25 with persistent volume and kubectl support.
- Additional support for Kubernetes 1.26+ is available in the installation workflow.
- All kinds of Kubernetes implementations are supported, whether cloud or local (for example, Amazon EKS or Minikube).
- OpenShift versions compatible with the supported Kubernetes versions are supported.
Internet connectivity is required to access the public repositories where Docker images for the Synthetic-enabled ActiveGate and Synthetic metric adapter are available. These image locations are referenced in the respective template files—see Install a containerized location and Update a containerized location below.
Sizing guide
The ActiveGate hardware requirements below are listed by size.
- CPU and RAM requests refer to the resources reserved by pods upon creation.
- CPU and RAM limits refer to the maximum resource consumption per pod.
- If the location is monitored by OneAgent or another deep monitoring solution, memory (RAM) requirements will increase.
- Browserless pod in FIPS mode has the same requirements as ordinary browserless pod.
| Browser-supporting pod | Browserless pod | Browser-supporting pod in FIPS mode | Browser-supporting pod in FIPS mode with corporate proxy | ActiveGate | Synthetic Engine | Browser worker | FIPS proxy | FIPS peer | ||
|---|---|---|---|---|---|---|---|---|---|---|
| Containers | 4 | 2 | 5 | 6 | 1 | 1 | 2 | 1 | 1 | |
| CPU requests | 1.4 vCPU | 0.4 vCPU | 1.9 vCPU | 2.05 vCPU | 0.3 vCPU | 0.25 vCPU | 2 × 0.5 vCPU | 0.5 vCPU | 0.15 vCPU | |
| CPU limits | 3.8 vCPU | 0.8 vCPU | 5.3 vCPU | 5.6 vCPU | 0.3 vCPU | 0.5 vCPU | 2 × 1.5 vCPU | 1.5 vCPU | 0.3 vCPU | |
| RAM requests | 3.25 GiB | 1.25 GiB | 3.5 GiB | 3.75 GiB | 0.25 GiB | 1 GiB | 2 × 1 GiB | 0.25 GiB | 0.25 GiB | |
| RAM limits | 7 GiB | 3 GiB | 7.5 GiB | 8 GiB | 1 GiB | 2 GiB | 2 × 2 GiB | 0.5 GiB | 0.5 GiB | |
| Ephemeral storage | 1.5 GiB | 1.3 GiB | 1.6 GiB | 1.7 GiB | 1.2 GiB | 0.1 GiB | 2 × 0.1 GiB | 0.1 GiB | 0.1 GiB | |
| Persistent storage | 3 GiB | 3 GiB | 3 GiB | 3 GiB | ||||||
| RAM disk | 1 GiB | - | 1 GiB | 1 GiB |
Best practices and caveats
ActiveGates
- We recommend the S ActiveGate size and a minimum of two ActiveGates per location.
- When considering node size, keep in mind the possible limitations specific to the Kubernetes service you will be relying on.
- All ActiveGates within a location are always the same size.
- Once specified, ActiveGate size for a location can't be changed because persistent storage can't be resized.
- Kubernetes locations follow the same rules as other locations in that an ActiveGate can't be added to multiple locations simultaneously.
- You cannot combine containerized and non-containerized ActiveGates in the same location.
- The image for Synthetic-enabled ActiveGate is in a public registry; this image location is referenced by the template file.
Locations
-
We recommend installing each location in its own namespace.
-
If deploying more than one location per namespace, use different names for the respective ActiveGate resources—see Install a containerized location below.
-
Locations that share a single Kubernetes namespace must be connected to the same Dynatrace environment as the Synthetic metric adapter in order to be auto-scalable. For example, assume that Location A and the metric adapter are configured for Environment X. However, Location A shares a namespace with Location B, which is configured for Environment Y. In such a case, Location A is auto-scalable; Location B is not auto-scalable.
-
If you want to install a location in the same namespace as other Dynatrace resources such as Dynatrace Operator, be aware of the more demanding hardware and system requirements for containerized Synthetic-enabled ActiveGates.
Synthetic metric adapter
- The best practice is to deploy the Synthetic metric adapter in its own namespace per Kubernetes cluster. The Synthetic metric adapter can share a namespace with a location. However, deploying the metric adapter in its own namespace ensures that it isn't deleted when a location is taken down.
- The metric adapter can only communicate with a single Dynatrace environment, so location auto-scaling works just for that environment.
- The image for the Synthetic metric adapter is in a public registry; this image location is referenced by the template file.
Auto-scaling specifics
For auto-scaling purposes, the Synthetic metric adapter needs access to and extends the Kubernetes API by specifying a new API service—v1beta1.external.metrics.k8s.io.
This API service is defined in the Synthetic metric adapter template—see Install and deploy a containerized location below.
API service definition in the metric adapter template
apiVersion: apiregistration.k8s.io/v1kind: APIServicemetadata:name: v1beta1.external.metrics.k8s.iospec:service:name: dynatrace-metrics-apiservernamespace: {{adapterNamespace}}group: external.metrics.k8s.ioversion: v1beta1insecureSkipTLSVerify: truegroupPriorityMinimum: 100versionPriority: 100
The Synthetic metric adapter also modifies an existing resource in its template—the horizontal-pod-autoscaler ServiceAccount in kube-system namespace.
Existing resource modification in the metric adapter template
apiVersion: rbac.authorization.k8s.io/v1kind: ClusterRoleBindingmetadata:name: hpa-controller-dynatrace-metricsroleRef:apiGroup: rbac.authorization.k8s.iokind: ClusterRolename: dynatrace-metrics-server-resourcessubjects:- kind: ServiceAccountname: horizontal-pod-autoscalernamespace: kube-system
Limitations
Note that only one external metric server is allowed in the Kubernetes cluster. Because of this, other components that serve as a metric server (such as the KEDA add-on or the Prometheus adapter) cannot be used along with the Synthetic metric adapter.
Install a containerized location
1. Initial setup for a Kubernetes/OpenShift location
-
Go to
 Synthetic > Private locations > New private locations > Kubernetes or OpenShift.
 -
Provide a Location name of your choice.
-
Select a Geographic location, for example,
San Francisco, California, United States. (Note that you cannot Save changes until you've specified a name and location.) -
In the ActiveGates section:
- Specify a Minimum and Maximum number of ActiveGates for your location. These settings are the auto-scaling parameters that the horizontal pod auto-scaler uses.
- Select an ActiveGate Node size (
XS,S, orM). See also Requirements and Best practices and caveats.
-
If needed, turn on the FIPS mode. You can choose between just FIPS mode and FIPS mode with corporate proxy. Alternatively, you can turn on the FIPS mode via API. For details, see Install FIPS-enabled containerized location via API.
-
Kubernetes only If your Kubernetes implementation is based on a later release than 1.21-1.25, turn on Use Kubernetes version 1.26+. See also Requirements and Best practices and caveats.
If you change this setting after downloading the location template, you need to repeat the deployment procedure.
-
Optional You can Enable ICMP request type for Network Availability Monitors executions.
-
Optional You can turn off support for browser monitors. If you do so, the ActiveGate node will be treated as browserless.
-
Optional Turn on Private location alert. It will generate a problem and send an alert when all ActiveGates at the private location go offline.
-
Select Next.
2. Deploy the location
-
Provide an ActiveGate name or use the default. This name is used as the prefix for ActiveGates deployed as part of the location. The first ActiveGate is named
<prefix>-0, the second ActiveGate<prefix>-1, and so on. This name is also used as the StatefulSet name. -
Provide a Location namespace name or use the default.
-
Select Download synthetic.yaml. This is the location template file. You can rename the file to match your location for easy identification.
-
Copy the downloaded location template over to your Kubernetes cluster.
-
Generate deployment commands.
-
Execute the following commands in your terminal:
- The command for creating namespace and secrets for the docker registry and ActiveGate.
- The command for deploying the ActiveGate.
-
Select Finish or proceed with Deploy Metric adapter.
3. Deploy the Synthetic metric adapter
This procedure generates a separate template for the Synthetic metric adapter. You then execute generated commands on your Kubernetes cluster to deploy the metric adapter.
- You need to deploy the Synthetic metric adapter just once per Kubernetes cluster.
- Installing a Synthetic metric adapter requires a Kubernetes super-user role to create ClusterRoles and ClusterRoleBindings.
-
Expand Deploy Metric adapter.
-
Provide a Metric adapter namespace name or use the default.
-
Select Download synthetic-adapter.yaml. This is the template file for the Synthetic metric adapter.
-
Copy the downloaded metric adapter template over to your Kubernetes cluster.
-
Generate deployment commands.
-
Execute the following commands in your terminal:
- The command for creating namespace and secrets for the docker registry and ActiveGate.
- The command for deploying the ActiveGate.
-
Select Finish.
Install FIPS-enabled containerized location via API
-
Set location to FIPS mode.
Set the
fipsModeproperty in the request JSON using REST API.- To create a new location, use a POST location call.
- To update an existing location, use a PUT location call.
-
Perform additional configuration:
-
Browser-supporting.
-
Provide a certificate for re-signing HTTPS requests (explained in FIPS mode):
kubectl -n $NAMESPACE create secret tls synthetic-fips-proxy-cert --cert=squid.crt --key=squid.key
-
-
Browser-supporting with corporate proxy.
-
Provide a certificate for re-signing HTTPS requests (explained in FIPS mode):
kubectl -n $NAMESPACE create secret tls synthetic-fips-proxy-cert --cert=squid.crt --key=squid.key -
Provide configuration of corporate proxy to Squid (explained in FIPS mode with corporate proxy):
kubectl -n $NAMESPACE create secret generic synthetic-fips-proxy-peer --from-literal='peer.conf=cache_peer proxy.example.com parent 443 0 default no-digest proxy-only login=proxyuser:proxypass tls tls-min-version=1.2 tls-options=NO_SSLv3'
- Provide configuration of corporate proxy to ActiveGate. For details, see Proxy configuration.
-
- Browserless. No additional configuration is needed.
-
-
Continue to download and deploy the YAML template as described in the Installation section.
Update a containerized location or its ActiveGates
Any updates to a location require that you download the location template file again and apply the changes via kubectl.
-
Go to the
Synthetic > Private locations -
Select your location in Private Synthetic locations.
-
Switch to the Private location deployment tab.
-
Re-enter the ActiveGate name and Location namespace that you provided during the location deployment.
-
Select Download synthetic.yml to download a new location template file.
-
Rename the file to match your location for easy identification.
-
Copy the template file over to your Kubernetes cluster.
-
Execute the following command to apply the changes on your Kubernetes cluster. Be sure to use your location template filename in place of
synthetic.yaml. Execute this command from the same location as the template file.kubectl apply -f ./synthetic.yaml
Any update redeploys ActiveGates in the reverse order of their deployment. For example, if your location contains the ActiveGates activegate-name-0 and activegate-name-1, activegate-name-1 is stopped and redeployed first.
The redeployed ActiveGate pod uses the same persistent volume deployed for log continuity.
Delete a location or metric adapter on Kubernetes
Code snippets for deleting location and metric adapter can be found in the respective tabs (Private location deployment or Metric adapter deployment) in the location details. You can copy and store these commands for future reference.
At any point, you can regenerate the commands for the respective namespaces.
- If you've renamed a template file, use the new filename in the commands.
- The cleanup commands shown below don't delete the respective namespaces.
Delete location
- Go to the Synthetic > Private locations
- Select your location in Private Synthetic locations.
- Switch to the Private location deployment tab.
- Expand Delete command (optional), and then copy and run the provided deletion command.
The procedure only deletes the Synthetic private location but doesn't delete its namespace.
Delete Synthetic metric adapter
- Go to the Synthetic > Private locations
- Select your location in Private Synthetic locations.
- Switch to the Metric adapter deployment tab.
- Expand Delete command (optional), and then copy and run the provided deletion command.
The procedure only deletes the metric adapter but doesn't delete its namespace.
Multi-AZ PVC access on cloud clusters
Using a multi-availability zone (multi-AZ) cluster with deployments utilizing PVC can result in pods being stuck in a pending state upon recreation. This happens because the storage volumes like EBS are not replicated between zones.
PVC is only shared between nodes located in the same availability zone. When you use a multi-AZ cluster and a node tries to access PVC from a different availability zone, it will become stuck in pending state and display an error message.
Currently, there are two possible solutions for multi-AZ Kubernetes deployments:
- Use node affinity to limit pods to a specific zone
- Use shared storage systems like EFS
Use node affinity to limit pods to a specific zone
You can configure node affinities to use only specific zones for a deployment.
To set node affinity
- Use the following command to find the zone each node is deployed on:
kubectl get nodes --show-labels
- Look for a label
failure-domain.beta.kubernetes.io/zone, for example,failure-domain.beta.kubernetes.io/zone=us-east-1a. - Use the kubectl label command to set a custom label for a node:
kubectl label nodes node name label=value
Example
kubectl label nodes ip-10-179-202-73.ec2.internal zone=us-east-1a - Add the custom node label to the
nodeSelectorsection of the Synthetic deployment template. For example:spec:nodeSelector:zone: us-east-1a - Save your changes.
- Apply the template.
Nodes with the same zone label will be deployed in the same availability zone and you'll be able to share PVC between them without causing an error.
Use shared storage systems
Each cloud service provides its own shared storage systems options. To explain how to use shared storage systems, we will use AWS EFS as the example. For information about storage systems used by other cloud storage providers, see:
- Google Cloud: About Filestore support for Google Kubernetes Engine
- Azure Storage: What is Azure Files?
The standard SMB/CIFS driver is not supported for Azure Files. For details, see Pod crashes when modifying file permissions when backed by Azure Files storage.
We assume that you already have EFS that you can use. If you don't, see Getting started with Amazon EFS to learn how to set up EFS.
Be aware that EFS may be more expensive than EBS. Check pricing.
To use storage class with EFS
- Complete the Synthetic deployment template similar to the example below:
kind: StorageClassapiVersion: storage.k8s.io/v1metadata:name: efs-testprovisioner: efs.csi.aws.comparameters:fileSystemId: fs-0c155dcd8425aa39dprovisioningMode: efs-apdirectoryPerms: "700"basePath: "/"
- Modify the volumeClaimTemplates section of the template similar to the example below:
volumeClaimTemplates:- metadata:name: persistent-storagespec:storageClassName: efs-testaccessModes:- ReadWriteManyresources:requests:storage: 3Gi
- Save your changes.
- Apply the template.
Now, if the pod is redeployed on a node in a different zone, the PVC should be automatically bound to the new deployment zone.
NAM monitors on containerized locations
OpenShift
OpenShift uses Security Context Constraint for limiting capabilities used by the pods.
By default, deployed pods will use the restricted-v2 SCC, which does not allow any additional capabilities.
The recommended solution is to prepare a custom Security Context Constraint.
-
Create a dedicated Service Account Optional
- If the custom SCC is used just by the synthetic deployment, it's recommended to create a dedicated Service Account.
oc -n $NAMESPACE create sa sa-dt-syntheticoc -n $NAMESPACE adm policy add-role-to-user edit system:serviceaccount:$NAMESPACE:sa-dt-synthetic
- If the custom SCC is used just by the synthetic deployment, it's recommended to create a dedicated Service Account.
-
Create a custom Security Context Constraint
-
scc-dt-synthetic.yaml
apiVersion: security.openshift.io/v1kind: SecurityContextConstraintsmetadata:name: scc-dt-syntheticallowPrivilegedContainer: falseallowHostDirVolumePlugin: falseallowHostIPC: falseallowHostNetwork: falseallowHostPID: falseallowHostPorts: falserunAsUser:type: MustRunAsRangeseccompProfiles:- runtime/defaultseLinuxContext:type: MustRunAsfsGroup:type: MustRunAssupplementalGroups:type: MustRunAsvolumes:- configMap- downwardAPI- emptyDir- persistentVolumeClaim- projected- secretusers: []groups: []priority: nullreadOnlyRootFilesystem: truerequiredDropCapabilities:- ALLdefaultAddCapabilities: nullallowedCapabilities:- NET_RAWallowPrivilegeEscalation: true -
prioritycan be set to any number between 1 and 9. If there are two or more SCCs that fulfill the requirements, the one with higher priority is selected.oc create -f scc-dt-synthetic.yaml
-
-
Add the new SCC to the Service Account used for synthetic deployment
oc -n $NAMESPACE adm policy add-scc-to-user scc-dt-synthetic system:serviceaccount:$NAMESPACE:default- If the
sa-dt-syntheticSA was created, substitute it in place ofdefault.oc -n $NAMESPACE adm policy add-scc-to-user scc-dt-synthetic system:serviceaccount:$NAMESPACE:sa-dt-synthetic
- If the
Azure RedHat OpenShift (ARO)
If the OpenShift cluster is deployed as an Azure Red Hat OpenShift (ARO) resource, by default, the Network Security Group won't allow ICMP traffic outside the cluster.
The AROs Network Security Group is not modifiable, but a custom NSG can be created and imported during the ARO cluster creation. To learn more about it, see Bring your own Network Security Group (NSG) to an Azure Red Hat OpenShift (ARO) cluster.
Running the cluster with default settings will only allow for using ICMP NAM monitors for resources inside the OpenShift cluster. Any requests going outside the cluster will fail.
Proxy configuration
Add the following code at the top of your location template file to insert a ConfigMap resource containing your proxy server information.
In the code sample below:
- The proxy server is used for connections to the Dynatrace Cluster and tested resources.
- The namespace (
namespace: dynatrace) must be the location namespace.
kind: ConfigMapapiVersion: v1data:custom.properties: |-[http.client]proxy-server = 10.102.43.210proxy-port = 3128proxy-user = proxyuserproxy-password = proxypassmetadata:name: ag-custom-configmapnamespace: dynatrace---
Add the following code at spec.template.spec.volumes:.
- name: ag-custom-volumeconfigMap:name: ag-custom-configmapitems:- key: custom.propertiespath: custom.properties
Add the following code to the ActiveGate container configuration under volumeMounts:.
- name: ag-custom-volumemountPath: /var/lib/dynatrace/gateway/config_template/custom.propertiessubPath: custom.properties
Dynatrace Operator compatibility
If you deploy Dynatrace Operator in the same Kubernetes cluster as a containerized Synthetic location, the generated StatefulSet template must include the pod annotation dynatrace.com/split-mounts: "true". This annotation prevents conflicts that occur when the Operator's injection encounters an ActiveGate image that already contains a /var/lib/dynatrace directory.
Starting with Dynatrace version 1.335, the location template generated by Dynatrace includes this annotation. If you manage the StatefulSet manifest manually or have an earlier version, make sure the annotation is present under spec.template.metadata.annotations. For details, see Dynatrace Operator 1.8.0 release notes.
Browserless private Synthetic locations
In general, we recommend the deployment of complete synthetic private locations to support the execution of all types synthetic monitors (HTTP, browser, NAM).
If you don't need to run browser monitors, consider deploying your location in browserless mode. This mode deploys the location (or ActiveGate belonging to it) without a browser, reducing hardware requirements. However, browser monitors can't run on a browserless location.
Consider browserless locations as an alternative to synthetic private locations with browser monitor support when you’re focused purely on:
- Network and infrastructure use cases (using NAM monitors)
- API monitoring (using HTTP monitors)
Compared to the regular template, following changes are introduced:
-
browservalue is set forDT_SYNTHETIC_UNSUPPORTED_MONITORING_MODULESenvironment variable insynthetic-vuccontainer underenv:- name: DT_SYNTHETIC_UNSUPPORTED_MONITORING_MODULESvalue: "browser" -
No
synthetic-vuc-workercontainers are included -
No
chromium-cachevolume is specified or mounted
Kerberos authentication configuration
Add the following code at the top of your location template file to insert a ConfigMap resource containing your Kerberos server information.
In the code sample below:
- The
EXAMPLE.COMrealm is used in Kerberos authentication. - The
example.comdomain is used in Kerberos authentication. - The
kerberos.example.comis the hostname of Key Distribution Center. - The namespace (
namespace: dynatrace) must be the location namespace.
kind: ConfigMapapiVersion: v1data:krb5.conf: |-[libdefaults]dns_lookup_realm = falseticket_lifetime = 24hrenew_lifetime = 7dforwardable = truerdns = falsepkinit_anchors = FILE:/etc/pki/tls/certs/ca-bundle.crtspake_preauth_groups = edwards25519dns_canonicalize_hostname = fallbackqualify_shortname = ""default_realm = EXAMPLE.COMdefault_ccache_name = /tmp/krb5cc_%{uid}[realms]EXAMPLE.COM = {kdc = kerberos.example.comadmin_server = kerberos.example.com}[domain_realm].example.com = EXAMPLE.COMexample.com = EXAMPLE.COMmetadata:name: krb-mapnamespace: dynatrace---
Add the following code at spec.template.spec.volumes:.
- name: krb5-confconfigMap:name: krb-mapitems:- key: krb5.confpath: krb5.conf
Add the following code to every synthetic-vuc-worker container configuration under volumeMounts:.
- name: krb5-confmountPath: /etc/krb5.confsubPath: krb5.conf
Synthetic metric adapter
Disable domain certificate validation
Add the following code to Synthetic metric adapter template under env:
- name: TLS_SECUREvalue: "false"
This deactivates certificate validation for the Synthetic metric adapter connection to the Dynatrace Cluster (by default, it is activated).
Proxy configuration
Add the following code to Synthetic metric adapter template under env:
- name: HTTPS_PROXYvalue: "http://proxyuser:proxypass@10.102.43.210:3128"- name: NO_PROXYvalue: "172.20.0.0/16" # do not proxy internal calls to Kubernetes cluster
For more details about these environment variables see Go httpproxy package documentation.
The way of obtaining Service CIDR depends on Kubernetes distribution, for example for AWS EKS the following command can be used:
aws eks describe-cluster --name my-cluster --query 'cluster.kubernetesNetworkConfig'
Migrate Synthetic Adapter to Grail query API
This section is relevant for customers using Grail metrics, including Dynatrace SaaS environments created after January 2026.
Starting from Dynatrace version 1.338+, Synthetic Adapter supports the Grail query API for Synthetic metrics. The migration requires regenerating the Synthetic Adapter dynametric token.
The new dynametric token must be a platform token created in Account Management. It requires the following scopes: storage:buckets:read, storage:metrics:read.
There are two ways to update to the new API:
- Update the whole deployment to a newer ActiveGate version 1.337+.
- Update to the new API independently, without updating the whole deployment.
Migrate when updating deployment to ActiveGate version 1.337+
- Download the new adapter template and all synthetic location templates that are using the adapter.
- Delete the previous
dynametricsecret.kubectl -n $adapterNamespace delete secret dynametric - Create a new
dynametricsecret.kubectl -n $adapterNamespace create secret generic dynametric --from-literal=apiToken=xxx.yyy.zzz - Apply the new adapter template.
kubectl apply -f synthetic_metric_adapter.yaml
- Apply the new location template.
kubectl apply -f $locationTemplateFile
- Verify if the location's HPA is receiving the new metrics. They should be available in about five minutes after deployment.
If thekubectl get hpa -n $locationNamespaceNAME REFERENCE TARGETS MINPODS MAXPODS REPLICAS AGEdynatrace-activegate-synthetic-hpa StatefulSet/dynatrace-activegate-synthetic 5541m/80 1 1 1 28d
TARGETSfield shows any value (not Unknown), the adapter is receiving the metrics.
Migrate without changing the deployed ActiveGate version
-
Delete the previous
dynametricsecret.kubectl -n $adapterNamespace delete secret dynametric -
Create a new
dynametricsecret.kubectl -n $adapterNamespace create secret generic dynametric --from-literal=apiToken=xxx.yyy.zzz -
Modify the adapter deployment.
Set the environment variable
METRIC_3RD_GEN_ENABLEDto"true".env:- name: METRIC_3RD_GEN_ENABLEDvalue: "true"Set the environment variable
BASE_URLto match the Latest Dynatrace URL.env:- name: BASE_URLvalue: "https://mySampleEnv.apps.dynatrace.com" -
Modify synthetic location deployments—change the target metric in the Horizontal Pod Autoscaler definition.
metrics:- type: Externalexternal:metric:name: "dt.sfm.synthetic.engine_utilization:dt.entity.synthetic_location==SYNTHETIC_LOCATION-A1183B9FB2353097" -
After applying the changes, verify if the location's HPA is receiving the new metrics. They should be available in about five minutes after deployment.
kubectl get hpa -n $locationNamespaceNAME REFERENCE TARGETS MINPODS MAXPODS REPLICAS AGEdynatrace-activegate-synthetic-hpa StatefulSet/dynatrace-activegate-synthetic 5541m/80 1 1 1 28dIf the
TARGETSfield shows any value except forUnknown, the adapter is receiving the metrics.
Non-scalable containerized locations
Auto-scalable locations become non-scalable for any of the following reasons.
-
The location reaches its maximum number of pods in the StatefulSet, and location utilization is over the threshold of 80%. No new ActiveGate pods are created until the maximum number of ActiveGates is increased.
-
The Synthetic metric adapter stops working, and the location horizontal pod auto-scalers don't receive the metrics required for auto-scaling.
You can run the following command to verify the state of a pod auto-scaler. In the example below,
dynatraceis the location namespace.kubectl describe hpa -n dynatraceIf
ScalingActiveis set toFalsein the output, the auto-scaler isn't receiving metric data.
API: Synthetic - Locations, nodes, and configuration API v2
You can automate the deployment of and manage containerized locations via the existing Synthetic - Locations, nodes, and configuration API v2. Early Access endpoints added to this API to facilitate the deployment of Kubernetes locations. The new endpoints help generate the commands you need to execute on the Kubernetes cluster.

- The GET location YAML endpoint (
/synthetic/locations/{LocationId}/yaml) fetches the location template file based on the location ID of the location you initially set up for containerized deployment. - The GET apply commands endpoint (
synthetic/locations/commands/apply) fetches the list of commands to deploy a location on Kubernetes/Openshift. - The GET delete commands endpoint (
synthetic/locations/{LocationId}/commands/delete)fetches the commands to delete a containerized location.