Browser clickpath events
- Explanation
- 18-min read
When you record a browser clickpath, your interactions with your web application are captured as a series of events. There are different event types to simulate interaction and control the clickpath, for instance, navigating to a URL, a click, selecting an option, entering information, or a JavaScript snippet. Besides the type, events have different properties, like the target (consisting of locators to identify web elements on a page) and the wait strategy.
Browser clickpath event types and their properties are described below. Clickpath events are editable during initial configuration or at any point later in edit mode in monitor settings (see the images below). You can edit, reorder, delete, and add events.
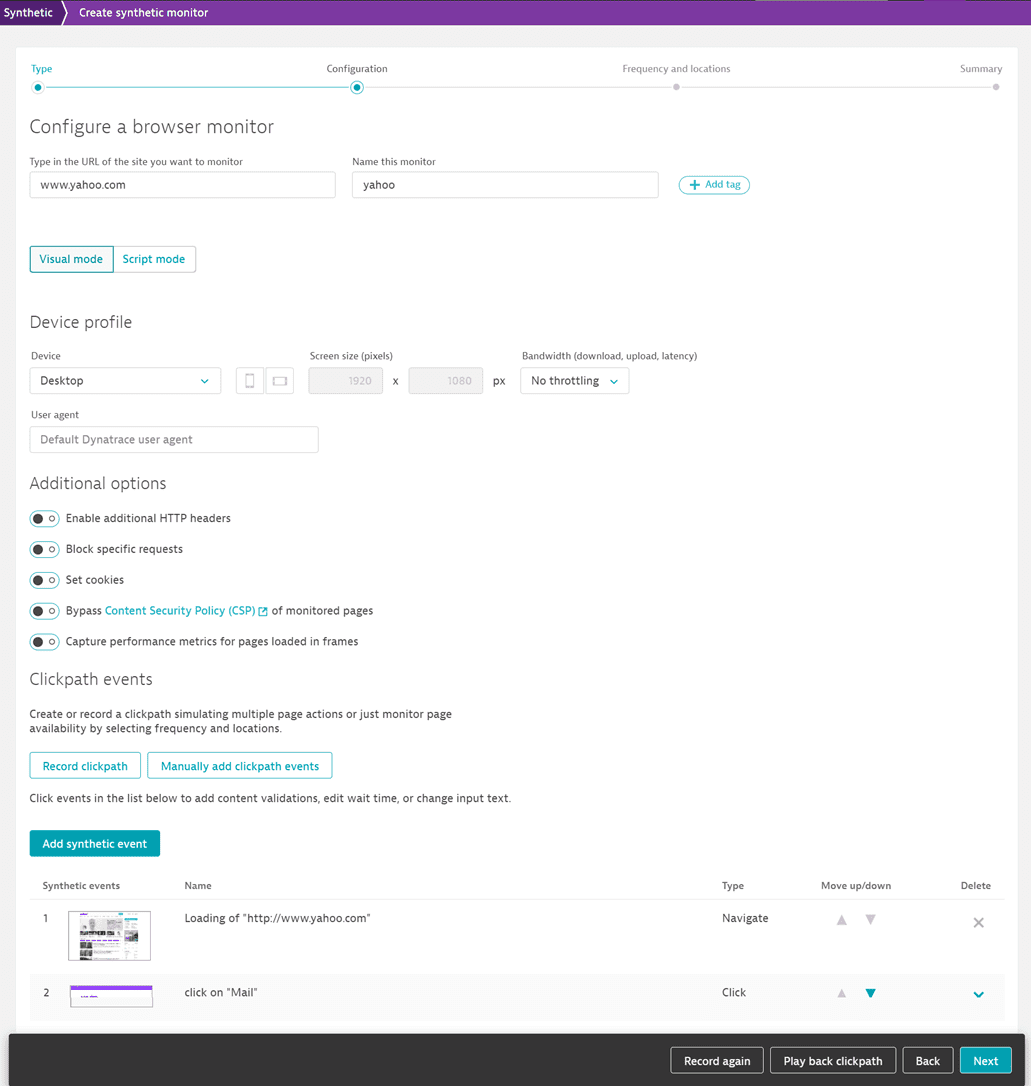
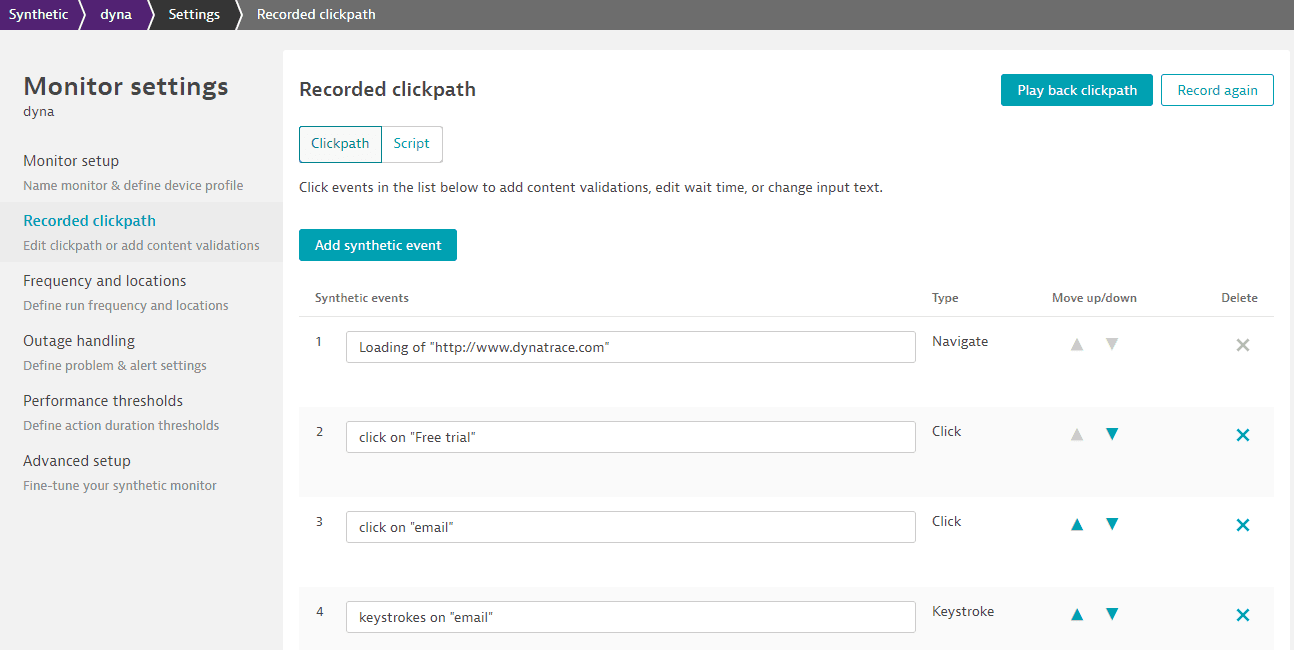
A Synthetic script event is not the same thing as an action—only events that trigger web requests contain one or more actions. The Synthetic events and actions card on the Synthetic details page helps you distinguish between script events with and without timings. Synthetic actions (similar to user actions in Real User Monitoring) hold the performance data collected during clickpath executions.
Navigate
The Navigate event simulates entering a URL in the address bar of a browser and then loading the page.
Single-URL browser monitors comprise a single Navigate event. However, note that opting for web form authentication automatically sets up your single-URL monitor with two script events: Navigate, and noneditable AutoLogin event.
To enhance synthetic monitor security, Dynatrace blocks monitors from sending requests to a local host (for example, localhost or 127.0.0.1).
In recorded clickpaths, the first event is automatically created as a Navigate event. However, when adding events manually or editing a clickpath, you can add a JavaScript event as the first event of the monitor. Navigate events can be preceded only by one or more JavaScript events. A clickpath requires at least one Navigate event.
If you re-record your clickpath from scratch (by selecting Record again > From the beginning of the clickpath), any JavaScript events that precede the first Navigate event will be erased. You can retain your initial JavaScript events by opting to record after them (After event > Select event).
Going to a new webpage by clicking a link in the current webpage creates a Click event in desktop profiles (or a Tap event on mobile devices), not a Navigate event.
See the sections below on wait and validation controls.
HTTP authentication
For browser clickpaths, you can automate signing in to the specified URL using HTTP-based authentication—turn on Enable HTTP authentication. Supported authentication methods are basic, digest, NTLM, and Negotiate.
For web form-based authentication in a clickpath, you can simply record entering the credentials used for authentication; Dynatrace automatically captures the credentials. After recording, you have the option of storing the credentials to the credential vault so that signing in is automated during monitor executions—see Supported authentication methods in Synthetic Monitoring for more information. See the Keystroke event for information on recording data entry, including user credentials, into fields.
Dynatrace stores and manages all Synthetic Monitoring credentials in a credential vault. Credentials are access controlled and can be designated as owner only or public.
You can choose an existing credential (Select credentials). You can only see the credentials that you have access to in this list, that is, public credentials or owner-only credentials created by you.
Browser monitors support usernames in the <username> and <domain>\<username> formats.
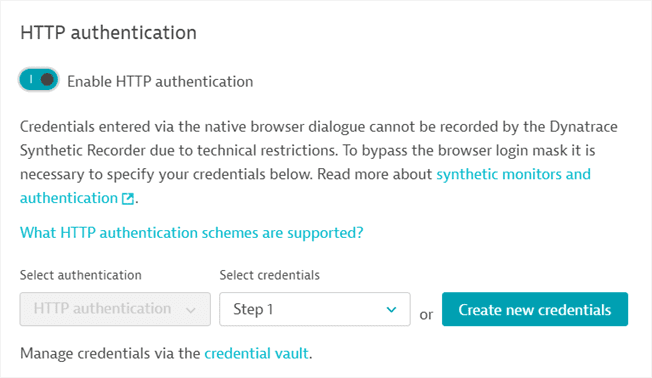
You can Create new credentials by entering a Username and Password. Provide a name for the credential and Save to vault. The credentials you create this way are automatically set to owner-only permissions and can only be used by you.
Note that you must have permission to access the credential vault in order to create credentials in script or UI mode in a browser monitor in this way. You can always capture entered credentials as part of a recorded clickpath.
Who can edit a monitor that has associated credentials?
- If a monitor is associated with a public credential, anyone on your team can switch on/off, delete, or edit the monitor.
-
If a browser monitor (clickpath or single URL) is associated with a restricted credential (owner only or shared with a few users), any user can make changes to certain fields, even if they don't have access to the credential used. You can edit monitor name, device emulation settings, wait conditions, frequency, locations, outage alerting, performance thresholds, metrics, connected applications, validation, and HTTP status codes to be ignored. And, of course, you can change a token or user ID/password credential. You can create a credential within monitor settings in edit mode. You'll need to change all credentials in the monitor to ones that you have access to. Note that replacing another user's credential with one you have access to is irreversible.
Controls that you cannot edit—such as the URL, switching on/off HTTP authentication, adding or deleting clickpath events, data entry in Keystroke, and Advanced setup in monitor settings—are grayed out or display an error message when you attempt to save changes, whether in script or UI mode.
- You can enable/disable or delete a synthetic monitor that's secured by another user's owner-only credentials.
Read more about credential permissions in Credential vault for synthetic monitors.
Click
In browser monitors, the Click event defines where to perform a mouse click on a page. It's inserted when you click an element such as a link, button, or field.
See the sections below on wait and validation controls.
The Click event interacts with a specific element on the web page. See the information on locators below to define how an element should be found.
Tap
In mobile device profiles (including tablets, laptops with touch, and custom devices specified as mobile), the Tap event defines where on a page to record tapping the device screen with a fingertip. For example, a Tap is inserted when you tap a hyperlink, button, or select a field.
When recording on mobile device profiles, the cursor changes to an icon that represents a fingertip.
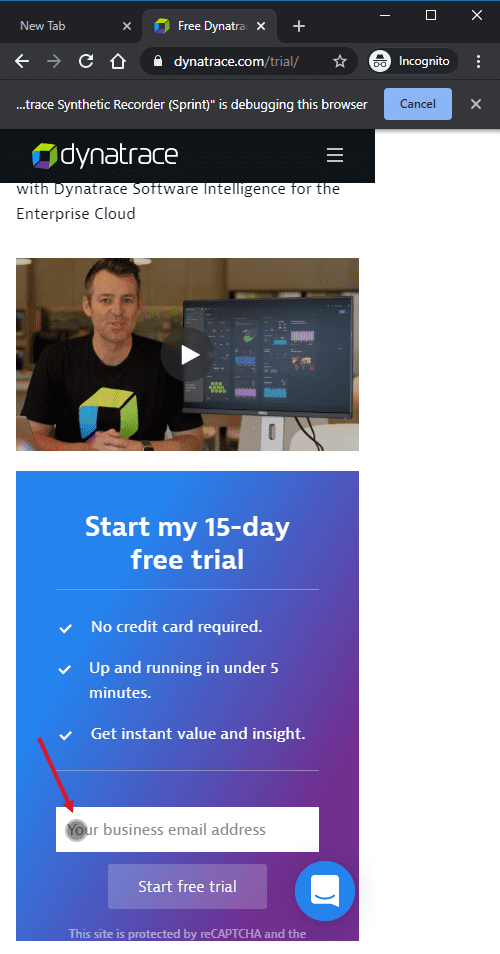
See the sections below on wait and validation controls.
The Tap event interacts with a specific element on screen. See the information on locators below to define how an element should be found.
Keystroke
The Keystroke event captures the string you type in a field on a web page.
-
The string is recorded in Text value, which can be edited. All text is captured by default as Plain text. However, for passwords stored to the credential vault, the text type is Credentials.
Dynatrace stores and manages all Synthetic Monitoring credentials in a credential vault. Credentials are access controlled and can be designated as owner only or public.
Read on below to learn how to capture or set a password and how to create a token in a Keystroke event.
Who can edit a monitor that has associated credentials?
- If a monitor is associated with a public credential, anyone on your team can switch on/off, delete, or edit the monitor.
-
If a browser monitor (clickpath or single URL) is associated with a restricted credential (owner only or shared with a few users), any user can make changes to certain fields, even if they don't have access to the credential used. You can edit monitor name, device emulation settings, wait conditions, frequency, locations, outage alerting, performance thresholds, metrics, connected applications, validation, and HTTP status codes to be ignored. And, of course, you can change a token or user ID/password credential. You can create a credential within monitor settings in edit mode. You'll need to change all credentials in the monitor to ones that you have access to. Note that replacing another user's credential with one you have access to is irreversible.
Controls that you cannot edit—such as the URL, switching on/off HTTP authentication, adding or deleting clickpath events, data entry in Keystroke, and Advanced setup in monitor settings—are grayed out or display an error message when you attempt to save changes, whether in script or UI mode.
- You can enable/disable or delete a synthetic monitor that's secured by another user's owner-only credentials.
Read more about credential permissions in Credential vault for synthetic monitors.
-
Simulate Return key automatically simulates the pressing of the Return key after keystrokes, for example, to submit a search string or trigger a login. When creating a monitor in UI mode, this saves you from having to set up a Click event after entering data into a field.
-
Simulate blur event (enabled by default) defines whether a blur event is simulated, which is usually when a text field loses focus.
-
See the sections below on wait and validation controls.
-
The Keystroke event interacts with a specific element on screen such as a form field. See the information on locators below to define how an element should be found.
Capturing or setting a password in Keystroke
In a Keystroke event, a recorded password is captured by default as Plain text. You can Save to credential vault—the data type automatically changes to Credentials.
Reset text value only if you want to clear the captured credential and convert the field to unencrypted text.
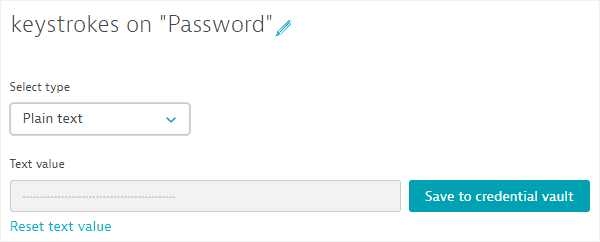
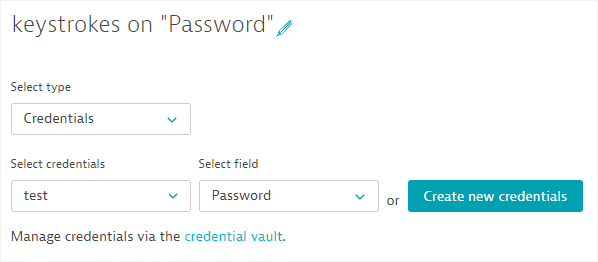
You can also use a different credential stored in the vault or create a new one in a Keystroke event. First, change the data type to Credentials.
You can choose an existing credential (Select credentials). You can only see the credentials that you have access to in this list, that is, public credentials or owner-only credentials created by you.
You can choose from user ID/password pairs or token credentials. Note in the image below how only the password from a retrieved UID/password pair is used.
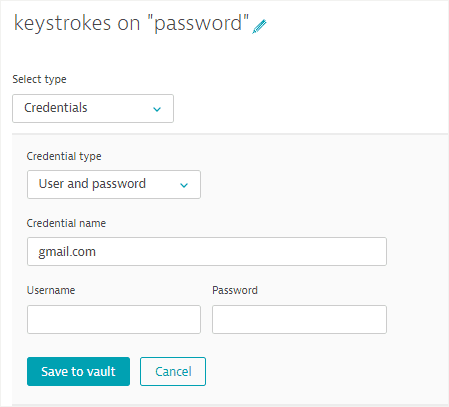
You can Create new credentials by entering a Username and Password. Provide a name for the credential and Save to vault. The credentials you create this way are automatically set to owner-only permissions and can only be used by you.
Note that you must have permission to access the credential vault in order to create credentials in script or UI mode in a browser monitor in this way. You can always capture entered credentials as part of a recorded clickpath.
Create a token in Keystroke
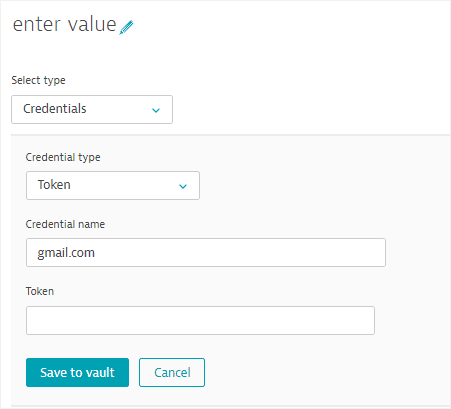
You can use an existing token you have access to in Keystroke. Change the text type to Credentials and select the ID of the credential you wish to use (Select credentials).
To create a new token, select Create new credentials. Select Token as the Credential type. Edit the default credential name, provide a Token value, and Save to vault. The credentials you create this way are automatically set to owner-only permissions and can only be used by you.
Note that you must have permission to access the credential vault in order to create credentials in script or UI mode in a browser monitor in this way.
Select option
The Select option event describes the use of lists in a clickpath.
The Index describes the position of the chosen item from the top; the first item in a list is always annotated 0. The Value field shows the text value of the item selected.
Click Add another selection to add another item to select in the same list. You can delete selected options as required.
See the sections below on wait and validation controls.
The Select option event interacts with a specific element on screen. See the information on locators below to define how an element should be found.
JavaScript
The JavaScript event allows you to execute snippets of JavaScript as part of your browser clickpaths.
With JavaScript events, you can create clickpaths for scenarios with some dynamic parts where it might be necessary to react on the page, for example:
- Login flows including random security questions
- Complex date selectors
- Pages using A/B testing
- Signups or product order workflows
- Custom validations
Executing JavaScript on PDF pages is not supported.
For XML pages, you can enable support by switching to script mode and enabling experimentalProperties in the configuration section as follows. The value of the property enableXmlInjection is a regular expression for the target XML page's URL.
"experimentalProperties": [{"name": "enableXmlInjection","value": ".*.xml$"}]
During synthetic monitor executions, the target XML page is rendered in HTML.
In the editor provided, define your JavaScript snippet, the target window, and wait strategy. The API that allows you to store and retrieve values, control JavaScript event outcome, or skip execution is described below.
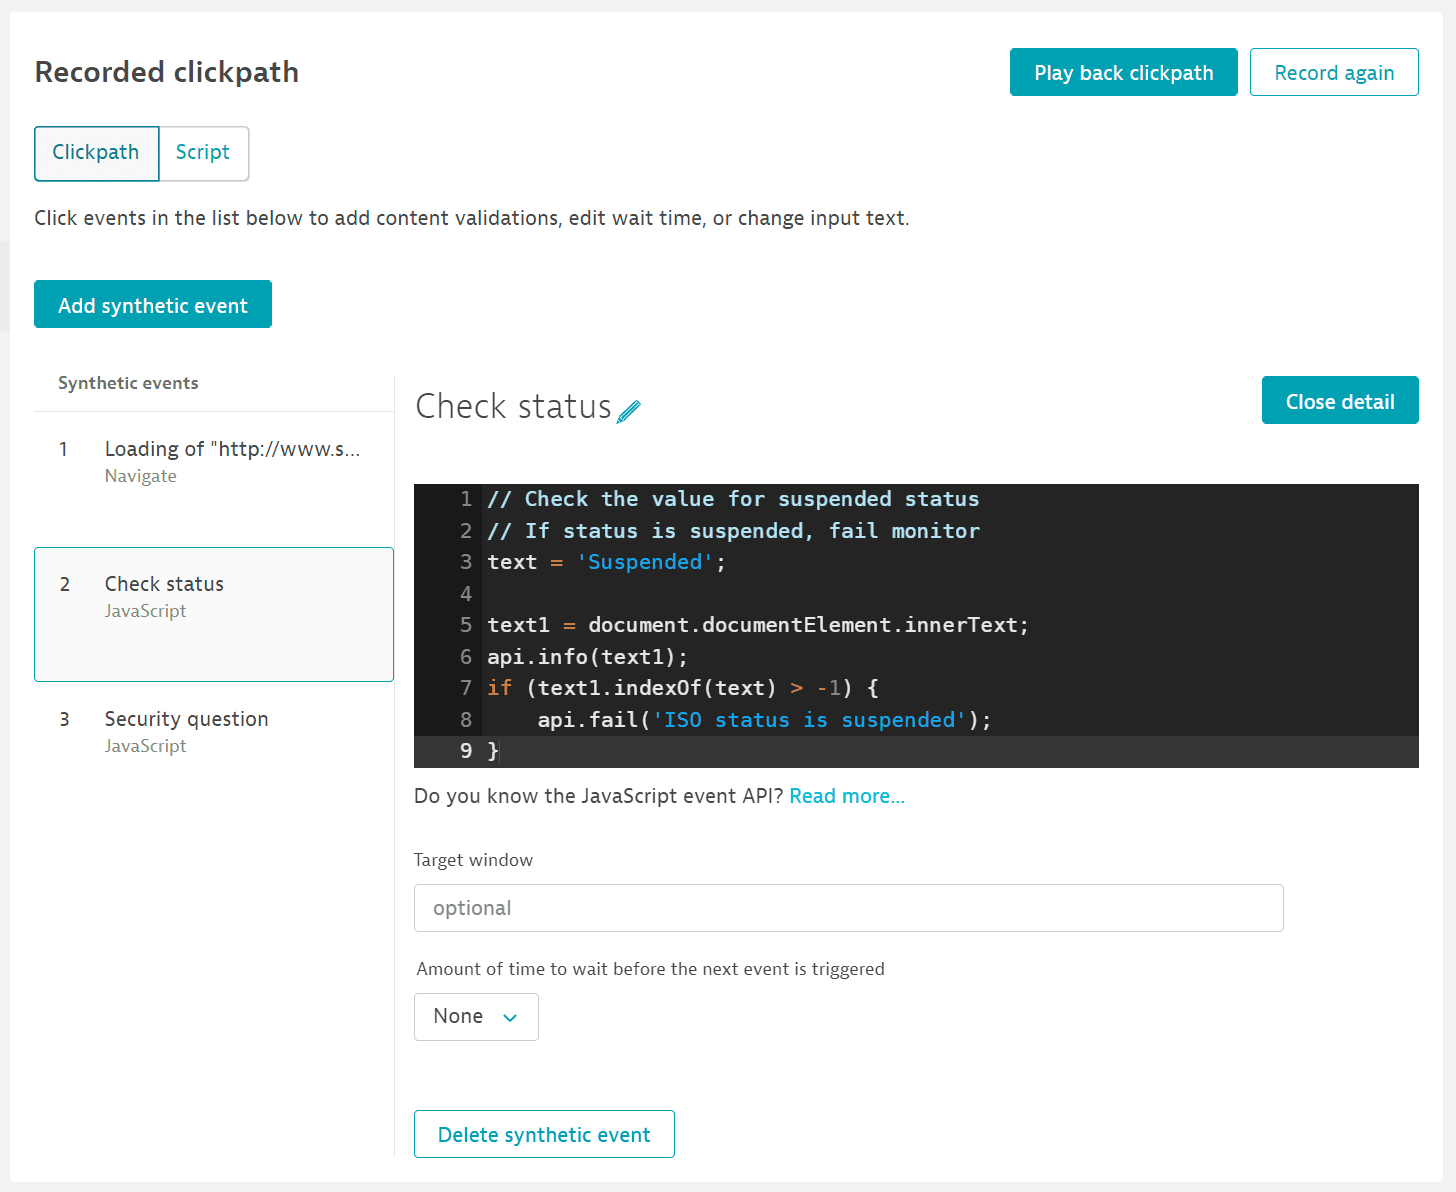
When adding events manually or editing a clickpath, you can add a JavaScript event as the first event of the monitor for such use cases as fetching a credential from the credential vault and setting a variable for use in the Navigate event URL. This feature requires ActiveGate version 1.225 and Chromium version 88+ on private Synthetic locations.
Navigate events can be preceded only by one or more JavaScript events; a clickpath requires at least one Navigate event.
If you re-record your clickpath from scratch (by selecting Record again > From the beginning of the clickpath), any JavaScript events that precede the first Navigate event will be erased. You can retain your initial JavaScript events by opting to record after them (After event > Select event).
JavaScript event API
The JavaScript event offers a basic API for the following operations.
Store and retrieve values across monitor events
api.setValue(key, value)—Sets avaluefor thekey. Use a separate instance ofapi.setValue()for each key-value pair you wish to specify.api.getValue(key)—Gets the value of thekeypreviously set byapi.setValue().api.getValues()—Returns an object holding the key-value pairs that were previously set byapi.setValue().
Variables can be passed only in the context of a single execution of browser clickpath. You also need to make sure that when you refer to a variable, the data behind it is logically available to the monitor.
After you set a global variable using the api.setValue() method, you can subsequently apply its value using the {variable_name} convention with api.getValue() or api.getValues(). You can also apply the value in subsequent browser clickpath configuration fields using the {variable_name} convention. The UI informs you whenever this is possible.
Variable and key names have a 100-character limit. Global variable values have a 5000-character limit.
Mark events as failed or finished
api.fail(message)—Marks the request as failed, providing themessageas the reason, and marks the monitor execution as failed.messageappears as the Failure reason for the execution in the Multidimensional analysis page. Themessageparameter has a 200-character limit.api.finish()—Finishes the JavaScript event so that the next event is executed.api.startAsyncSyntheticEvent()—Causes the JavaScript event to wait for a later call ofapi.finish()orapi.fail()to end it. As the use of this method overrides the wait condition, we recommend setting the wait time to None.
Skip clickpath events
These methods skip events after completion of the current event.
api.skipNextSyntheticEvent()—Skips execution of the next event.api.skipNextSyntheticEvents(n)—Skips execution of the nextnconsecutive events.api.skipSyntheticEvent(eventIndex)—Skips execution of the event with the indexeventIndex. Event index numbers start at1and match the event numbers displayed in the web UI.api.skipSyntheticEvents(eventIndexes)—Skips execution of multiple events; the arrayeventIndexesspecifies the indexes of events to skip, for example,api.skipSyntheticEvents([8, 9]).
Basic logging
api.info(message)—Logs amessageusing theinfolog level.api.warn(message)—Logs amessageusing thewarninglog level.api.error(message)—Logs amessageusing theerrorlog level.
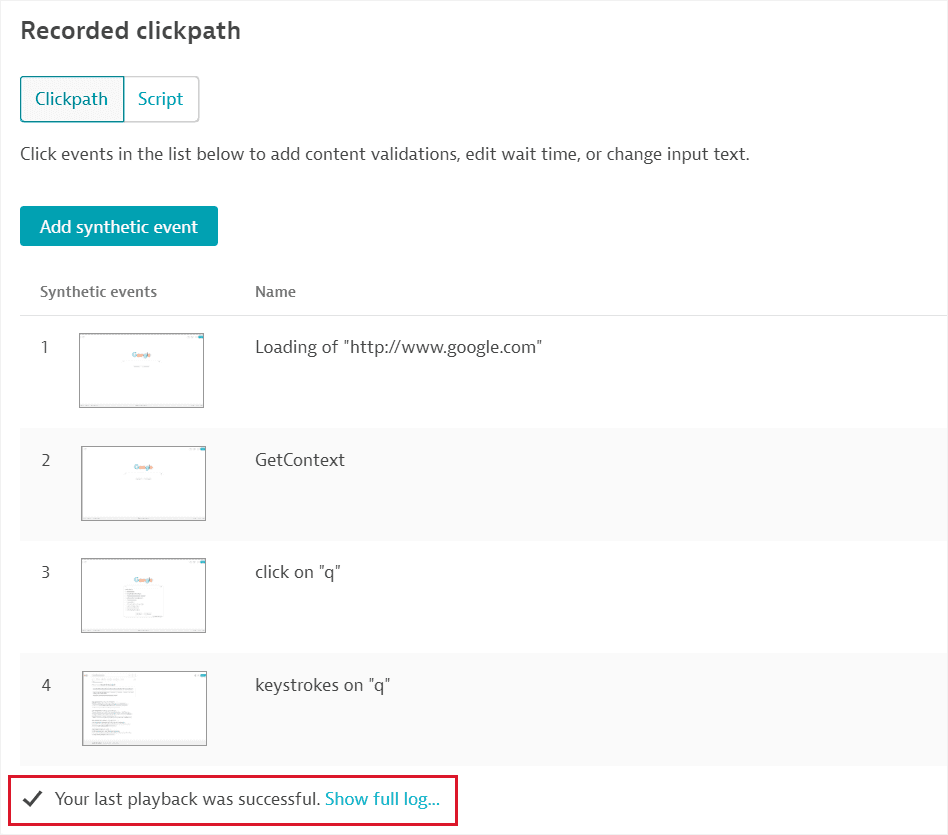
The message parameter has a 200-character limit. After local playback, logging appears at the bottom of the Dynatrace web UI. Select Show full log as shown in the image below. When executing monitors from private Synthetic locations, log lines (with the [CUSTOM] prefix) can be found in the VUC test execution file.
Retrieve data
-
api.getCredential(id, type)—Retrieves a credential value, given the credential ID (id) and (type), which can beusername,password, ortoken. You must provide the exact value of one of the autocomplete suggestions for the credential ID; using dynamic identifiers like variables is not supported. The list consists of only those credentials to which you have access.Requires ActiveGate version 1.212+ for private Synthetic locations.
As a security best practice, we recommend that you use only dedicated test credentials for synthetic monitors.
-
api.getContext().locationapi.getContext().location.name—Returns the name of the private or public location from where the monitor is executed. This is helpful when applying conditional logic such as displaying localized pages or using different login information per location.api.getContext().location.cloudPlatform—Returns the name of the cloud platform on which a public Synthetic location is deployed.
During local playback, properties of the context are undefined. We recommend setting a default value to cover this scenario.
Examples
Example 1 - Generate and set a dynamic email address for monitoring a sign-up process.
var email = 'synthetic' + Date.now() + '@example.com';api.setValue('email', email);document.getElementById('email').value = email;
Example 2 - Get a random first name / last name from an API endpoint and set it during a sign-up process.
api.startAsyncSyntheticEvent();fetch('https://randomuser.me/api/').then((resp) => resp.json()).then(function(data) {document.getElementById('firstName').value = data.results[0].name.first;document.getElementById('lastName').value = data.results[0].name.lastname;api.finish();}).catch(function(error) {api.fail('Fetch request to randomuser.me failed');});
Example 3 - Use the cloud platform vendor to differentiate between locations with the same name.
if (api.getContext().location.name === "Sydney" &&api.getContext().location.cloudPlatform === "AWS") {document.getElementById("linkAustraliaAWS").click();}if (api.getContext().location.name === "Sydney" &&api.getContext().location.cloudPlatform === "Alibaba") {document.getElementById("linkAustraliaAlibaba").click();}
Example 4 - Use a different user ID based on the monitor location.
In this example, a user ID is set in the JavaScript event and stored in a global variable for use later within brackets ({}) in a field or by calling api.getValue(). As an alternative to setting a variable for the user ID, you may also insert a credential from the credential vault.
//Default value for the user ID in case a location not defined below is usedvar userid_by_loc = "ValueDoesNotExist";try {//Get the location namevar loc = api.getContext().location.name;api.info("Location Name is: " + loc);//Get the cloud platform the location is hosted invar platform = api.getContext().location.cloudPlatform;api.info("Cloud Platform is: " + platform);//Set the user ID per locationif ((loc.indexOf("Los Angeles") >= 0) && (platform.includes("Google Cloud") >= 0)) {userid_by_loc = 'LA_User';} else if ((loc.indexOf("Oregon") >= 0) && (platform.includes("Google Cloud") >= 0)) {userid_by_loc = 'Oregon_User';} else if ((loc.indexOf("Chicago") >= 0) && (platform.includes("Azure") >= 0)) {userid_by_loc = 'Chicago_User';}} catch (err) {api.info("Error message: " + err.description);}//Set a global variable to store the user ID that has been set and use laterapi.setValue("UserID", userid_by_loc);
Cookie
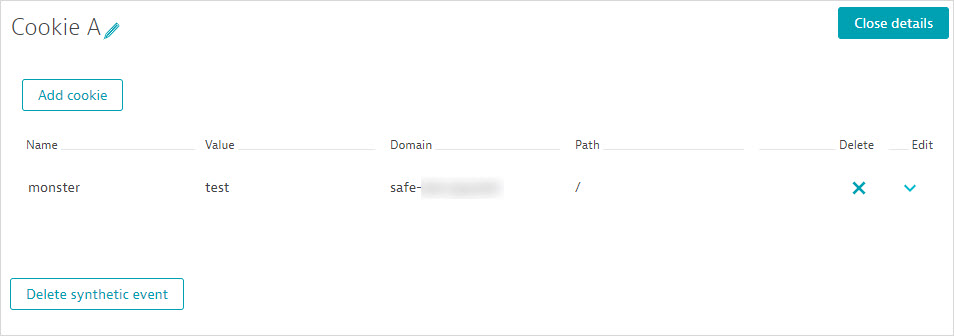
Cookies enable you to store browser state information on the client side so that each monitor execution is based on the same state and you can accurately monitor a performance baseline.
You can set cookies in Additional options when creating a browser monitor or in Advanced setup in monitor settings in edit mode. These cookies are valid for the entire monitor execution. If you want to set cookies only for a specific portion of your clickpath, use the Cookie event.
In edit mode, enable Set cookies, then provide a Name and cookie Value. Every cookie must be unique within the list.
The following symbols are not allowed in the cookie value: ;,\". Provide the Domain of the cookie, and optionally, the Path to the cookie. Save your cookie.
Select Add cookie to define additional cookies.
Common controls
This section describes controls that are common to several event types.
Amount of time to wait before the next event is triggered
While Dynatrace automatically selects an appropriate wait time for each event, you can customize this setting to define how long Dynatrace should wait before the next event is executed.
-
None
-
Wait for page to load completely waits for network activity to be completed after the load event is triggered. This is the default wait time (60 seconds) used when loading a new page.
-
Wait for specific period of time allows you to specify the number of seconds that Dynatrace should wait between this event and the next.
-
Wait for background network activity to complete waits for all network activity to be complete following the event. This is the default wait time used for XHRs and interactions within single-page applications.
This option is not available for Navigate events.
-
Wait for specific element to appear allows you to wait for a specific HTML element on the page by specifying the CSS or DOM locator for the element. You can also specify the text to validate against in the element, and a timeout for locating the element.
-
Wait for next event waits until one of the locators of the next event is found. This is the same as Wait for specific element to appear but automatically uses the locators of the next event.
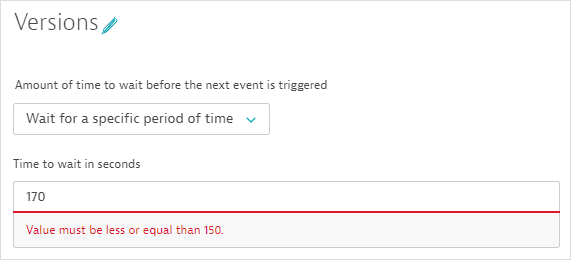
Be sure to specify a wait time that does not exceed the programmed timeout values for browser clickpaths (see below). A problem will be generated if these timeouts are exceeded.
- Script timeout:
5 minutes - Event timeout:
60 seconds
These timeouts cannot be changed in the Dynatrace web UI. However, you can use the PUT configuration method request of the Synthetic configuration API v2 to change browser monitor timeouts across your environment for execution on private locations, local playback, and wait times. The image below shows a Navigate event after the global timeout has been changed via API from 60 seconds to 150 seconds.
Validate content
Content validation helps to verify that your browser monitor loads the expected page content or element. Validations are performed through validation rules: Select Add custom content validation to define a validation rule.
In browser clickpaths, you define validations for each event; for single-URL monitors, which contain a single event, you define validation for the monitor as a whole.
Validation is performed after following all redirects, even if the very first response delivers HTML content.
You can validate based on specific text on a webpage, a specific element, text included within an element, or text in the DOM or any resource. You can opt to pass or fail your monitor/event based on your validation criteria. If pass criteria are not met (or fail criteria are met), the monitor/event fails and the execution is aborted.
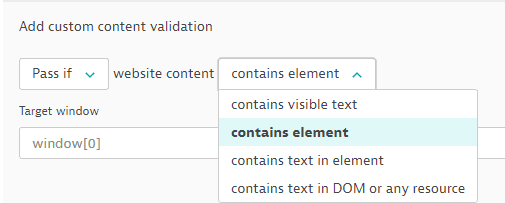
Target window defines the tab in which the text/element is found. window[0] is the first tab opened and window[1] represents the second tab. It can also be window[N].frames[X] where X is a number of the iframe that is displayed on the page in tab N. Frames can also be chained, where window[N].frames[X].frames[Y] means that elements with given locators are within frame Y, which is within frame X on tab N.
You can also use a placeholder in the Target window value, for example, window[0].frames[{index}], where {index} is a variable defined earlier using the api.setValue() method in a JavaScript event.
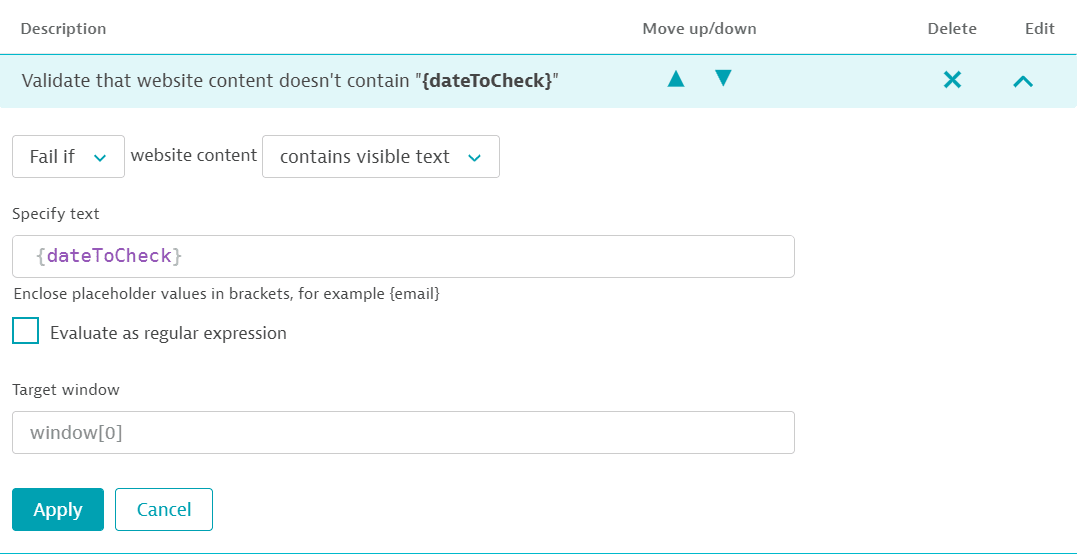
If your validation is based on visible text (contains text), text found in a specific element (contains text in element), or markup text in the DOM or a resource (contains text in DOM or any resource), you need to Specify text (not case sensitive). Enclose placeholder values in brackets, for example, {email}. Optionally, you can specify text as a regular expression (Evaluate as regular expression).
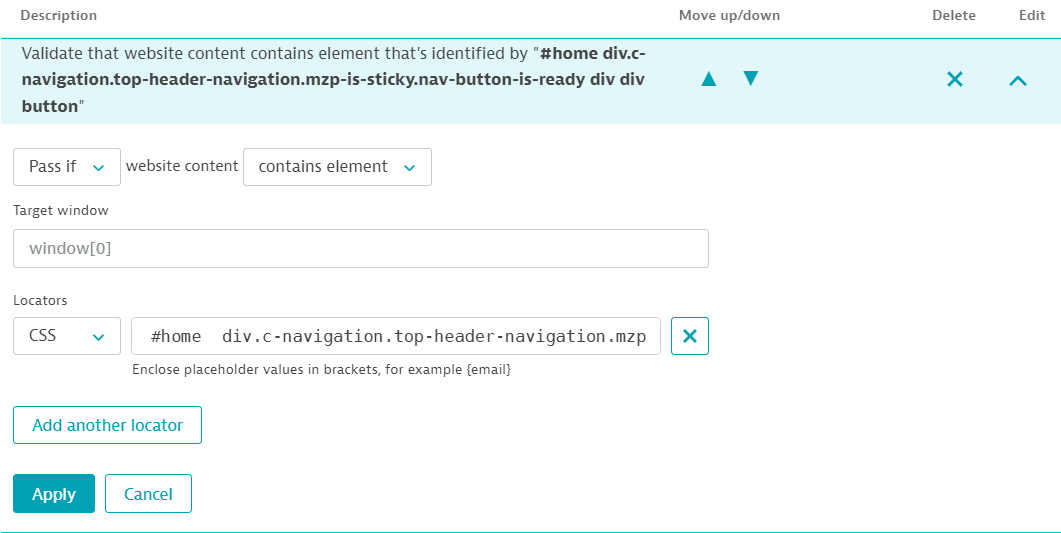
If your validation searches for an element (contains element) or text found in a specific element (contains text in element), you need to specify the CSS selectors or DOM locators to use during replay: Select Add locator, then select DOM or CSS, and provide the locator reference. When pasting the locator string, be sure to remove any > characters.
You can add and reorder as many locators as you like. Validation is performed in the order you define till a locator is matched.
You can add and reorder more than one validation to an event/monitor. Validation is performed in the order you define; if any of the rules fail, the monitor fails.
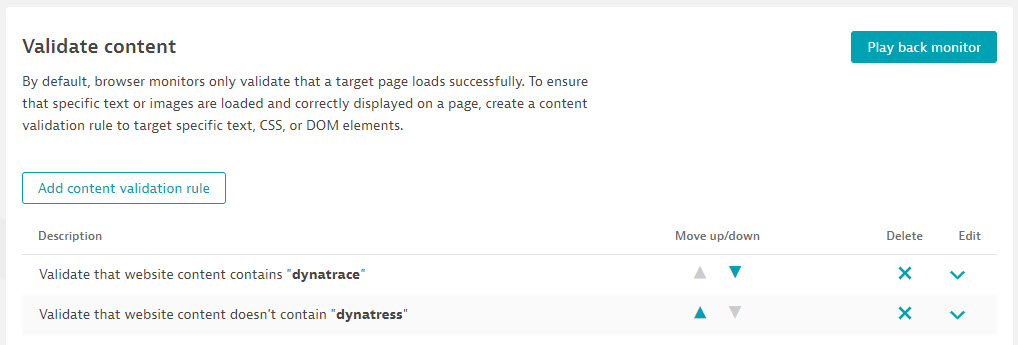
Example 1 - Content validation based on visible text
Select contains visible text and provide the text to look for (the string is not case sensitive). This text must be visible on the webpage. Determine whether the monitor should fail or pass based on the provided text. In the example below, the monitor is set to fail if the text in a placeholder (specified earlier in the script) is found.
Example 2 - Content validation based on an element
Select contains element. You need to provide the locator for the element you wish to validate.
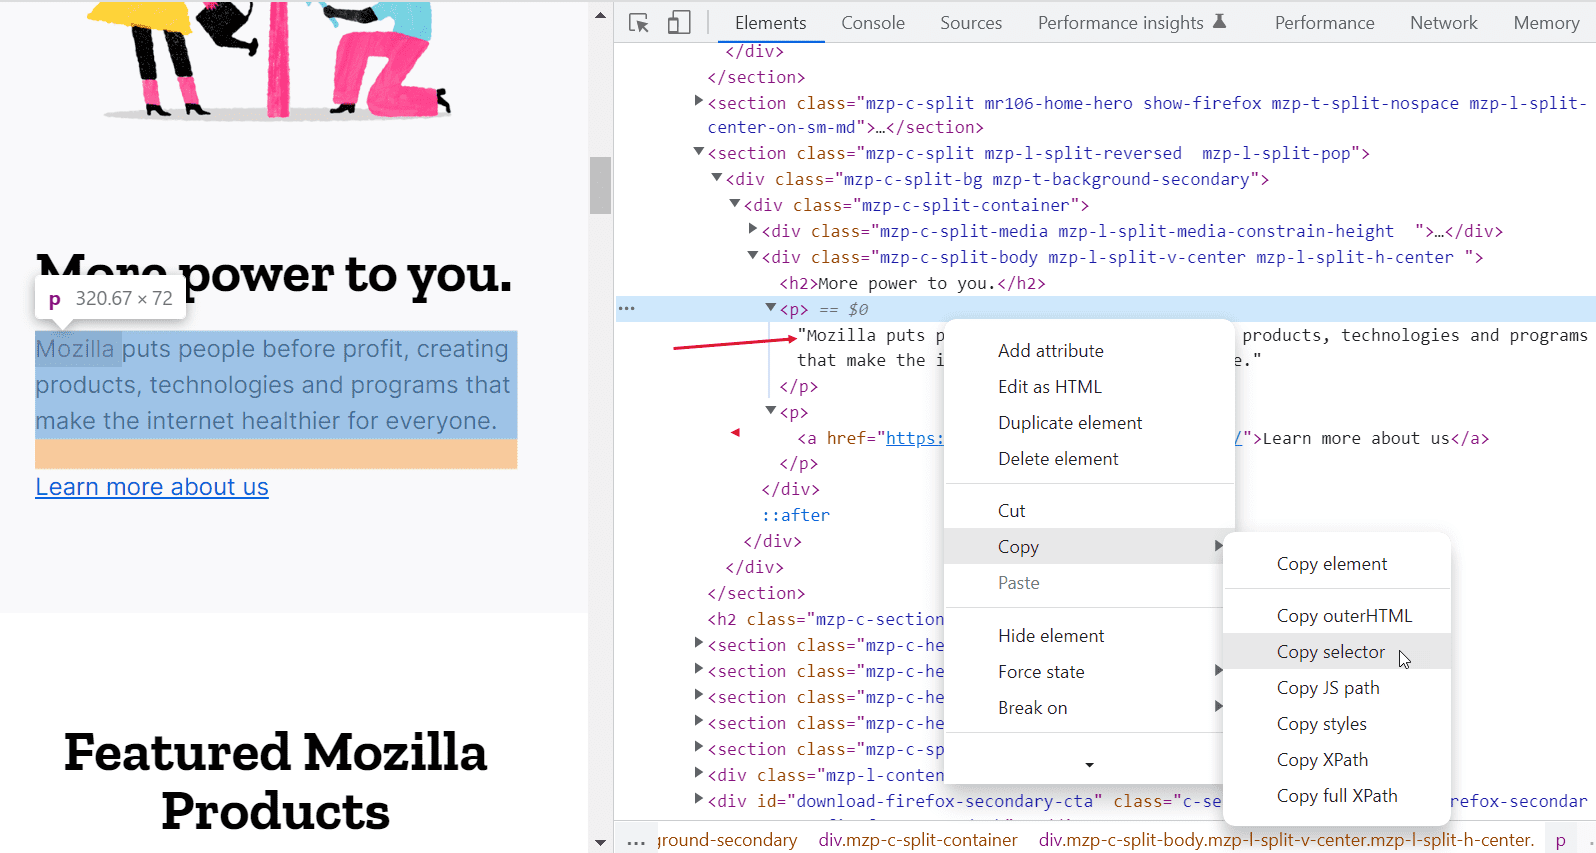
To find the locator, open developer tools for your webpage (right-click > Inspect). Right-click the element you're interested in and select Copy > Copy selector. Then paste the CSS selector, making sure to remove any > characters.
The example below shows a validation rule based on the presence of an element.
Example 3 - Content validation based on text in an element
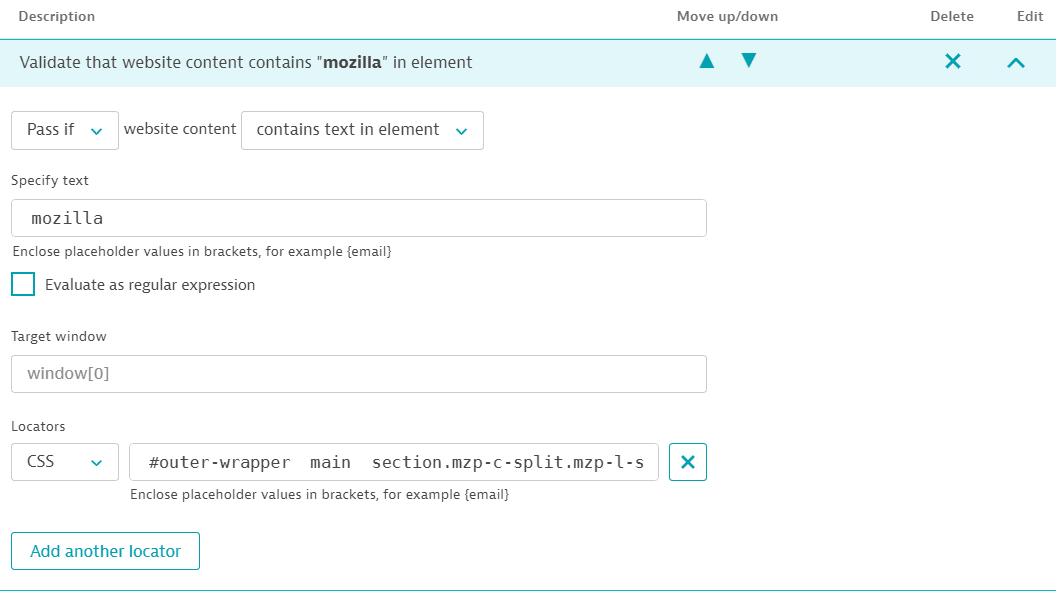
Select contains text in element. In addition to the text string to identify, you need to provide the locator for the element containing the text. The string doesn't need to be visible on the webpage but must be part of the text between the opening and closing tags of an element; the string cannot contain attribute names or values.
To find the locator, open developer tools for your webpage. Right-click the element you're interested in and select Copy > Copy selector. Then paste the CSS selector, making sure to remove any > characters.
The screenshots below show a specific element containing the text Mozilla in developer tools and the corresponding validation rule in a browser monitor.
Example 4 - Content validation based on DOM or resource text
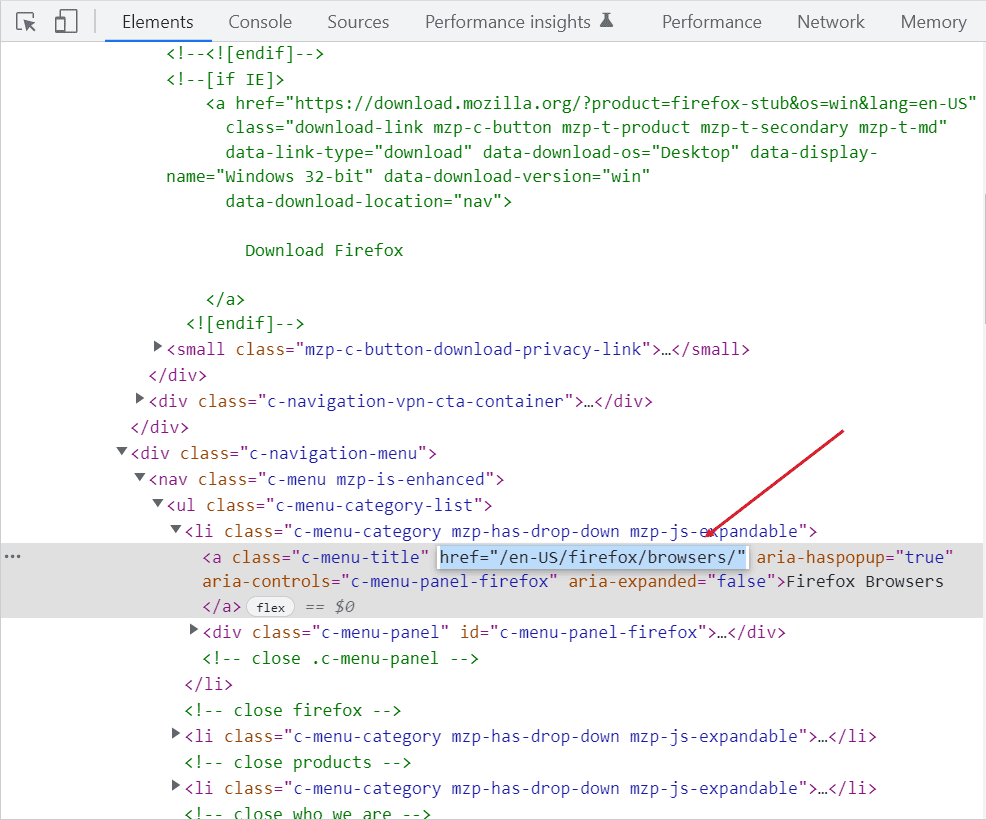
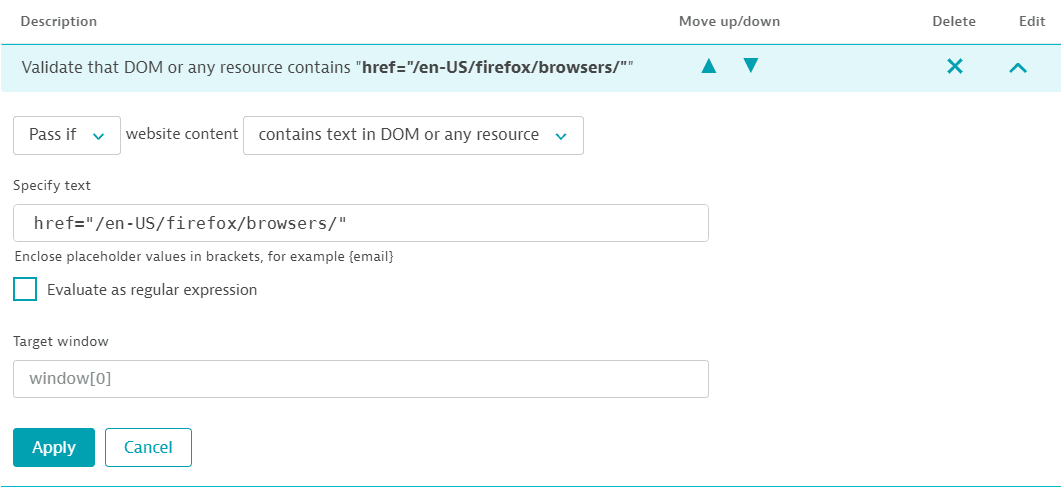
Select contains text in DOM or any resource to validate content based on any string in the DOM, including comments and attribute names and values.
To find your string, open developer tools for your webpage. Copy the text you wish to validate and paste it in the validation rule.
The screenshots below show the attribute and value for a destination URL (href="/en-US/firefox/browsers/") selected in the DOM. The selected string is used as validation text for a browser monitor.
Edit element locators
This control is available in Click, Tap, Keystroke, and Select option events.
When one of the above events in your clickpath targets a specific element on a webpage, you can view and edit the element locators in either DOM or CSS format. Locators help Dynatrace identify the element during playback. We might capture multiple locators to make sure the element is found even if some parts of the page code (such as names or IDs) change. In most cases, we capture CSS locators. Locators are evaluated sequentially; if the first locator isn't found, the second is evaluated, and so on until there's a match.
Select Add locator, then select DOM or CSS, and provide the locator reference. See DOM locator format below for more information on specifying DOM locators.
You can add as many locators as you like. You can also edit or delete any existing locators for your element.
Target window defines the tab in which the text/element is found. window[0] is the first tab opened and window[1] represents the second tab. It can also be window[N].frames[X] where X is a number of the iframe that is displayed on the page in tab N. Frames can also be chained, where window[N].frames[X].frames[Y] means that elements with given locators are within frame Y, which is within frame X on tab N.
You can also use a placeholder in the Target window value, for example, window[0].frames[{index}], where {index} is a variable defined earlier using the api.setValue() method in a JavaScript event.
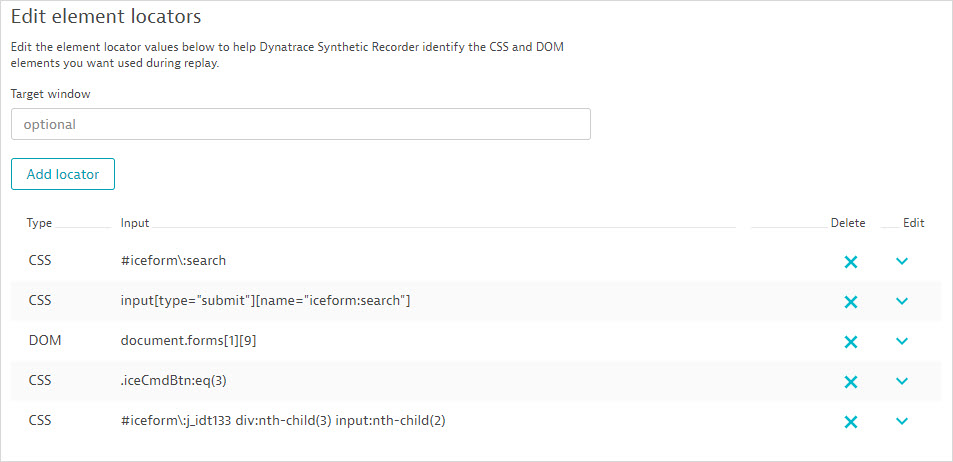
DOM locator format
Dynatrace version 1.292+
You might prefer to set up advanced, custom DOM locators for your elements. The rules below define the supported format when using JavaScript in DOM locators to access elements on a webpage. These rules are necessitated by the transition of the Dynatrace Synthetic Recorder (a Google Chrome browser extension) to Manifest Version 3 (MV3), which is the latest iteration of the Chrome extension platform.
-
To identify an element, you can do either of the following.
-
Begin the DOM locator with
document..document.forms[0][1].options[0]document.getElementById('adminusername')document.querySelector("body > div.vf-body-container > div > div > section > flows").shadowRoot.querySelectorAll("#postalTown")[1]For example,
document.getElementById('adminusername')is a way to access the element by element ID;getElementByIdis a method ofdocument. -
Use a valid JavaScript global variable name at the beginning of your DOM locator to access an element directly by its ID. The variable name should contain a link to the element with the corresponding ID. For example, for the element
<div id="EmailAddress"></div>, you can specify the following DOM locator.EmailAddress
-
-
XPath expressions are supported.
Your DOM locator beginning with
document.can contain an XPath expression in thexpathExpressionparameter of theevaluate()method. In the example below, the XPath expression is'//form[@id=\\'ctl00\\']/div[4]/div[3]/span'.document.evaluate('//form[@id=\\'ctl00\\']/div[4]/div[3]/span', document, null, XPathResult.ANY_TYPE, null).iterateNext() -
The DOM locator should be a chain (sequence) of method calls, properties, or index signatures, as shown in the examples below.
document.method().method1()document.method().prop['2565']document.method( 11 , 'erert','123')document.getElementById('deviceList').querySelectorAll('a')[0] -
Method call arguments can be any of the following; see the examples that follow.
- Double-quoted or single-quoted strings
- Numbers
nullundefineddocumentXPathResult.*
document.method("str1")document.method('str2', null)document.method(undefined, document)document.method(XPathResult.ANY_TYPE) -
Javascript computations are not supported inside DOM locators.
// Not supporteddocument.forms[1+2] -
Javascript global variables are not supported inside DOM locators.
// Not supported, where someVar is a global variabledocument.querySelector(someVar)
Related topics
 Synthetic Classic