AWS PrivateLink
- How-to guide
- 10-min read
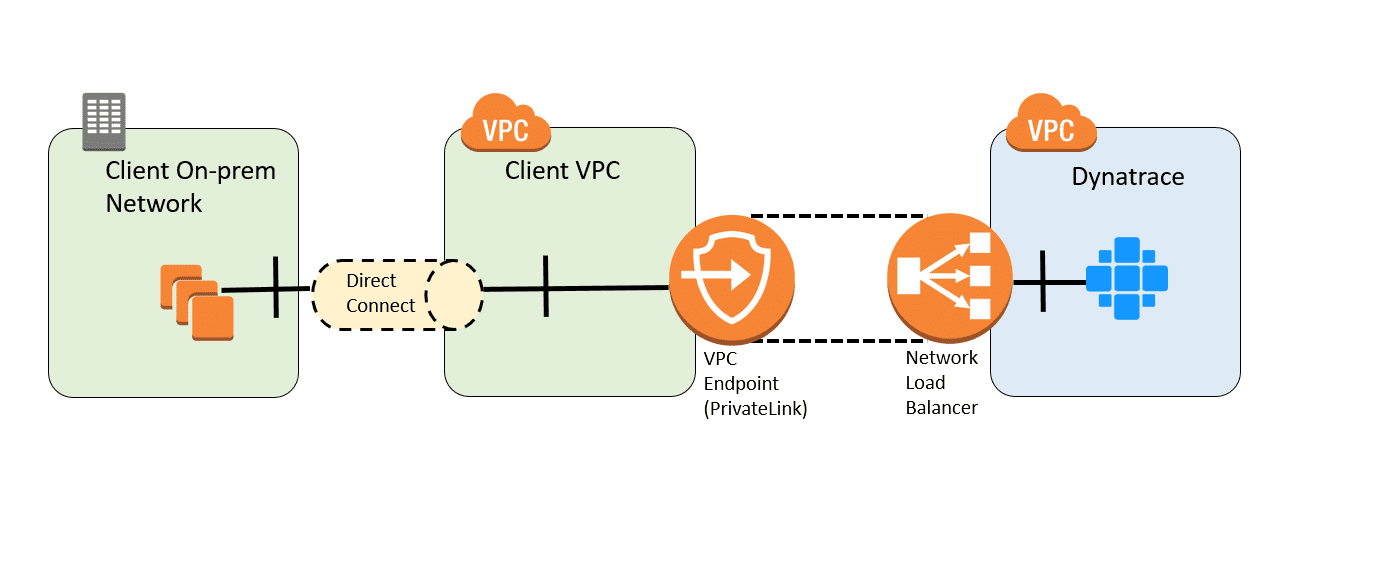
AWS PrivateLink lets you connect your applications directly to the Amazon VPC service, so that traffic never leaves the AWS cloud. You can use PrivateLink to connect your monitored hosts to the Dynatrace VPC (Virtual Private Cloud) endpoint. Dynatrace monitoring traffic is always encrypted and secure, yet PrivateLink provides even greater security, stable connectivity, and a reduction in traffic costs.
Use cases
The primary use case for PrivateLink with Dynatrace is connectivity for monitored applications running in AWS VPCs. Dynatrace will not use Interface VPC endpoints to access Amazon CloudWatch and services such as EC2 or ELB.

However, it’s also possible to use AWS VPCs for on-premises applications, provided that you use DirectConnect or VPN Gateway to connect your network to a VPC in a given region.

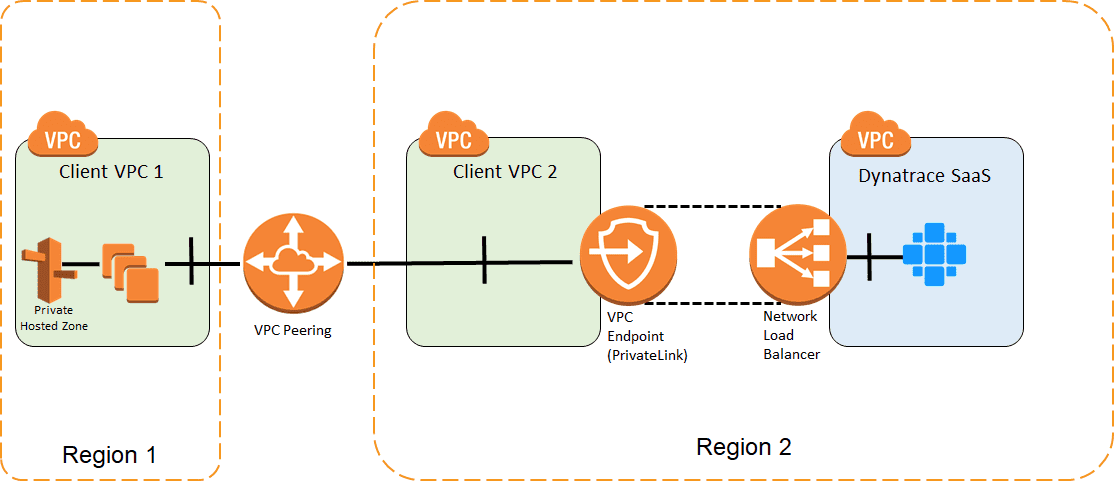
The interface VPC Endpoint (PrivateLink) must be created in the VPC that's located in the same region as the Dynatrace environment. However, you can still monitor hosts running in a different VPC, including a VPC located in a different region.

For more information, see VPCs in different AWS Regions
Set up PrivateLink
Dynatrace API provides you with the endpoint that enable you to set up your PrivateLink without assistance from Dynatrace. Set up the PrivateLink connection in these steps:

Add your AWS account to the allowlist

Get VPC Endpoint service name

Create VPC Endpoint

Override the DNS name of your Environment

Enable PrivateLink communication
Also see the following sections:
Prerequisites
Before you begin, make sure you have the following:
-
Your Environment ID
-
Your AWS account ID
-
API token with the following permissions assigned:
- Write configuration (
WriteConfig). Necessary to add AWS an account ID to your environment allowlist for the AWS PrivateLink connection, and to enable PrivateLink communication. - Read configuration (
ReadConfig). Necessary to get the AWS PrivateLink configuration, including the VPC Endpoint service name.
- Write configuration (
 Add your AWS account to the allowlist
Add your AWS account ID to your Environment allowlist for AWS PrivateLink connection. Use the Dynatrace AWS PrivateLink API. For example, run the following call:
curl -X PUT "https://{EnvId}.live.dynatrace.com/api/config/v1/aws/privateLink/allowlistedAccounts/{AwsId}" \-H "accept: application/json; charset=utf-8" \-H "Authorization: Api-Token {ApiToken}" \-H "Content-Type: application/json; charset=utf-8" -d "{\"id\":\"{AwsId}\"}"
Replace:
{EnvId}with your Environment ID{AwsId}with your AWS account ID{ApiToken}with the API token
After a successful call, Dynatrace API returns the following response where 123456789012 is your AWS Account ID:
HTTP 201{"id": "{123456789012}"}
 Get VPC Endpoint service name
You'll need the VPC Endpoint service name for your Dynatrace Environment when you create the VPC Endpoint for your connection. Run the following Dynatrace API call to determine the VPC Endpoint service name:
curl -X GET "https://{your-environment-id}.live.dynatrace.com/api/config/v1/aws/privateLink" \-H "accept: application/json; charset=utf-8" \-H "Authorization: Api-Token {ApiToken}"
For more information, see AWS PrivateLink API - GET configuration.
After a successful call, Dynatrace API returns the following response containing the VPC Endpoint service name for your Environment. Note it down as you'll need it when creating the stack. The VPC Endpoint service name doesn't change, so you need to perform this action once.
HTTP 200{"enabled": false,"vpcEndpointServiceName": "com.amazonaws.vpce.us-west-2.vpce-svc-12a34bc5defgh678i"}
 Create VPC Endpoint
Create an interface VPC Endpoint for one of the supported Regions using either the AWS console or an API call. For more information, see Interface VPC Endpoints (AWS PrivateLink) in the AWS doc.
Dynatrace currently supports the following AWS Regions and corresponding availability zones:
| AWS Region code | Availability zone IDs |
|---|---|
| ap-northeast-1 | apne1-az1, apne1-az2, apne1-az4 |
| ap-south-1 | aps1-az1, aps1-az2, aps1-az3 |
| ap-southeast-1 | apse1-az1, apse1-az2, apse1-az3 |
| ap-southeast-2 | apse2-az1, apse2-az2, apse2-az3 |
| ca-central-1 | cac1-az1, cac1-az2, cac1-az4 |
| eu-central-1 | euc1-az1, euc1-az2, euc1-az3 |
| eu-west-1 | euw1-az1, euw1-az2, euw1-az3 |
| eu-west-2 | euw2-az1, euw2-az2, euw2-az3 |
| il-central-1 | ilc1-az1, ilc1-az2, ilc1-az3 |
| sa-east-1 | sae1-az1, sae1-az2, sae1-az3 |
| us-east-1 | use1-az2, use1-az4, use1-az6 |
| us-west-2 | usw2-az1, usw2-az2, usw2-az3 |
- In the AWS console, select one of the supported regions, go to VPC service, section Endpoint, and click Create Endpoint to create your PrivateLink endpoint.
- Select Find Service by name as the service category, enter the service name you determined in the previous step (for example
com.amazonaws.vpce.us-west-2.vpce-svc-12a34bc5defg678ij) and click Verify. - Configure the VPC, subnets, and security group settings. The security group needs to permit incoming traffic on port 443. If you use more than one VPC for your monitored applications, repeat this step for each VPC.
 Override the DNS name of your Environment
Create a private DNS so that you can transparently connect to Dynatrace using the PrivateLink you’ve created using the CloudFormation template below. See Creating a Stack on the AWS CloudFormation Console in the AWS doc for more information.
-
Determine the VPC Endpoint DNS name and its Hosted Zone ID to be used as a stack parameters. In the AWS Management console, go to Networking & Content Delivery section > VPC > Endpoints where you should find the endpoint associated with a given service name. Select this endpoint and the details section will display DNS Names. The DNS Name is constructed as
VPC-Endpoint-DNS-name(Hosted-zone-ID).Use the first entry as the source for VPC Endpoint DNS name and its Hosted Zone ID.
-
Select the stack template. Use the file hosted on Dynatrace GitHub as the stack template.
-
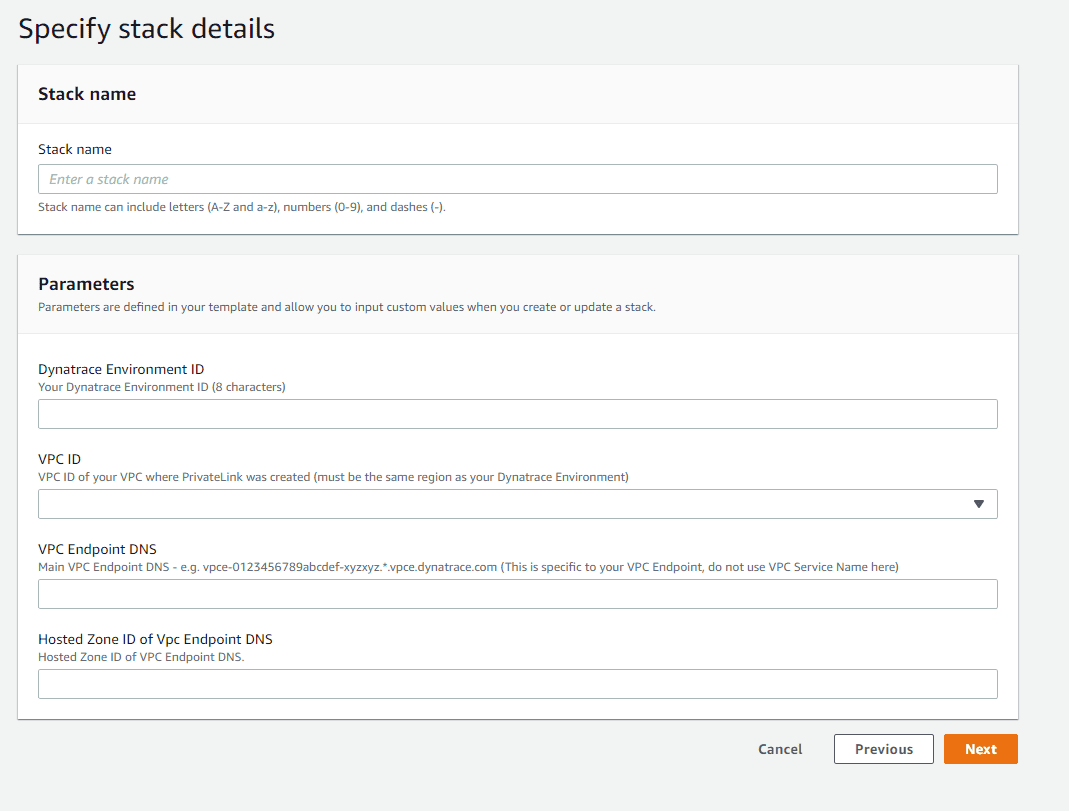
Specify stack parameters. In the Specify stack details page, provide the following parameters you determined earlier:
- Your Dynatrace Environment ID
- VPC ID - the identifier of the VPC where you created the VPC endpoint
- VPC Endpoint DNS name
- Hosted Zone ID of VPC Endpoint DNS

-
Click Next to go to Options, click Next step to review your stack, click Create stack to launch the stack running your private DNS.
 Enable PrivateLink communication
Use AWS PrivateLink API to enable the PrivateLink communication. Enabling PrivateLink communication on your Environment makes OneAgents and Environment ActiveGates use only the domain you defined in Step 4 to connect to the service and won’t try to discover alternative endpoints for the connection. A limited number of endpoints will be used by all OneAgents and environment ActiveGates. However, only in combination with DNS override will it result in the actual connection via PrivateLink. Run the following Dynatrace API call:
curl -X PUT "https://{EnvId}.live.dynatrace.com/api/config/v1/aws/privateLink" \-H "accept: application/json; charset=utf-8" \-H "Authorization: Api-Token {ApiToken}" \-H "Content-Type: application/json; charset=utf-8" \-d "{\"enabled\":true}"
Replace:
{EnvId}with your Environment ID{ApiToken}with the API token
After a successful call, Dynatrace API returns the HTTP 204 code.
VPCs in different AWS Regions
If you monitor hosts from a VPC located in a different region, Such a VPC can be connected using VPC peering, Transit Gateway or VPN Gateway. Note that the DNS override must be present in every VPC that has hosts monitored by Dynatrace.
Create a Private Route 53 Hosted Zone in each VPC, or associate all the VPCs with a single private hosted zone.
For example, you have a Dynatrace environment in Sydney, that is the ap-southeast-2 region, but the monitored hosts are running in a VPC in Tokyo, ap-northeast-1 region.
In order to connect Dynatrace OneAgents via PrivateLink you need to perform the following steps:
- Make sure you have a VPC configured in Sydney.
- Create an interface VPC Endpoint in the Sydney VPC.
- Establish an inter-region VPC peering between the Tokyo and Sydney VPCs.
- Create the CloudFormation stack based on a template obtained above with the DNS override for the Tokyo VPC.
You can use a single endpoint for multiple VPCs, but each VPC needs to be connected using the VPC-peering and needs a DNS override.
Use ActiveGate for PrivateLink connectivity
While you can connect OneAgent via PrivateLink, we recommend that you use an ActiveGate. If you download the OneAgent installer via ActiveGate, it already contains a pre-configured ActiveGate endpoint and doesn’t need connectivity to the PrivateLink endpoint. For example, if you have an environment called xyz12345.live.dynatrace.com and ActiveGate running in a local network at https://172.31.1.5:9999, modify the OneAgent installer download URL by replacing the environment domain with the ActiveGate domain and adding environment context in the path, for example:
wget --no-check-certificate -O Dynatrace-OneAgent-Linux.sh https://172.31.1.5:9999/e/xyz12345/api/v1/deployment/installer/agent/unix/default/latest?Api-Token=<api token>&arch=x86&flavor=default
The Dynatrace server must be aware of the ActiveGate at the time of OneAgent installer download.
Multi-environment ActiveGates
PrivateLink connectivity isn't supported by ActiveGates that are configured for multi-environment support. To use PrivateLink for multiple environments, each environment needs a dedicated Environment ActiveGate.
Verification of ActiveGate installer signature
Currently, there is no option for getting the public key for signature verification through PrivateLink. The key is accessible only publicly.
To verify the signature, use one of the following options:
-
Verify the signature from a host with internet access.
-
Download the key from Dynatrace, make it accessible to your hosts, and verify the signature offline.
Assuming that the public key (
dt-root.cert.pem) is in the same directory as the installer file, you can use this command:( echo 'Content-Type: multipart/signed; protocol="application/x-pkcs7-signature"; micalg="sha-256"; boundary="--SIGNED-INSTALLER"'; echo ; echo ; echo '----SIGNED-INSTALLER' ; cat Dynatrace-ActiveGate-Linux.sh ) | openssl cms -verify -CAfile dt-root.cert.pem > /dev/null
What happens next
Once you’ve completed these steps, all instances of ActiveGate or OneAgent installed in your VPC will begin using PrivateLink. Thanks to the DNS override, using PrivateLink is transparent. No process restart is required.
To verify that your PrivateLink endpoint is really used:
-
Try resolving your Dynatrace environment domain from an instance running in your VPC. The domain should resolve to a private IP addresses in your VPC, for example:
nslookup xyz12345.live.dynatrace.comcluster-us-west-2-prod-us-west-2-oregon.live.ruxit.com canonical name = vpce-0c79a2e58780e4b62-x8vhytdj.oregon-1.vpce.dynatrace.com.Name: vpce-0c79a2e58780e4b62-x8vhytdj.oregon-1.vpce.dynatrace.comAddress: 172.31.41.143Name: vpce-0c79a2e58780e4b62-x8vhytdj.oregon-1.vpce.dynatrace.comAddress: 172.31.28.144Name: vpce-0c79a2e58780e4b62-x8vhytdj.oregon-1.vpce.dynatrace.comAddress: 172.31.13.64 -
If the domain resolves to a public IP address, double-check your DNS and VPC configurations. The private DNS region (
EndpointRegion) and VPC ID (Vpcid) must match the corresponding instance settings. The VPC must also support privately hosted zones, soenableDnsHostnamesandenableDnsSupportmust be set totrue. -
If the domain name resolves as expected, but OneAgent can’t connect to the endpoint on port 443, check if incoming traffic on port 443 is permitted in the security group settings associated with your PrivateLink endpoint.
-
You can also enable VPC flow logs for the network interfaces of your instances or the network interfaces associated with PrivateLink. By checking the IP addresses in the logs, you can verify if an instance is communicating with a private endpoint. If you see
REJECTentries instead ofACCEPT, then most likely the traffic is blocked by your security group settings.