Synthetic app
- Latest Dynatrace
- App
- 7-min read
With the  Synthetic app you can create and manage synthetic monitors.
Prerequisites
Permissions
The following table describes the required permissions.
Installation
Make sure the app is installed in your environment.
Navigation and filtering
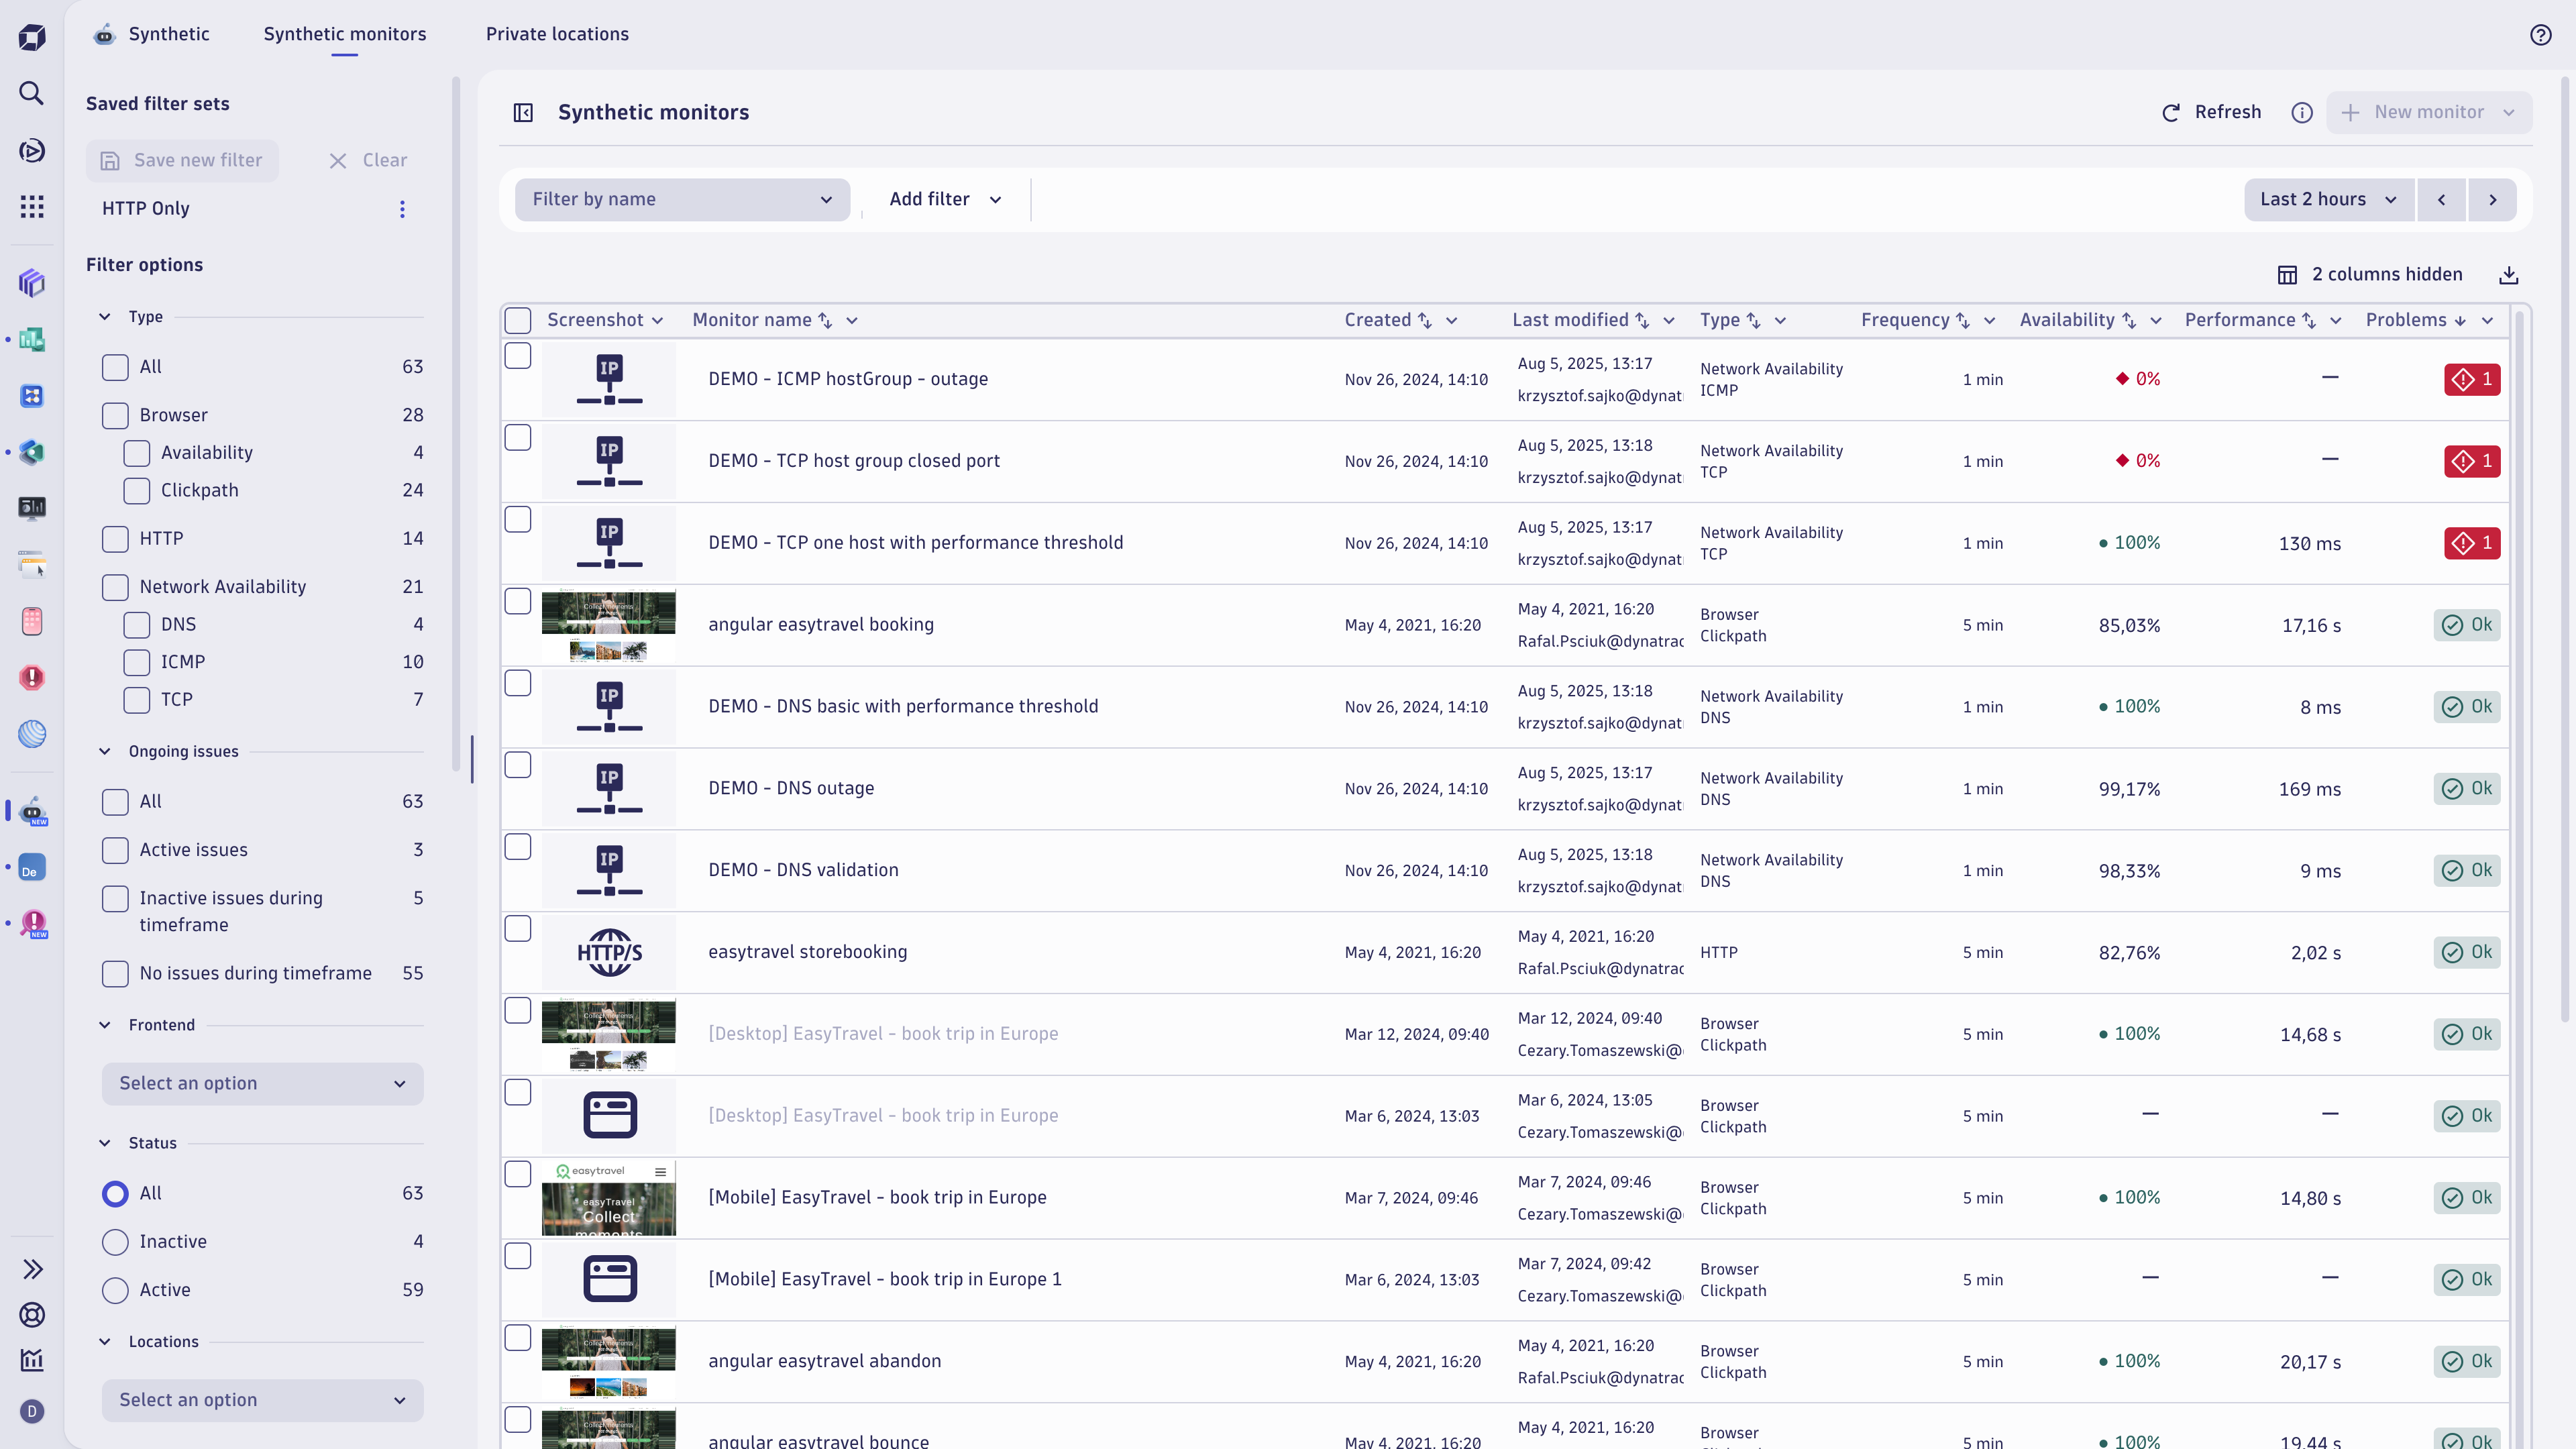
The synthetic monitors page is the landing page of the Synthetic app and is the control center for your synthetic monitors. By default, the page displays all monitors in your environment, active or inactive, in a table with key availability and performance results, so you can check the health of your monitors at a glance.
Powerful and flexible filters enable you to narrow your search for synthetic monitors.
To find out how to create a new monitor, see Create monitors.
Monitors table
By default, monitors with open problems (issues) are displayed alphabetically at the top of the table. Next, enabled monitors with no problems are displayed alphabetically, followed by disabled monitors displayed alphabetically.
You can hide and sort columns in ascending or descending order. Select Columns in the top-right corner of the table to select which columns to display or hide.
Pagination controls at the bottom of the monitor table allow you to specify the number of rows per page and to move through the monitor table from page to page.
The columns display the following information for each monitor.
- Monitor name—Select to view a quick overview of the monitor to the right of the Synthetic monitors page
- Created—monitor creation date and time
- Last modified—ID of the user who last edited the monitor and the date and time of modification
- ID - full monitor identifier
- Last execution—date and time of the most recent execution from any location
- Type—monitor type, for example,
HTTP - Frequency—execution frequency or
On demand, as specified in the monitor configuration - Availability—average availability during the selected timeframe
- Duration—average performance during the selected timeframe in seconds
Monitor preview
In the  Synthetic app, to display the preview panel for a monitor, select the monitor's name in the Monitor name column of the Synthetic monitors page.
To browse between your monitors, open the preview panel for any monitor and then select another monitor name to switch the preview to the newly selected monitor. Filters are persistent.
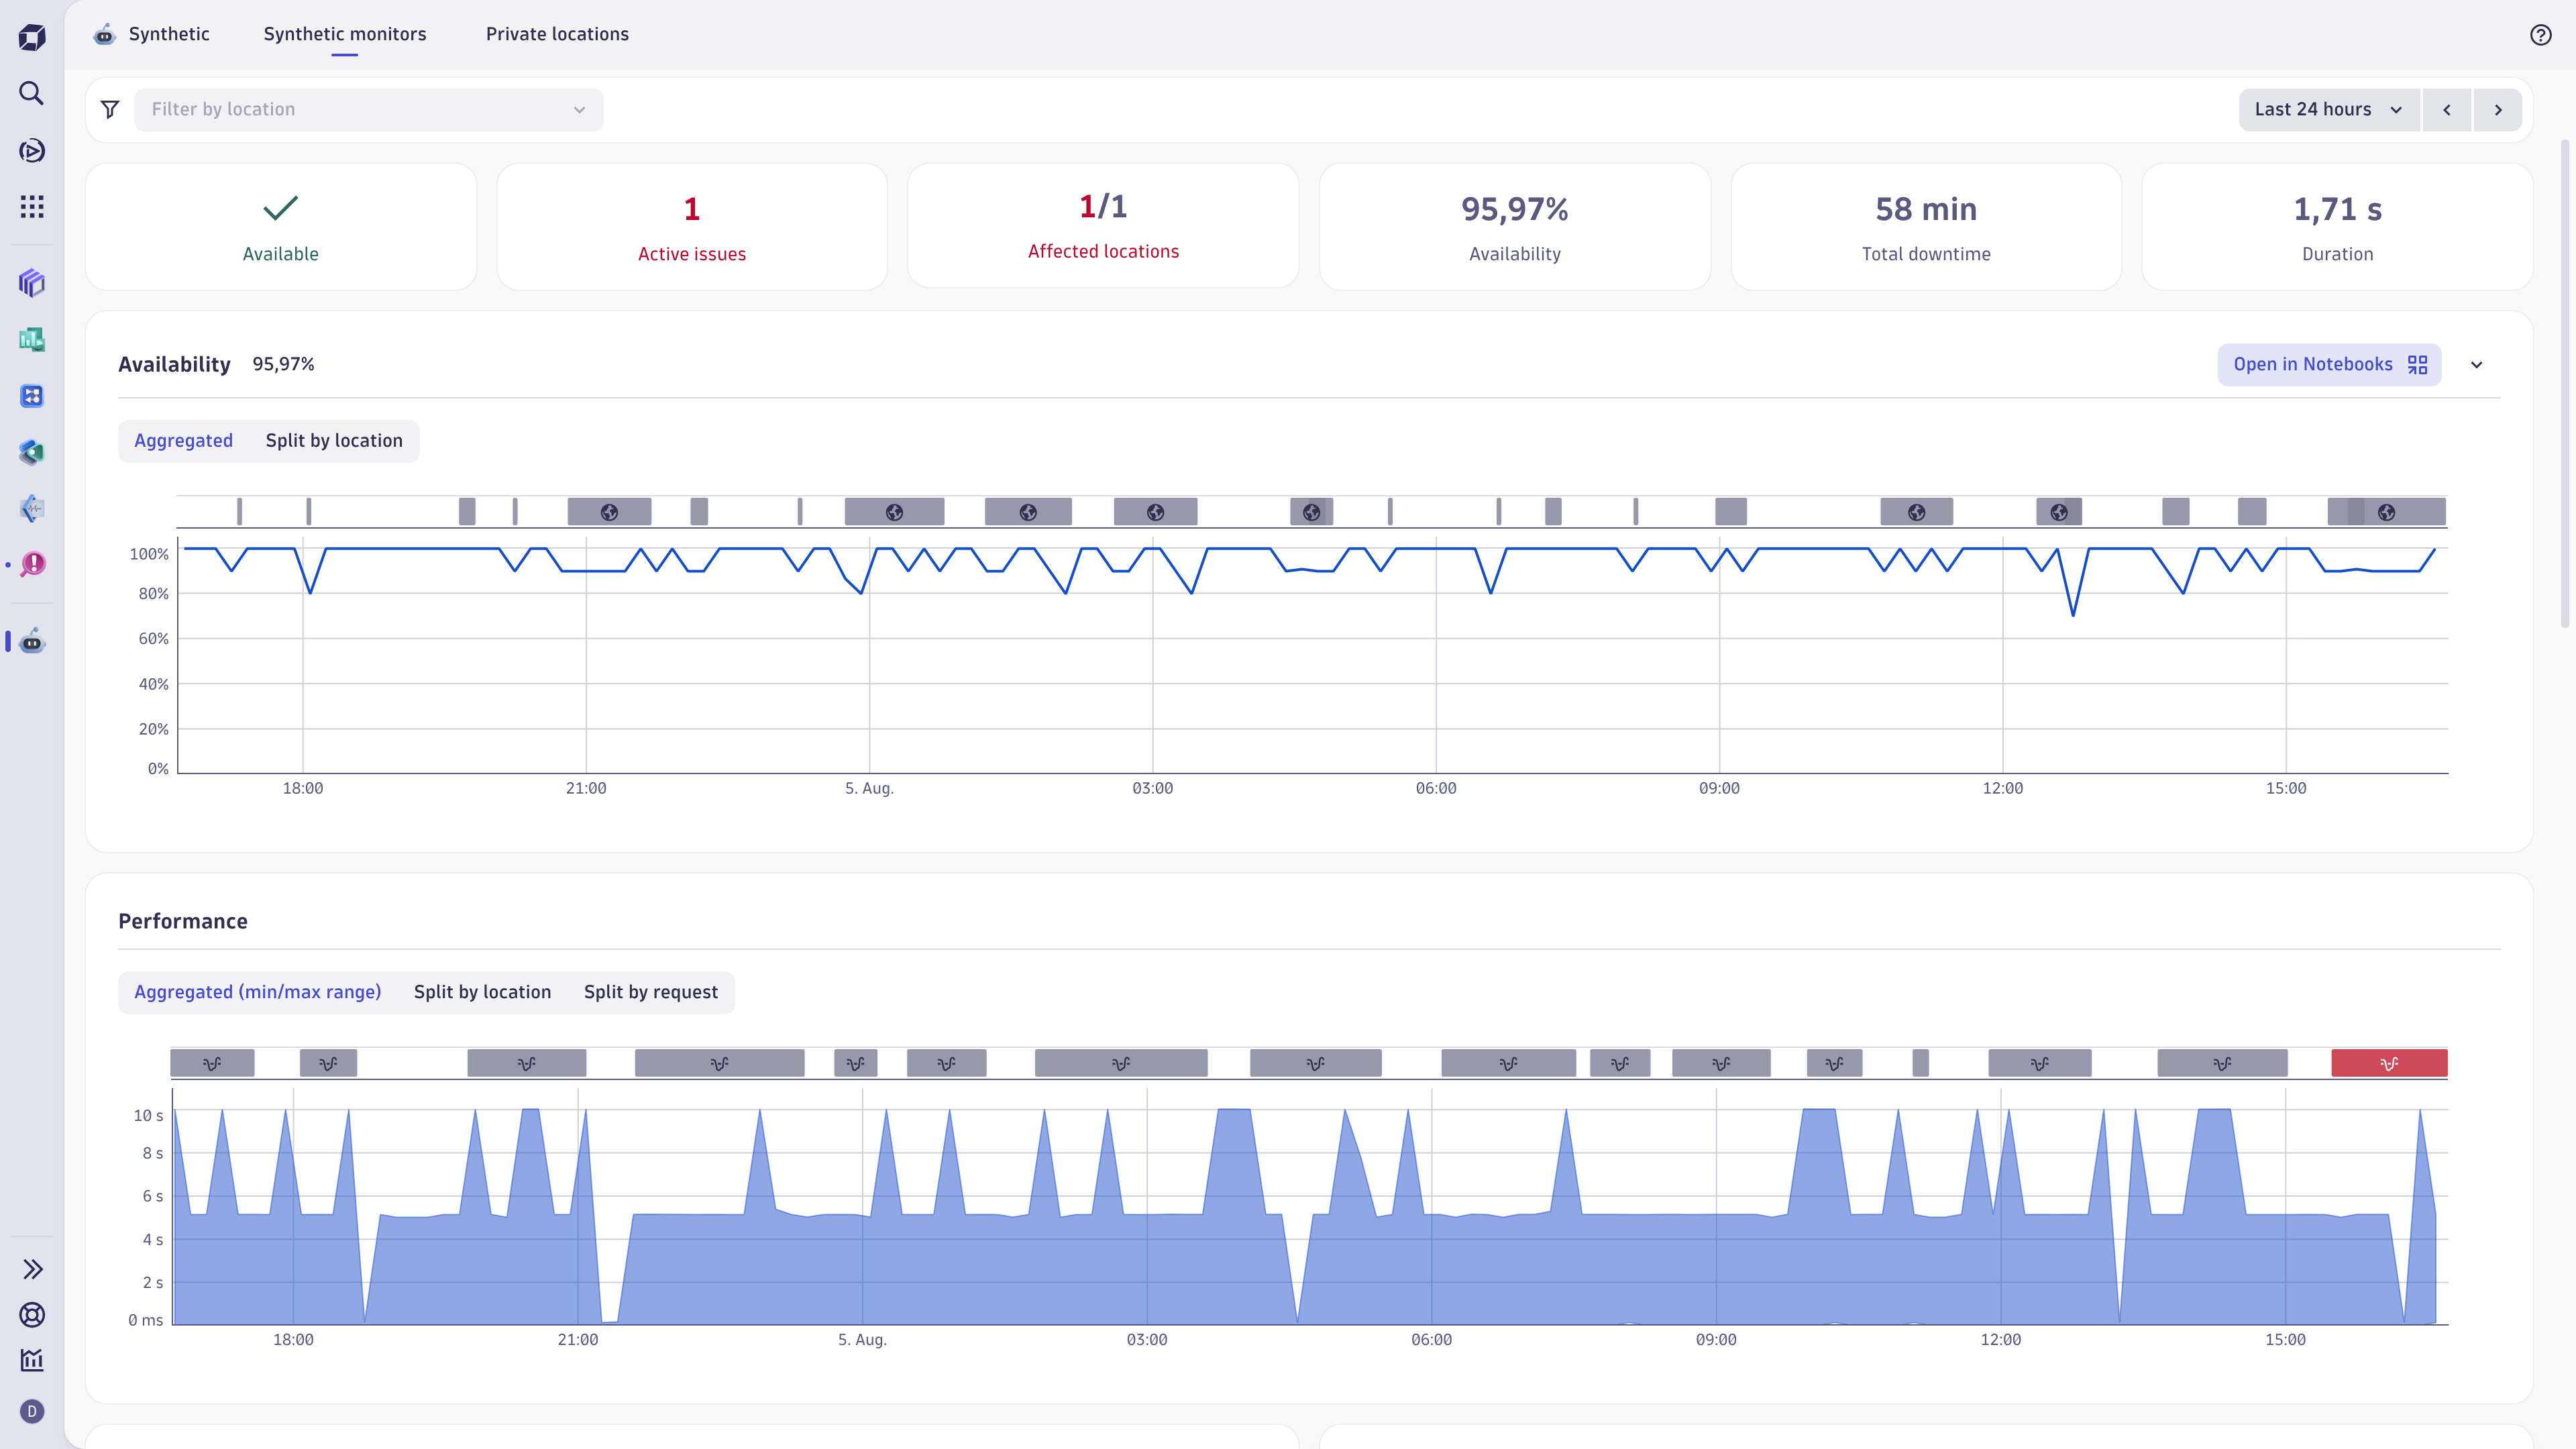
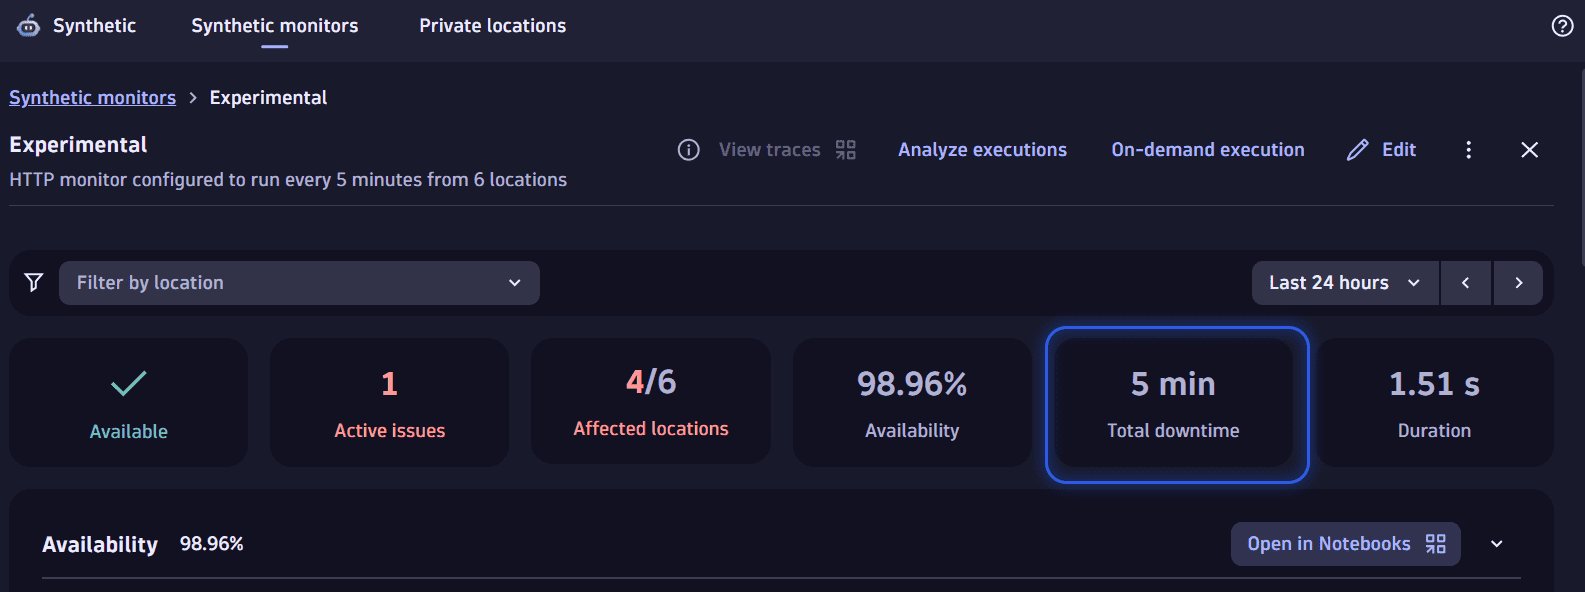
The preview panel shows:
- Tiles for important information at a glance:
- Outage/Available/No data—the monitor availability status at the moment of the last executed test
- Active issues—the number of issues being observed at the moment
- Affected locations—the number of locations where outages happened within specific timeframe
- Availability—the monitors availability rate in percent within specific timeframe
- Total downtime—the total outage time for all locations within specific timeframe
- Duration—the average response time for all locations within specific timeframe
- A list of problems, including the problem start date and duration, or No problems found. To analyze a problem in the Problems app, select the problem link in the list.
- A list of changes. In latest Dynatrace, this section displays changes to the monitor: when it was changed, who changed it, and what they changed. You can only access changes from a specified timeframe.
- Properties such as monitor type, locations, requests in last execution, frequency, steps, and tags.
Use the controls in the upper-right corner of the preview panel to:
- Edit the selected monitor
- Delete the selected monitor
- Enable a disabled monitor
- Disable an enabled monitor
- Display the reporting page for the selected monitor (see below)
- Close the preview panel
Filters
Filters allowing multiple selections help you find the monitors you're looking for. You can also save frequently used filters. Expand  or collapse
  the filters to focus on search or results, as required. The filters are automatically collapsed when viewing the quick overview for a monitor.
The following filter categories (each with multiple options) allow you to search for monitors.
- Type—monitor type
- Ongoing issues—monitors with and without availability or performance problems
- Frontend application—associated RUM application
- Status–whether monitors are active or inactive (disabled)
- Locations–public and private monitoring locations
- Device profile—for example,
desktop,Apple iPhone 8 - Last editor–ID of the user who last edited a monitor
- Tags—values or key-value pairs applied to monitors; you can choose tags to include or exclude from your search.
- Edited during the timeframe—monitors that were or were not edited during the selected global timeframe
- ISP / Cloud provider—of public Synthetic locations
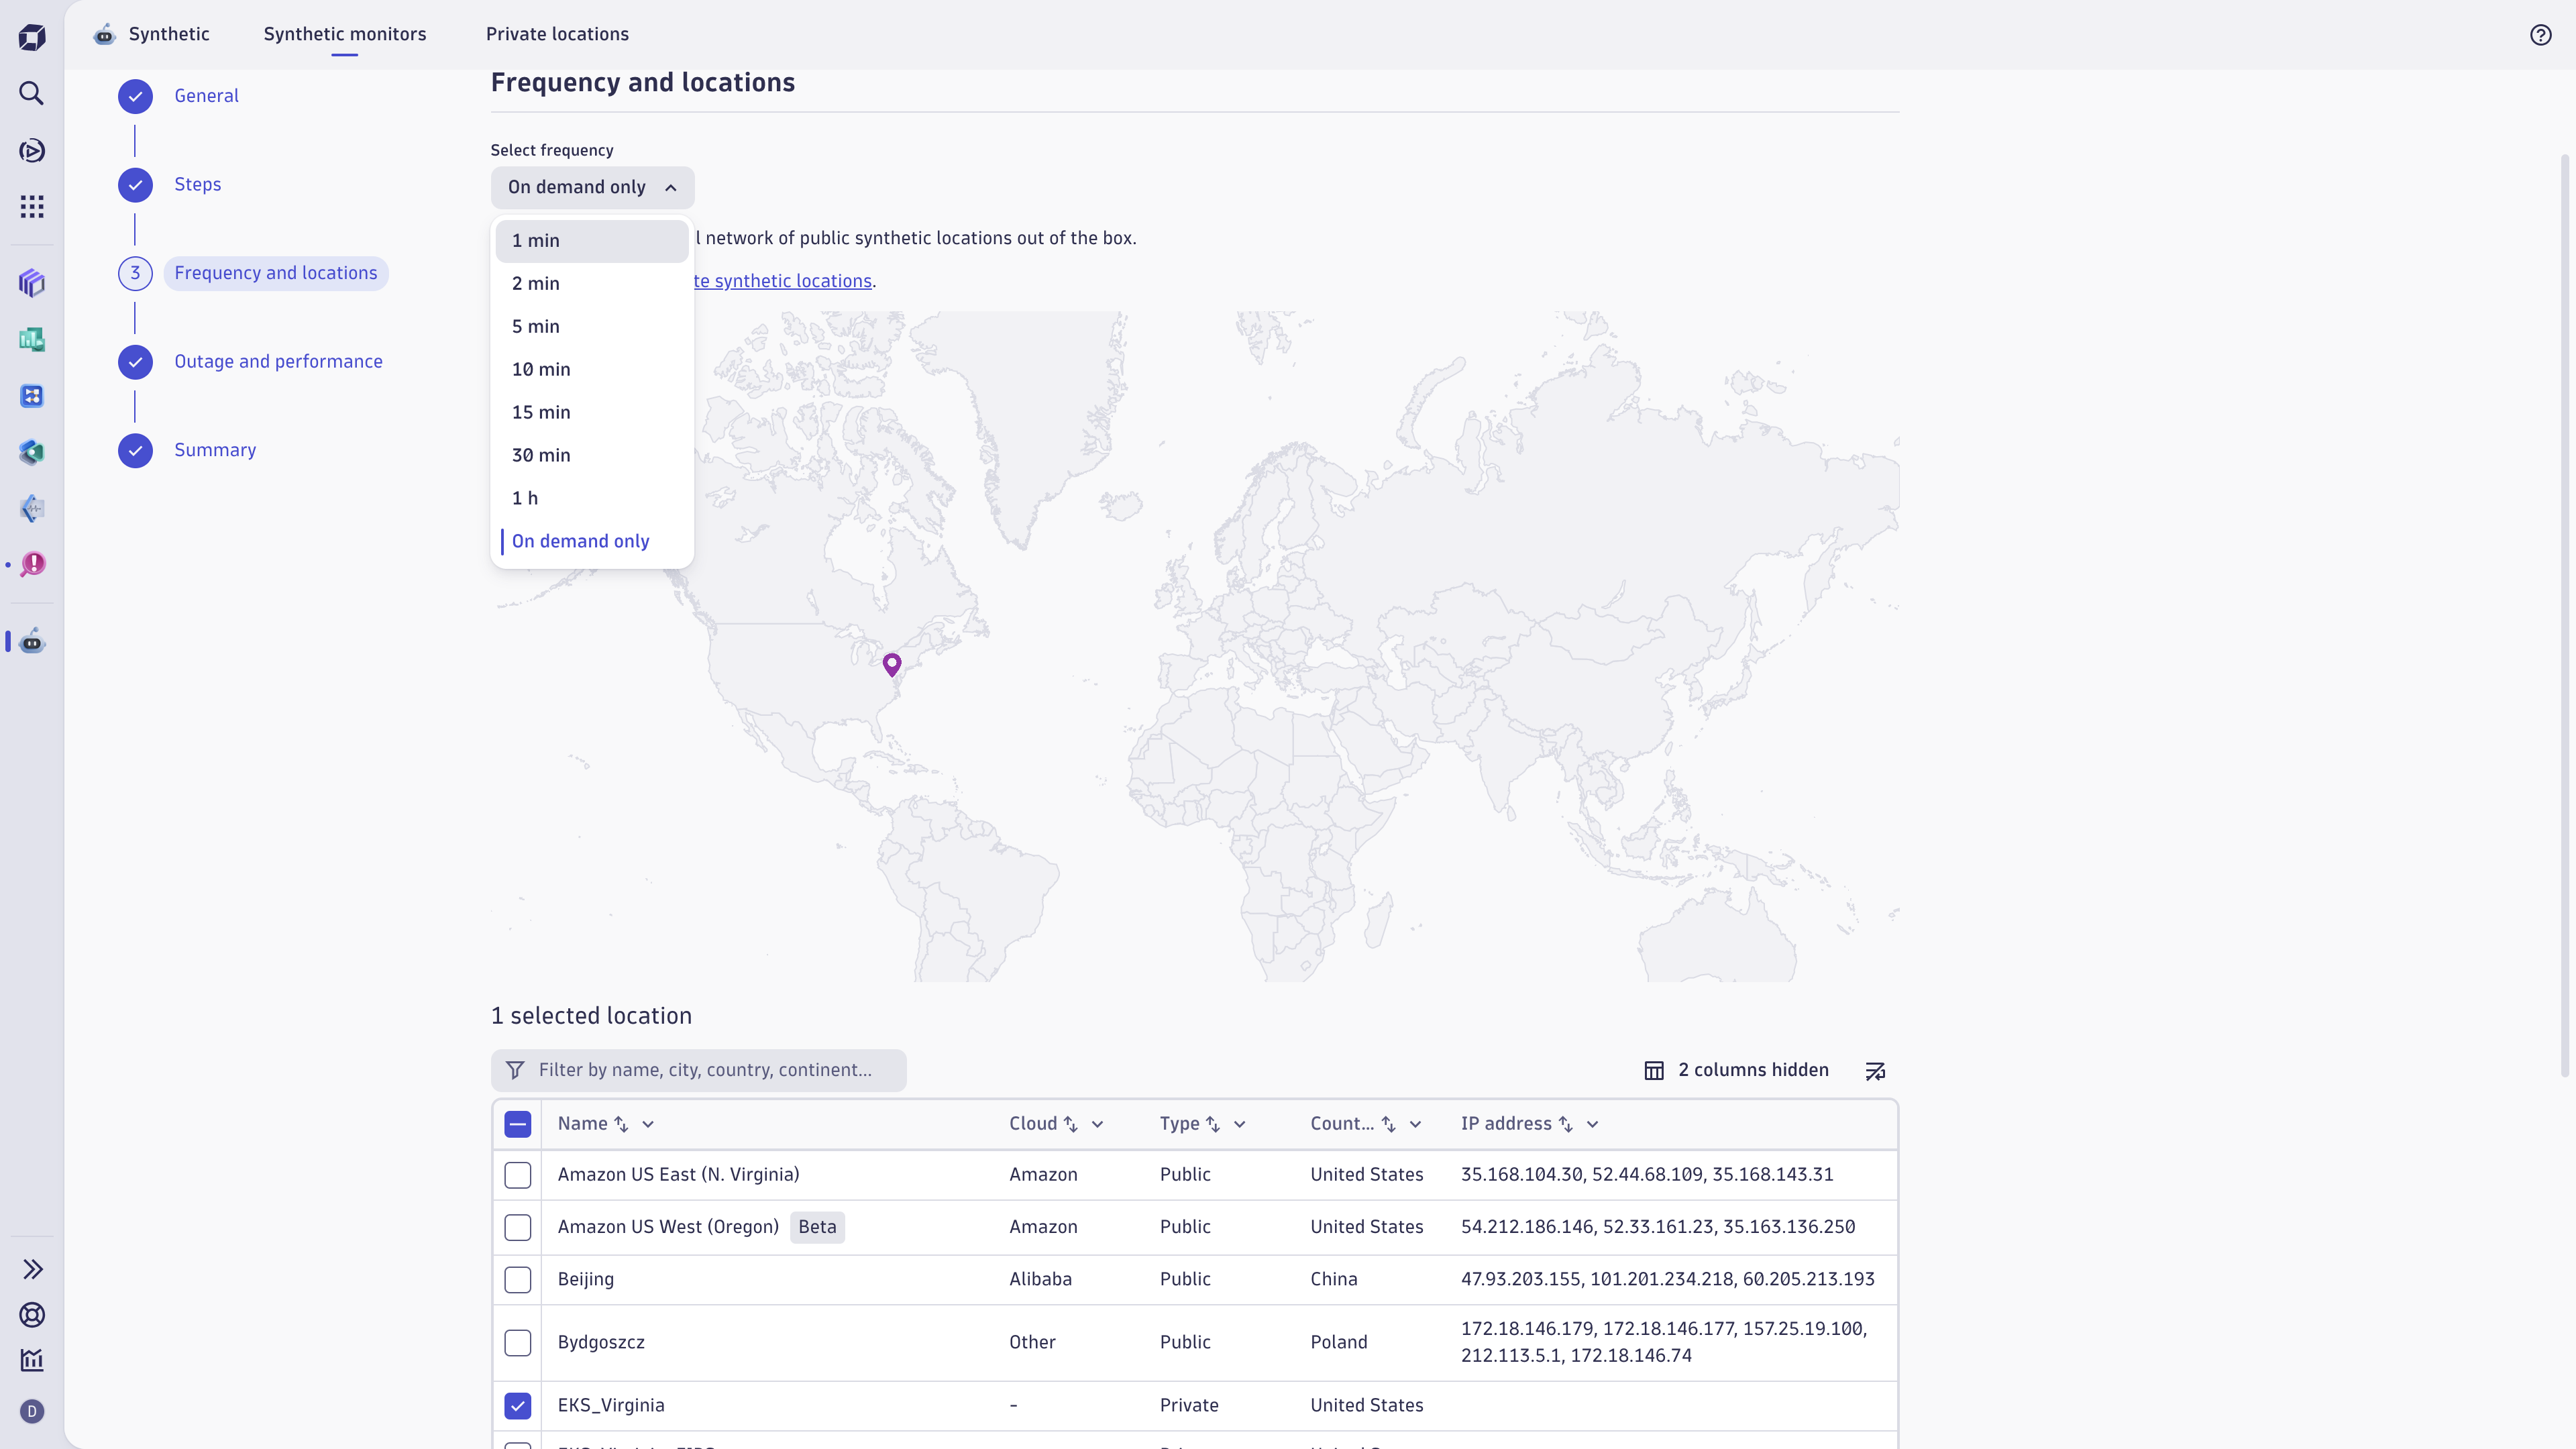
- Frequency—monitoring frequency
How filters work
Within each category, you can select multiple filters. For example, when selecting monitors by Type, you can opt to view HTTP as well as DNS monitors. Within a category, filters are applied using the OR logic—monitors matching any selection are displayed.
The filter options shown in most categories depend on your monitors; only those filters relevant to your monitors are available. For example, if you have no HTTP monitors, you won't see the HTTP option to filter by.
The number of monitors matching each filter is displayed. For example, the list of Locations shows the number of monitors per location. This number is dynamically adjusted based on your filter selections in other categories.
You can select filters in multiple categories. Filter categories are applied using the AND logic. For example, if you select all Network availability monitors (DNS, ICMP, and TCP) and two tags, IP, and host-group, the resulting list contains network availability monitors with either the IP or the host-group tags.
Filter sets
You can save combinations of filters as named filter sets for quick access to frequently used search criteria—select Save new filter and provide a filter name. You can set one filter set as default to be applied each time you go to the Synthetic app.
Select More  next to a filter set for additional actions such as Set as default, Rename, Duplicate, or Delete.
Filter bar
The filter bar  at the top of the page displays a fixed filter for searching by monitor name: select Filter by name and enter your search string. Any additional filters or filter sets you apply are displayed in the filter bar, from which you can clear applied filters.
Manage synthetic monitors
In the Create monitor section, you can choose the type of synthetic monitor that you want to create.
Create monitors
To create a monitor:
- Select +New monitor in the upper-right corner of Synthetic.
- Choose one of the following:
- Browser—choosing this option will allow you to create a browser monitor in Synthetic Classic. Learn how to Create a single-URL browser monitor.
- HTTP—choosing this option will allow you to create an HTTP monitor in Synthetic. Learn how to Create and configure an HTTP monitor.
- Network availability—choosing this option will allow you to create a NAM monitor in Synthetic. Learn how to Configure a NAM monitor.
Reporting
For each monitor type, you can display a reporting page. See
Total downtime calculation for synthetic monitors
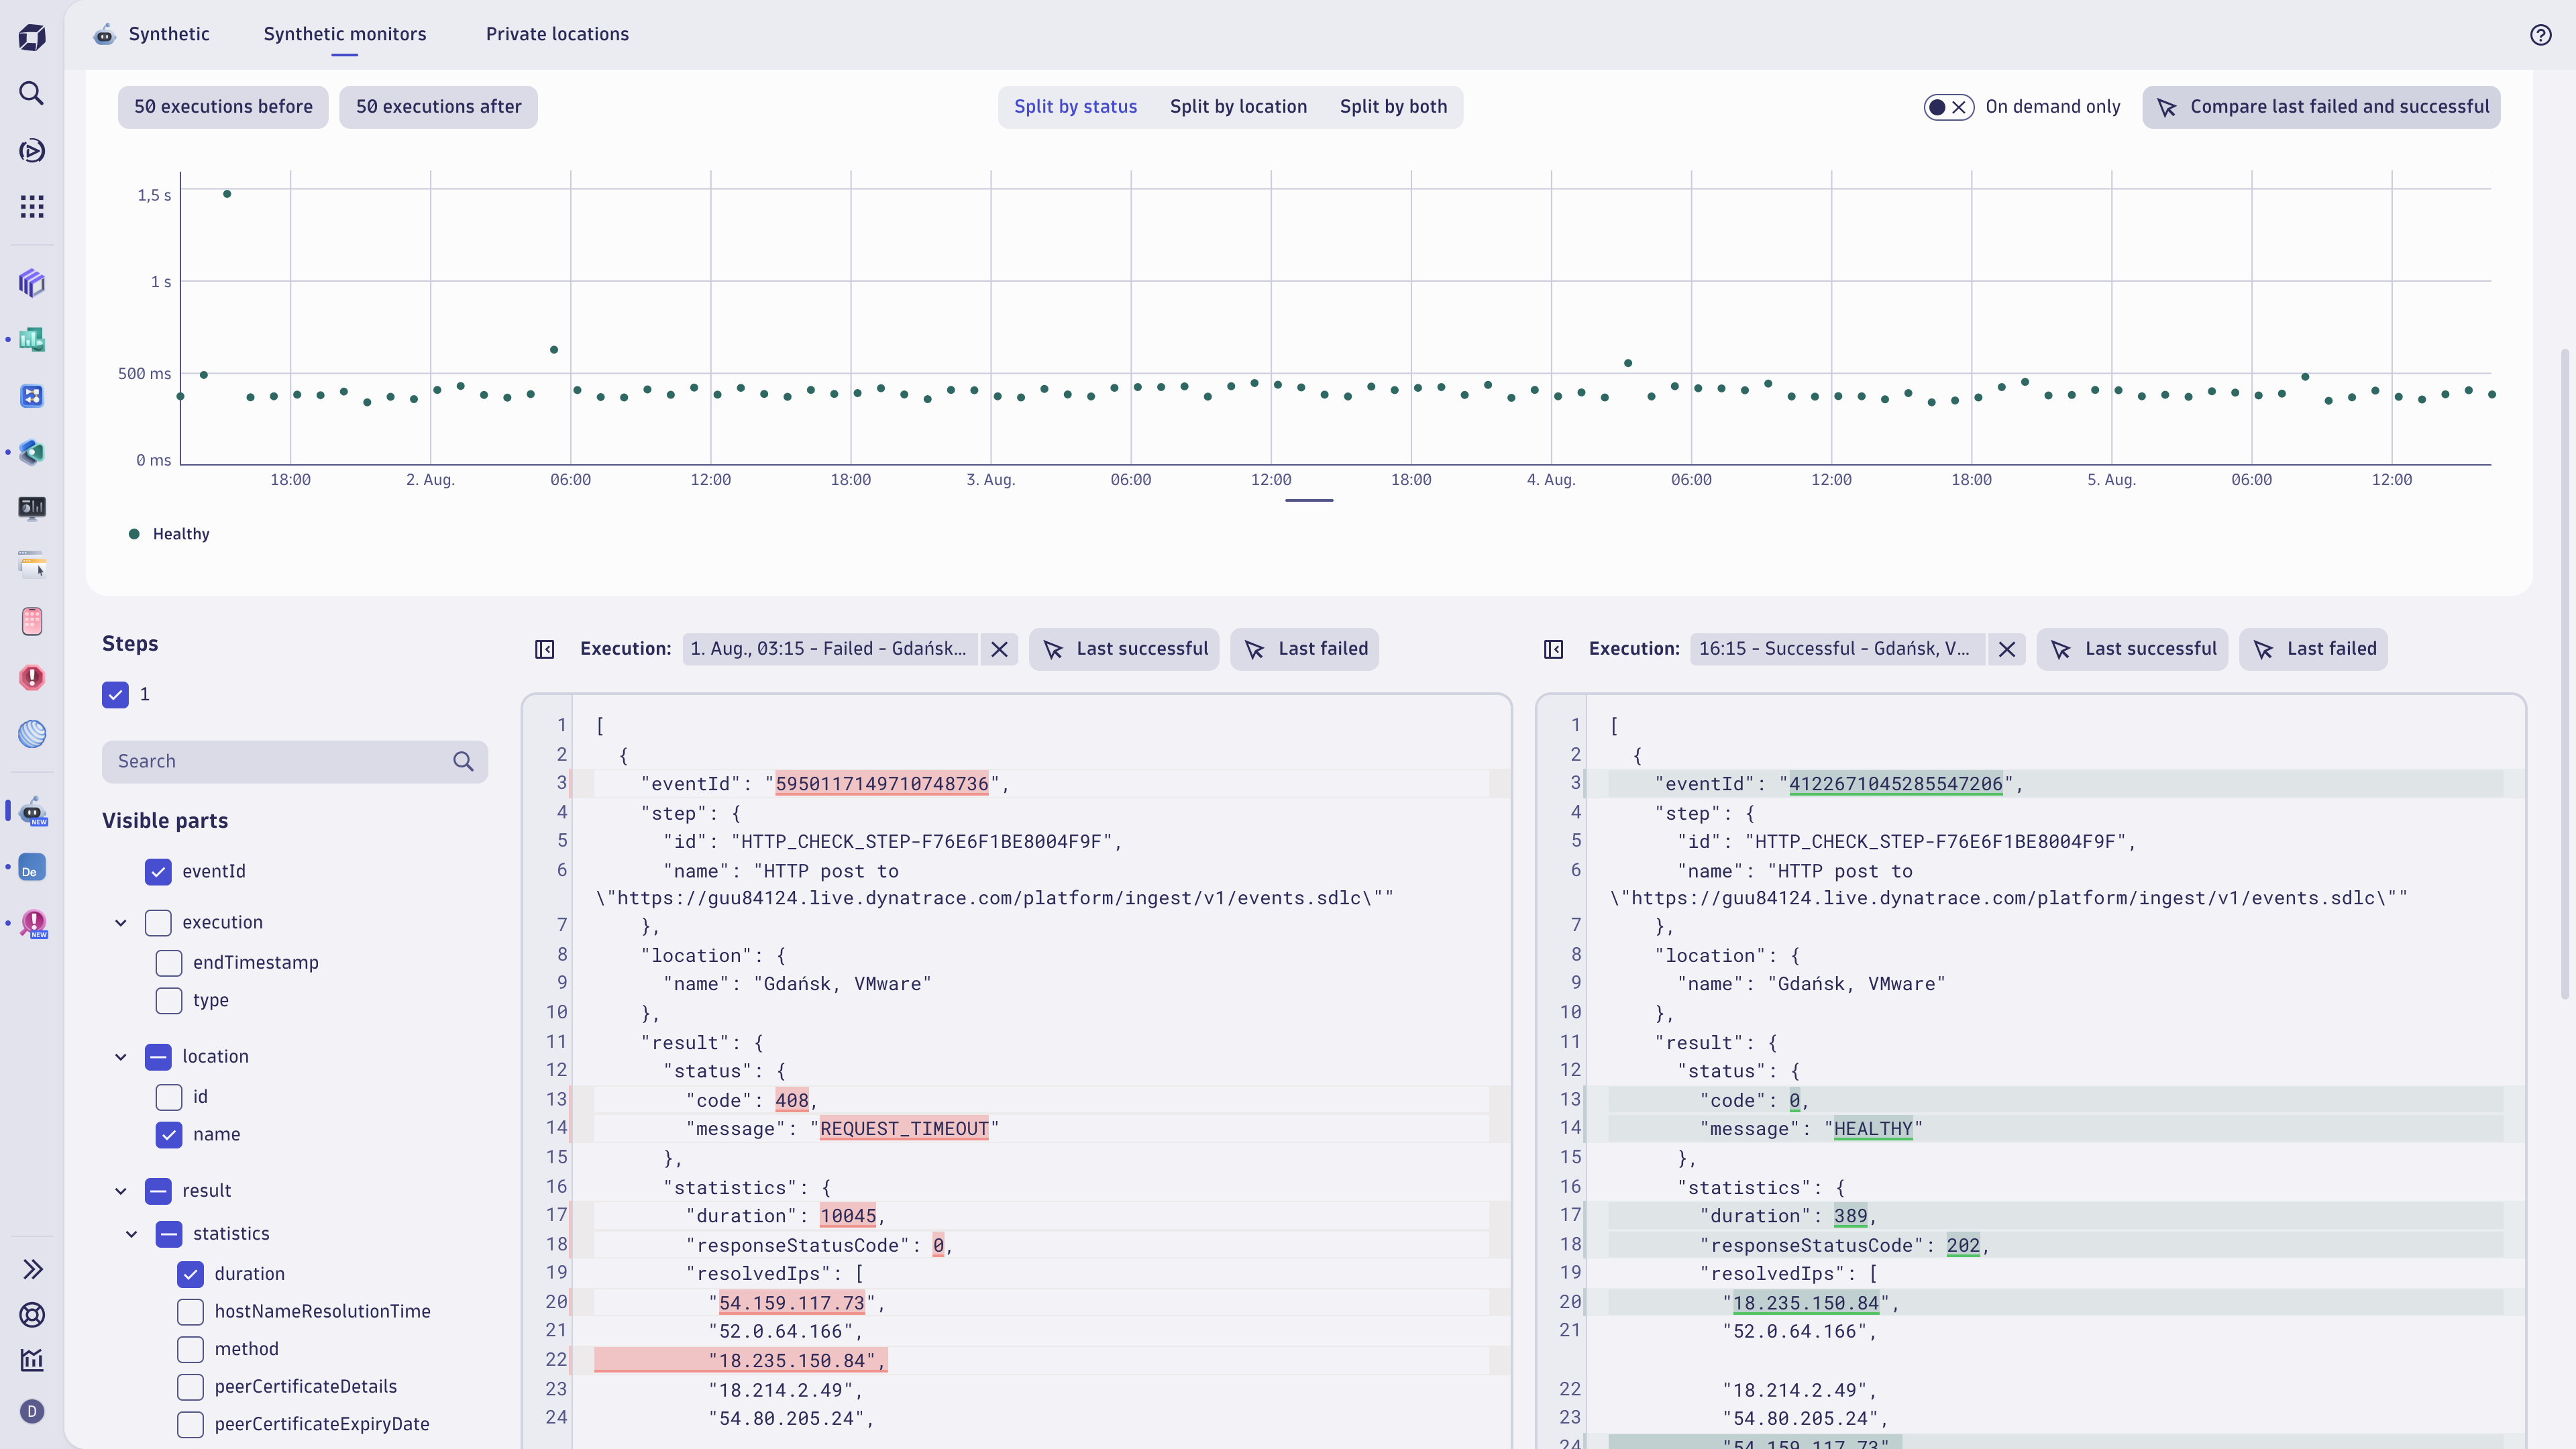
The total monitoring time is divided into minute-level data points. All data points count as executions, although they don't necessarily coincide with actual executions.
On the screen below, the blue data points coincide with actual executions, and the white data points don't.
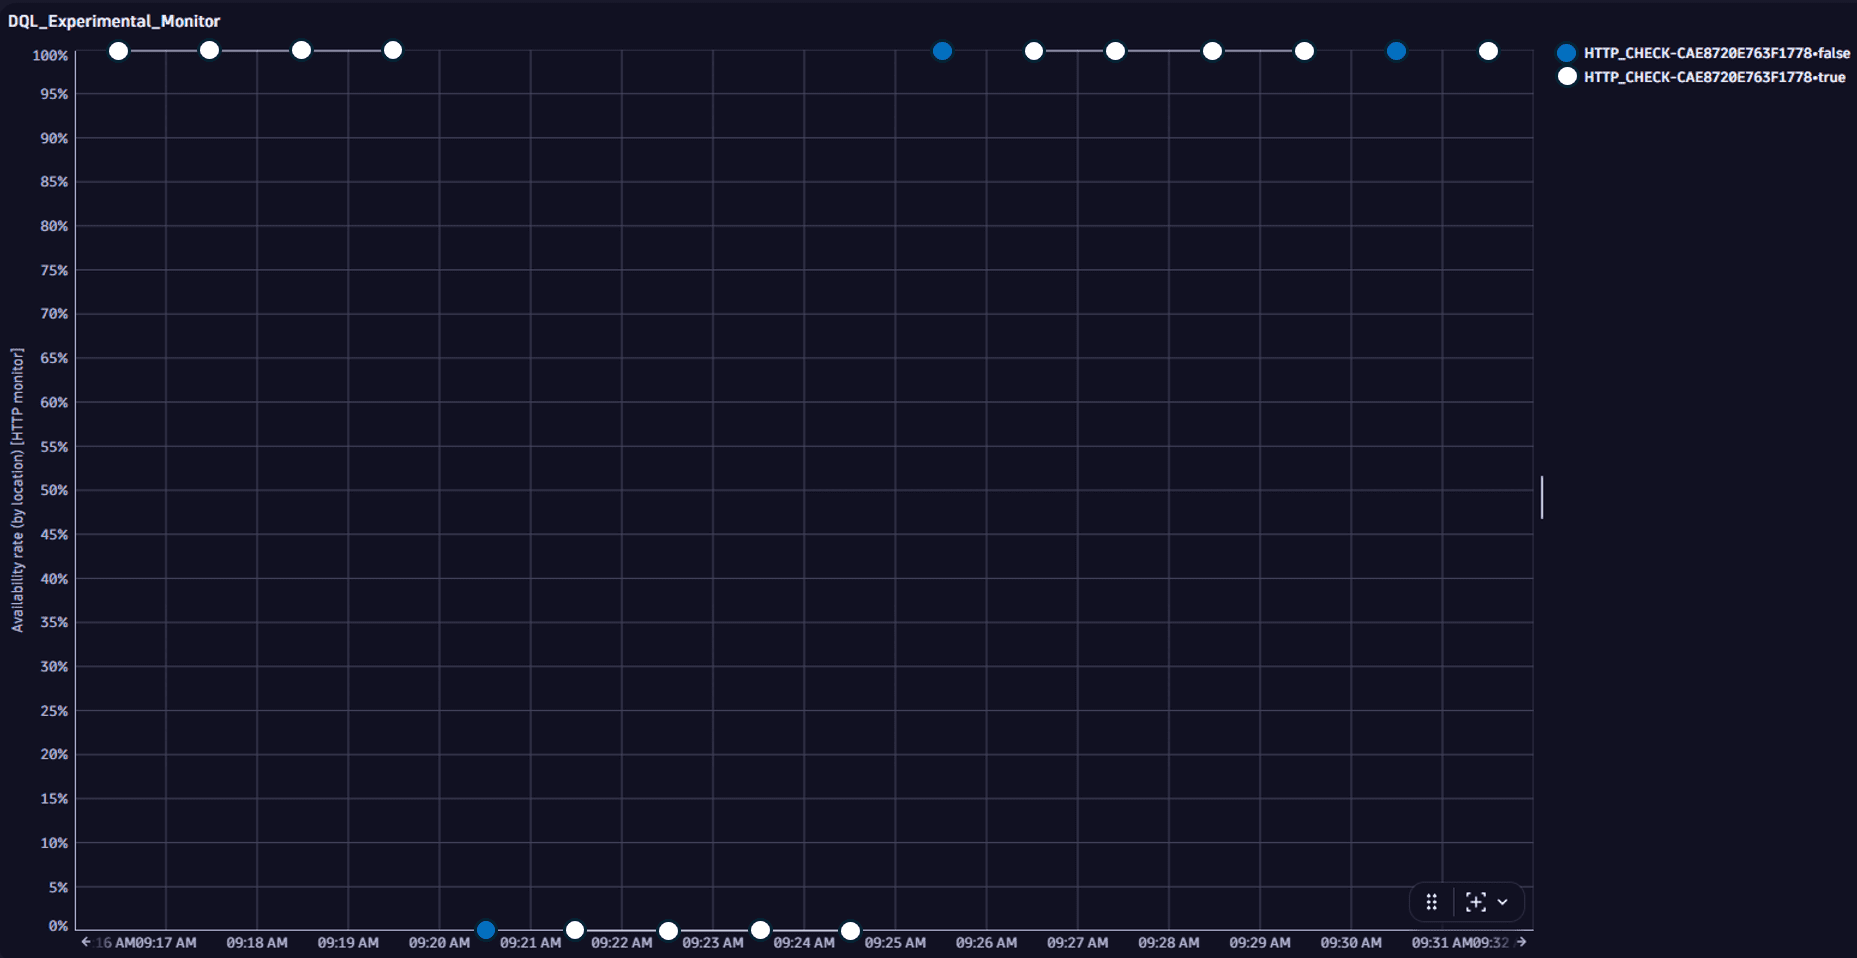
For example, if a monitor is set to execute tests every five minutes, every fifth data point (blue) coincides with an actual execution. All data points following the first failed ("down") execution and preceding the first successful ("up") execution count as "down." Thus, the total downtime is calculated as follows:
Total downtime = the first actual down execution + all following down data points.
Learning modules
Go through the following process to learn using the Synthetic app:
- Reference
- Learn about the Synthetic details page for HTTP monitors.
- Reference
- Learn about the Browser details page for Browser monitors.
- How-to guide
- Learn how to create and configure a browser monitor to check the performance and availability of your site.
- Reference
- View the synthetic monitors in your environment, search for monitors, and get a quick overview of a selected monitor.
- How-to guide
- Learn about how to perform on-demand executions.
- How-to guide
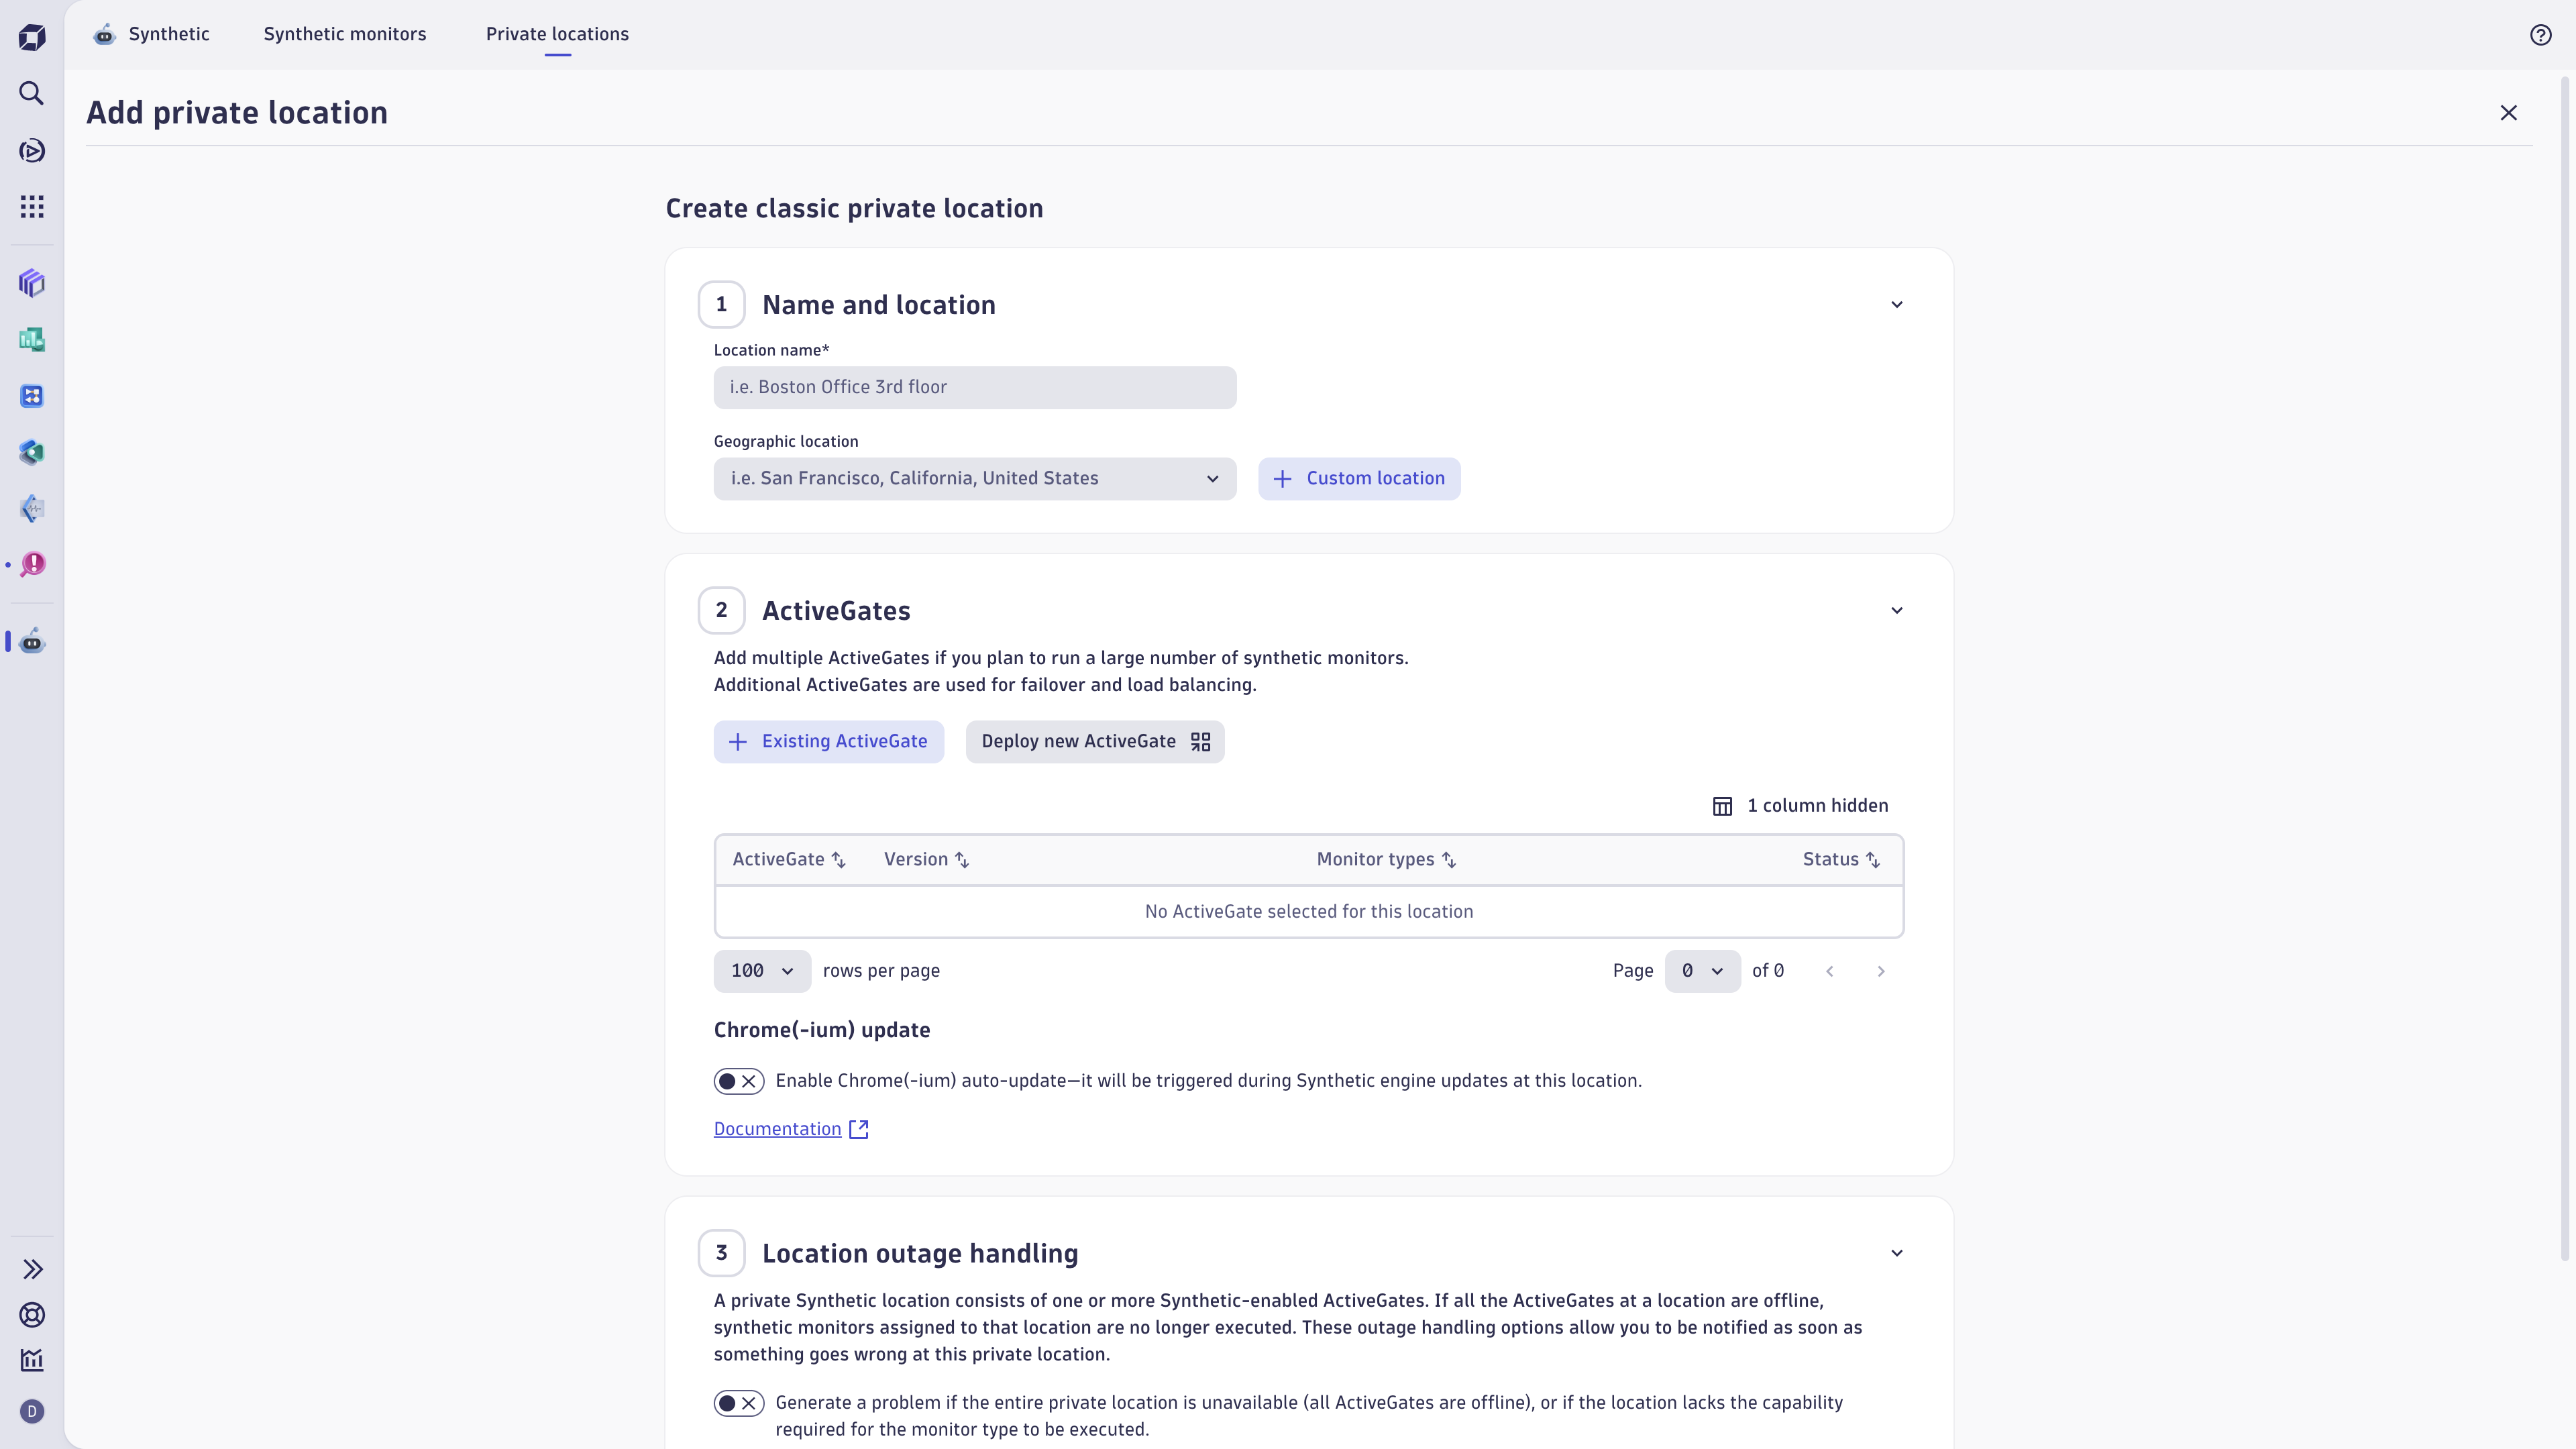
- Learn how to manage private locations in the Synthetic app.
- How-to guide
- Learn how to set up and edit an HTTP monitor to check the performance and availability of your site.
- How-to guide
- Learn how to set up a NAM monitor to check the performance and availability of your site.
 SyntheticDigital Experience