Install a cluster
- How-to guide
- 7-min read
To set up a Managed cluster and install the first cluster node, follow the steps below.
Before you begin
Ensure that your system meets the specified hardware requirements and system requirements.
Installing the data stores for the various Dynatrace Managed components on network/remote disks is not recommended due to potential performance and stability issues.
 Download installer
- Log in to the Linux machine and navigate to the directory where you want to install Dynatrace Managed.
- Copy the
wgetcommand line for the installer from the activation email you've received. - Paste the
wgetcommand line for the installer into your terminal window. Wait for the download to complete.
 Verify installer
The Dynatrace Managed installer file is digitally signed. In conjunction with OpenSSL and the Dynatrace root certificate, the signature file can be used to verify the authenticity of the installer. The signature file has the same name as the installer, with a .sig extension.
-
Copy the
wgetcommand line for the installer file signature from the activation email you've received. -
Paste the
wgetcommand line for the installer file signature into your terminal window. Wait for the download to complete. -
Verify the installer file signature using this command:
openssl cms -inform PEM -binary -verify -CAfile dt-root.cert.pem -in dynatrace-managed-<version>.sh.sig -content dynatrace-managed-<version>.sh > /dev/nullReplace
<version>with your Dynatrace Managed version. -
If verification succeeds, the response should be
Verification successful. If the verification fails, the response will beVerification failurefollowed by details.
 Retrieve SBOM file
Dynatrace provides a Software Bill of Materials (SBOM) that includes a detailed inventory of software components and dependencies. The SBOM in CycloneDX format can be extracted from the installer archive file.
-
You need root rights to extract the Dynatrace Managed installer archive. You can use
suorsudoto run the extraction command. To do this, type one of the following commands into the directory where you downloaded the installation script.Replace
<version>with your Dynatrace Managed version.-
Ubuntu Server
sudo /bin/sh dynatrace-managed-<version>.sh --extract ARCH -
Red Hat Enterprise Linux
su -c '/bin/sh dynatrace-managed-<version>.sh --extract ARCH' -
Other Linux distributions with root session
/bin/sh dynatrace-managed-<version>.sh --extract ARCH
-
-
The extraction results in an archive file with the file name
dynatrace-managed-<version>.tar.gz. Extract the archive file with the following command.tar -xzvf dynatrace-managed-<version>.tar.gz -
The
tarcommand results in a folder with the namedynatrace-managed-<version>. You can list the files in the folder with the following command.ls -l dynatrace-managed-<version> -
The folder contains the SBOM in CycloneDX format with the file name
dynatrace-managed-sbom.cdx.json.
 Run installer
-
You need root rights to install Dynatrace Managed. You can use
suorsudoto run the installation script. To do this, type one of the following commands into the directory where you downloaded the installation script.Replace
<version>with your Dynatrace Managed version.-
Ubuntu Server
sudo /bin/sh dynatrace-managed-<version>.sh -
Red Hat Enterprise Linux
su -c '/bin/sh dynatrace-managed-<version>.sh' -
Other Linux distributions with root session
/bin/sh dynatrace-managed-<version>.sh
To view a list of all available installation parameters, run the installer with the parameter
--help. -
-
Type
Acceptif you agree to the Dynatrace Managed Terms of use. Installation won't continue until you complete this step. To quit installation, pressCtrl+C. -
The Managed installer works in interactive mode. It displays prompts for values like installation path and user account. Accept the default values by pressing
Enter. To override the values, type your choices in the terminal and pressEnter.Please have your Dynatrace Managed license key available. You can't complete installation without a license key.
Default settings
- Installation path (binaries):
/opt/dynatrace-managed - Dynatrace Server data files:
/var/opt/dynatrace-managed - The system user who runs Dynatrace processes:
dynatrace - The system group who runs Dynatrace processes:
dynatrace
Bypass interactive mode
To bypass all questions and install with default settings, run the installer with the
--install-silentparameter. Be sure to provide your Dynatrace Managed license key as the--licenseparameter value.What happens during installation
Dynatrace Managed cluster is a set of specialized components that have been configured to host your monitoring environment and process-monitoring data.
The installer sets up the following components in the installation directory (by default,
/opt/dynatrace-managed):- Pre-configured Java Runtime Environment (your operating system settings aren't affected by this). Not visible in your
alternativesoptions. - Cassandra-based Hypercube storage
- Elasticsearch-based search engine
- Dynatrace Server
- An embedded ActiveGate
The installer also optimizes operating system settings:
- Swap is turned off (with
swapoff).
Note that enabling swap can result in undesired behavior and so isn't supported. iptables"PREROUTING" rules are enhanced to enable forwarding of communication to Dynatrace Server (via HTTPS on port 8021). To see the exact rules, typeiptables -L -vt natinto your terminal.readaheadpage cache is set to 512.- Limits for users are changed globally (unlimited locked-in-memory address space, unlimited address space, increased limit for number of processes and open files). See
/etc/security/limits.conffor details. max_map_countis modified.
The following system files and directories may be modified during installation of Dynatrace Managed:
/etc/hosts/etc/sysctl.conf/etc/pam.d/su/etc/rc.local/etc/security/limits.conf/etc/security/limits.d/90-nproc.conf/etc/sudoers/etc/sudoers.d//etc/init.d//etc/init.d/rc*.d//etc/systemd/system/
Installation logs
You can find the Dynatrace Managed installation log file in the
/opt/dynatrace-managed/installer/directory. To easily identify the right log file, look for the installation date in the file name. For example, the log file of a successful installation performed on September 30th would be20160930-173309-success-install-of-managed-installer.log - Installation path (binaries):
 Finalize setup
-
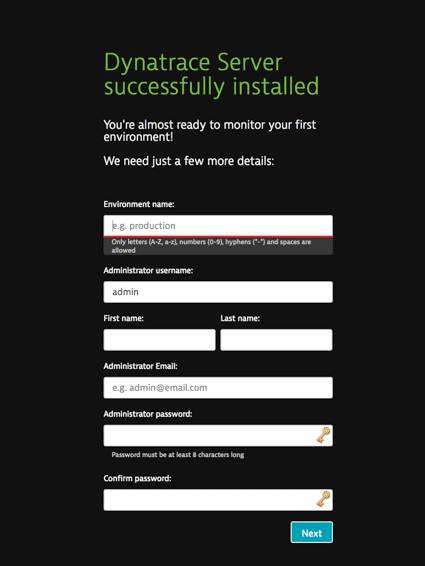
Copy the environment URL displayed at the end of the installation process. Paste the URL into your browser to complete the installation. The following page appears.
-
Give your first monitoring environment a name and set up an administrator account. Then select Next. You will be logged in and redirected to the Cluster Management Console. A default domain is generated, which should be used instead of the IP address for secure (HTTPS) connection.
-
Go to Environments to view your newly created environment. Select your environment and then Go to environment to access the environment's web UI. You can later create additional environments.
FAQ
Can I use a privilege management system other than sudo?
Yes, you can use pbrun, but you must grant the Dynatrace user permission to run /opt/dtrun/dtrun *. Specify the user who is installing Dynatrace Managed and the command that replaces sudo. Note that <version> represents the Dynatrace Managed version number.
/bin/sh dynatrace-managed-<version>.sh --system-user dynatrace:dynatrace --sudo-cmd "/usr/bin/pbrun \$CMD"
Additionally, for maintenance purposes, please consider adding scripts from the locations below:
/opt/dynatrace-managed/uninstall-dynatrace.sh/opt/dynatrace-managed/launcher/*/opt/dynatrace-managed/utils/*
Run this command to stop all Dynatrace Managed processes running on a node.
pbrun /opt/dynatrace-managed/launcher/dynatrace.sh stop
Do not remove or overwrite dtrun, as it is required by installation and update procedures. The installer calls dtrun without arguments to validate that the user has administrative privileges, but for normal operation Dynatrace calls dtrun with arguments to actually run commands.