Set up a proxy for private synthetic monitoring in Classic
- Dynatrace Classic
- How-to guide
- 3-min read
You can incorporate proxies, load balancers, and reverse proxies in your Dynatrace deployment. In particular, your ActiveGate configuration allows you to define one or more proxies for outgoing connections.
- To set up a proxy for communication with the tested resource, edit the
custom.propertiesfile and set properties in the[synthetic]section. - To set up a proxy only for internal communication with the Dynatrace Cluster, see settings for Dynatrace Cluster communication only.
- To set up the same proxy for both a tested resource and the Dynatrace Cluster, set properties in the
[http.client]section.
Proxy configuration properties
You can use the following properties when configuring a proxy for your Synthetic-enabled ActiveGate:
| Property | Description |
|---|---|
| Server address (hostname or IP address) |
| Port Optional If left empty, the default |
| Scheme Optional If left empty, the default Must be set to |
| User name Optional |
| User domain in the case of NTLM authentication |
| Password Optional The password provided in the If a comma ( |
| If set to |
| A list of hosts for communication with which proxy should not be used by ActiveGate The hosts in the list should be separated by |
| ActiveGate version 1.271+ A list of proxy authentication schemes Optional This is a prioritized list of proxy authentication schemes that ActiveGate should use when authenticating with the proxy server.
Supported values: |
Proxy connection scenarios
These are the possible scenarios for your proxy configuration. Access to tested resource via proxy is only supported for browser monitors and http monitors.
Connect to the Dynatrace Cluster
[http.client]proxy-server=<proxy>proxy-port=8080proxy-user=usernameproxy-password=password[synthetic]proxy-off=true
Connect to both the Dynatrace Cluster and tested resource
[http.client]proxy-server=<proxy>proxy-port=8080proxy-user=usernameproxy-password=password
Connect to the Dynatrace Cluster and tested resources via different proxies
-
Connect to the Dynatrace Cluster
[http.client]proxy-server=<proxy>proxy-port=8080proxy-user=usernameproxy-password=password -
Connect to the tested resource
[synthetic]proxy-server=<proxy between AG and tested resource>proxy-port=9090proxy-user=username_twoproxy-password=password_two
Connect to the tested resource and/or Amazon S3
The Synthetic-enabled ActiveGate needs access to the Amazon S3 service to upload and access screenshots for browser monitors on private locations.
[synthetic]proxy-server=<proxy between AG and tested resource>proxy-port=8080proxy-user=usernameproxy-password=password
For more information, see Proxy Auto-Configuration (PAC) files.
Configure synthetic monitoring with direct connection to other resources
[synthetic]proxy-server=<proxy between AG and tested resource>proxy-port=8080proxy-user=usernameproxy-password=passwordproxy-non-proxy-hosts=my.corp.org|*.gdansk.dynatrace.com
Proxy Auto-Configuration (PAC) files
You can use Proxy Auto-Configuration (PAC) files to handle complex proxy configuration for private browser monitors.
What is a PAC file?
A Proxy Auto-Configuration (PAC) file is a JavaScript function that determines whether web browser requests (HTTP, HTTPS, and FTP) go directly to the destination or are forwarded to a web proxy server (for details, see Proxy Auto-Configuration (PAC) file on developer.mozilla.org).
How to provide a PAC file to your browser monitors
You can manually provide a PAC file using the script mode only in the previous Dynatrace.
Use the script mode for single-URL browser monitors and browser clickpaths.
-
For new monitors, switch from Visual mode to Script mode.
-
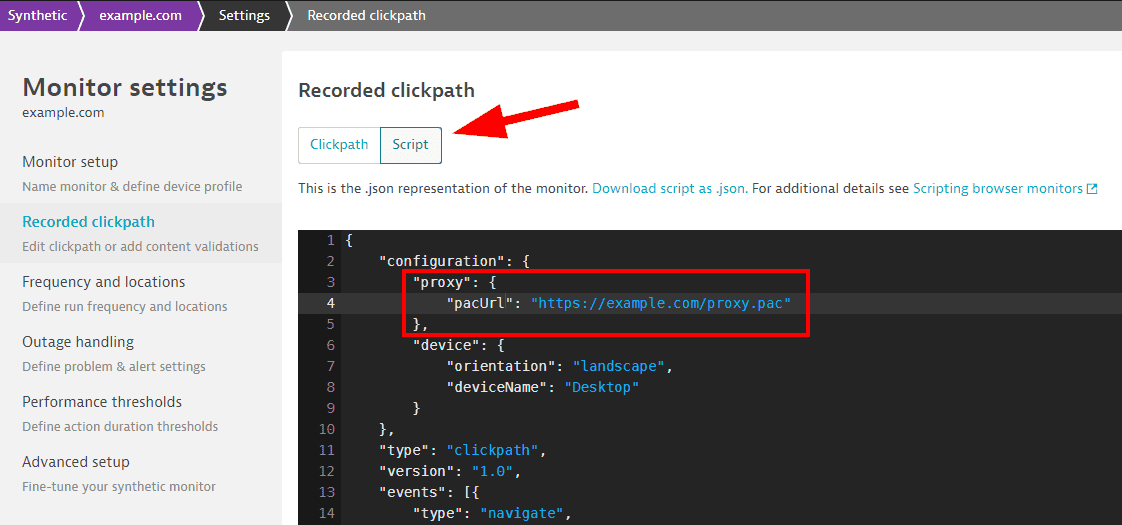
For existing monitors, select Edit to open settings and select Recorded clickpath for clickpaths. Then switch to Script mode.
For existing single-URL browser monitors, select Monitor script.
You’ll need to add the following in the configuration object of the JSON file:
"proxy": {"pacUrl": "https://www.example.com/test.pac"}
where pacUrl points to your hosted PAC file.
For more information on script mode, see Script mode for browser monitor configuration.
PAC file configuration compatibility
- PAC file configuration only applies to private Synthetic locations, not public locations.
- PAC file configuration applies only to the monitor you configure—each individual monitor must have the PAC file configured in its script; there is no global setting for all monitors to use a PAC file for proxy services.
- When you set a PAC file proxy for one synthetic monitor script, it only applies to that monitor.
- If a PAC file is specified, it overrides the proxy settings specified at the ActiveGate level for communication with the tested resource. Specifically, it overrides the properties in the
[synthetic]section. - The PAC file must be served via HTTP/S.
Proxy configuration for FIPS mode
When Synthetic location is installed in FIPS mode, browser monitor traffic must be routed through local intercepting proxy, so that all traffic leaving the host is encrypted with a crypto library that is FIPS-certified:
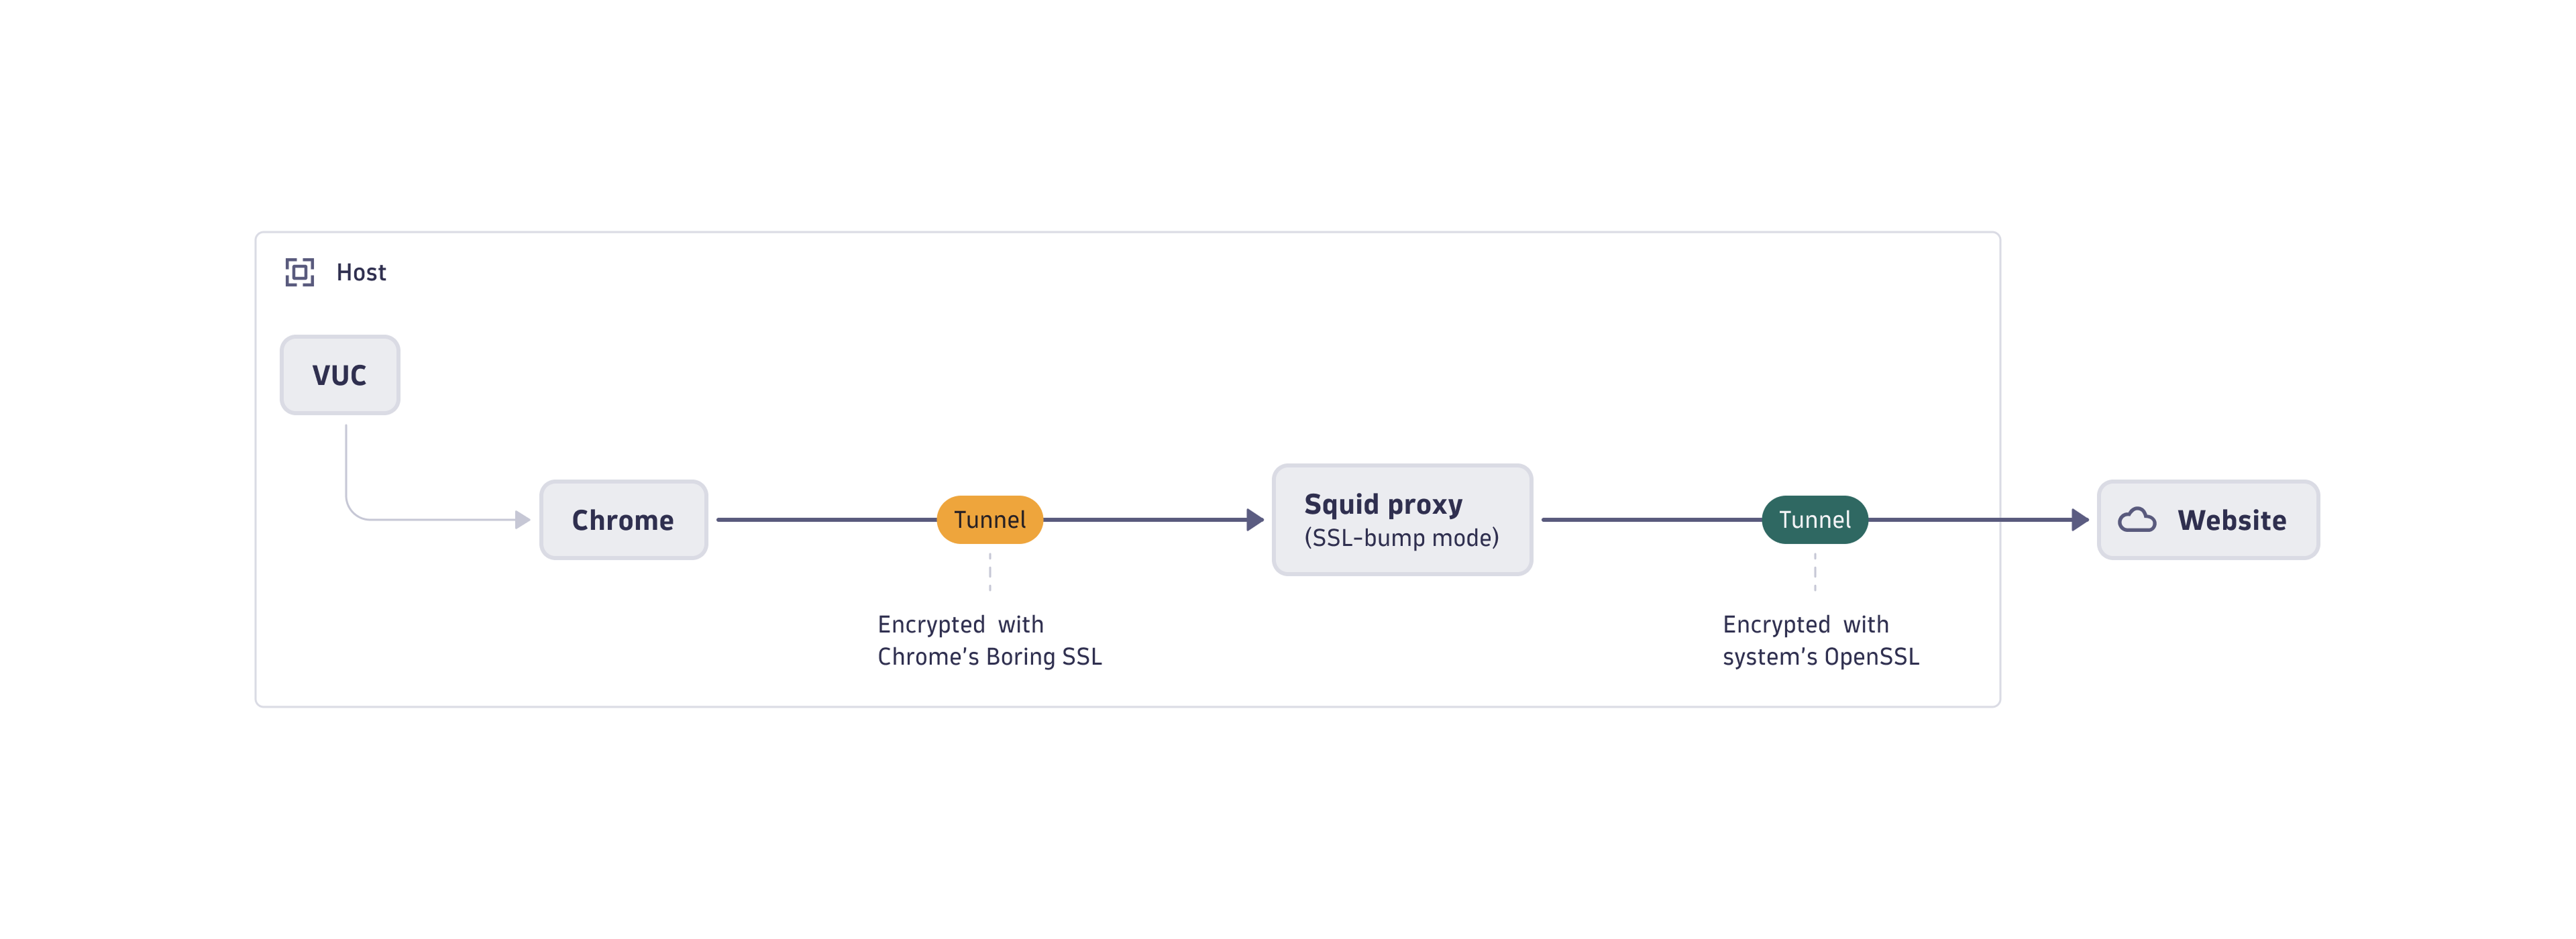
In this example setup, we use the Squid proxy linked to the system's OpenSSL library, but you can use different proxy software as long as its crypto library is FIPS-certified.
-
Install proxy on the same host as Synthetic engine:
sudo dnf install squid -
Provide CA certificate for re-signing intercepted requests:
sudo mkdir /etc/squid/ssl_certsudo mv ~/prepared_ca_cert.pem /etc/squid/ssl_cert/squid.pemsudo chown --recursive squid:squid /etc/squid/ssl_certsudo chmod 700 /etc/squid/ssl_certsudo chmod 600 /etc/squid/ssl_cert/squid.pem
If SELinux is enabled, you may need to adjust file labels. For details, see the Red Hat Documentation for Red Hat Enterprise Linux 8 or Red Hat Enterprise Linux 9.
-
Create temporary certificate cache:
sudo /usr/lib64/squid/security_file_certgen -c -s /var/spool/squid/ssl_db -M 4MBsudo chown --recursive squid:squid /var/spool/squid/ssl_db -
Configure the proxy to perform SSL interception (by default,
/etc/squid/squid.conf):acl SSL_ports port 443acl Safe_ports port 80 443 1025-65535acl CONNECT method CONNECThttp_access deny !Safe_portshttp_access deny CONNECT !SSL_portshttp_access allow localhosthttp_access deny allhttp_port 3128 ssl-bump generate-host-certificates=on dynamic_cert_mem_cache_size=4MB cert=/etc/squid/ssl_cert/squid.pemacl step1 at_step SslBump1ssl_bump peek step1ssl_bump bump allcache deny all -
Restart the proxy for configuration to take effect:
sudo systemctl enable squidsudo systemctl restart squid -
Verify that proxy is working correctly:
curl --proxy localhost:3128 https://example.com -
Optional If you chose a different proxy port, you need to adjust Synthetic configuration (by default,
/var/lib/dynatrace/synthetic/config/user.properties):com.vuc.fips.proxy.port=3128
Proxy configuration for FIPS mode with corporate proxy
If your organization mandates use of a corporate proxy, you need to set up a second local Squid instance due to limitations of Squid:
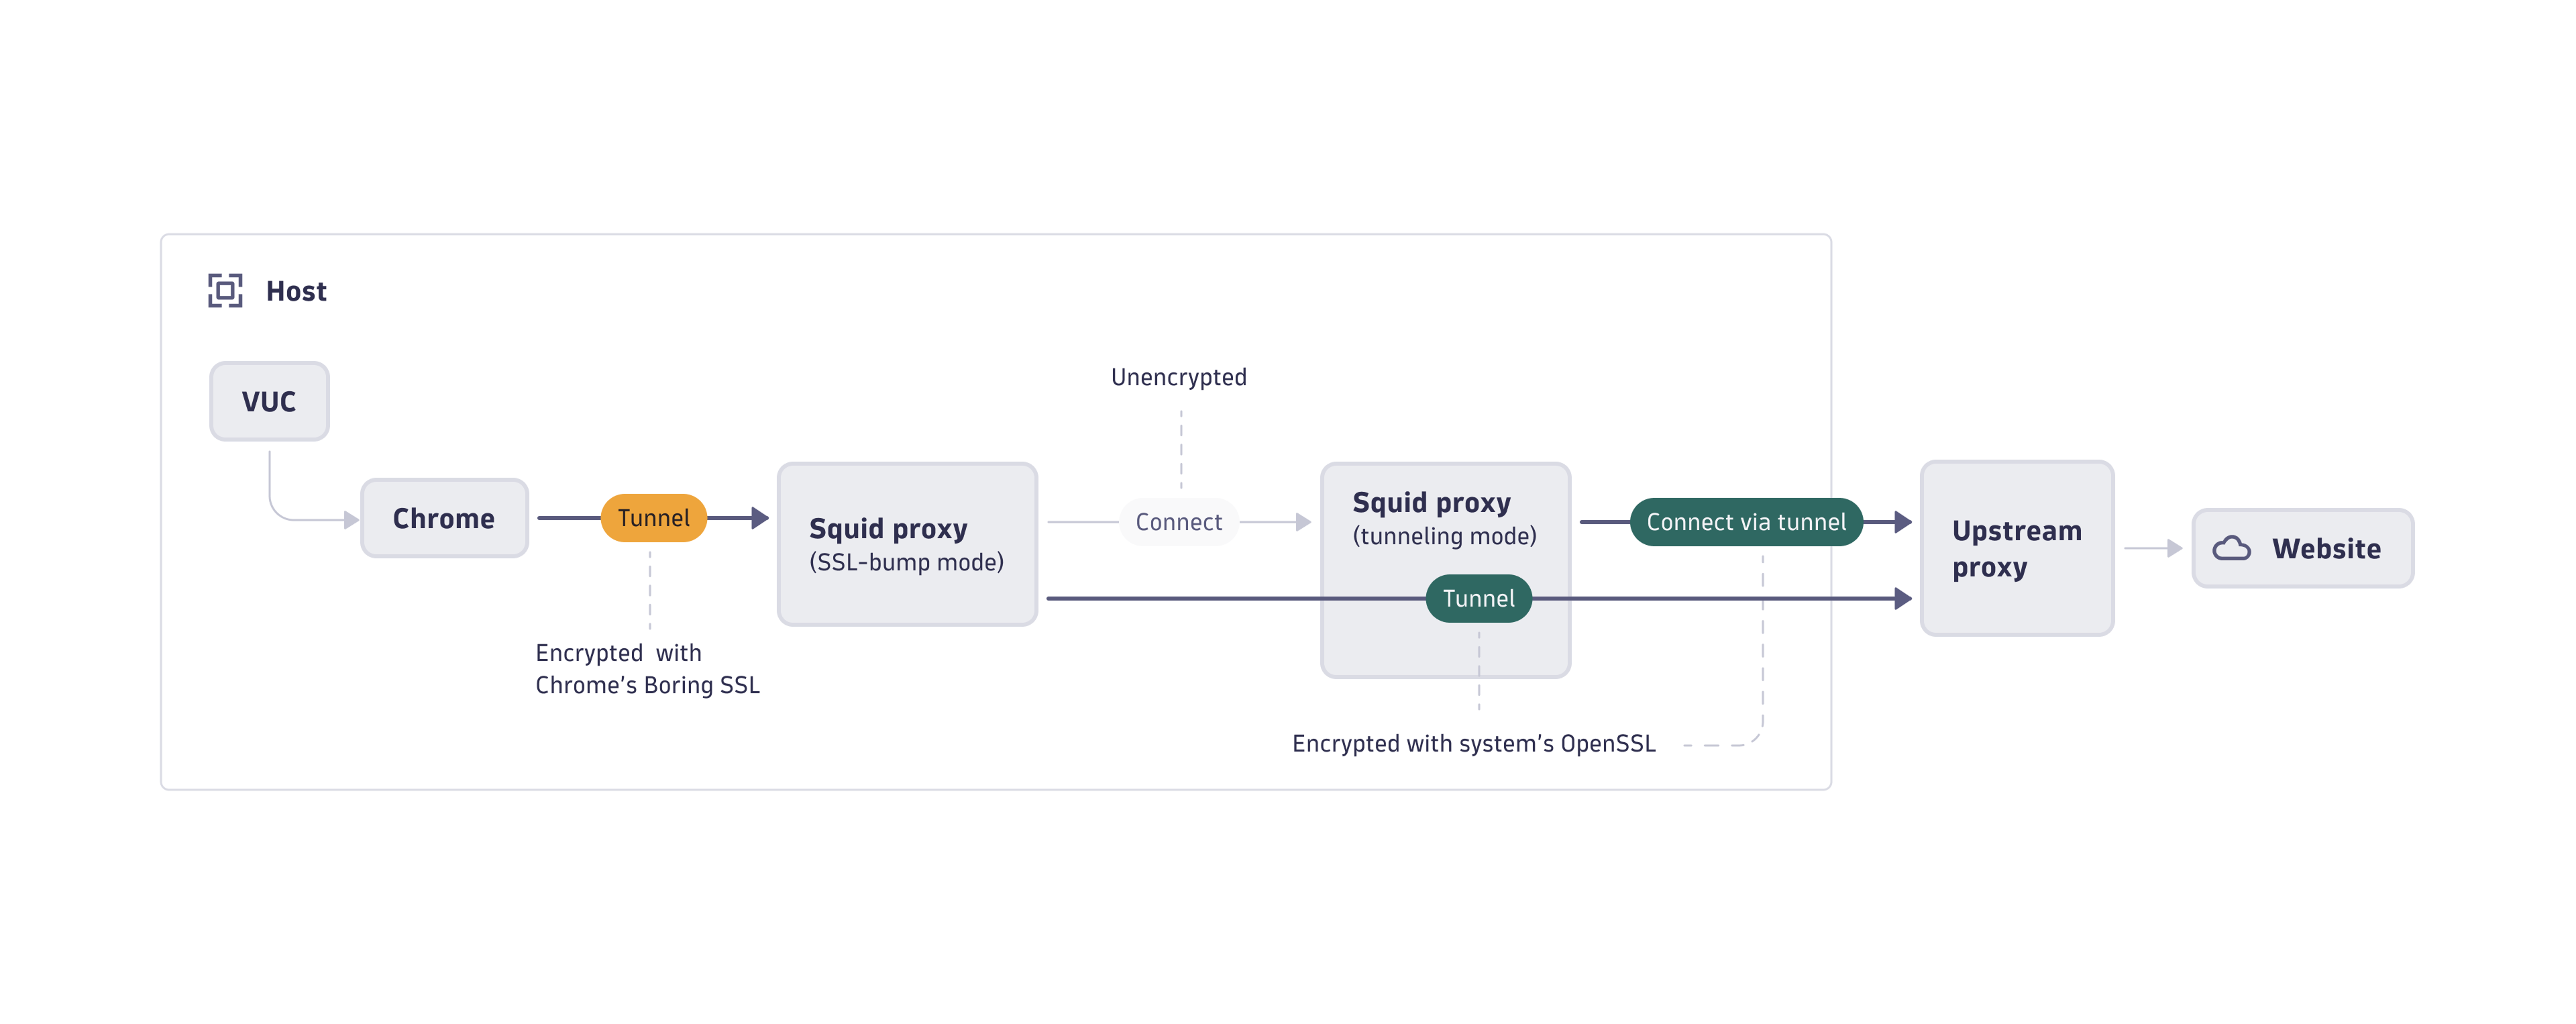
If you're using a different proxy software, this might not be applicable to you.
-
Configure proxy for FIPS, as described in the previous section.
Squid version
5+is required, so Red Hat version8and Ubuntu version20aren't supported. -
On the same host, create a second squid service definition:
/usr/lib/systemd/system/squid2.service[Unit]Description=Squid with upstream proxyAfter=network.target network-online.target nss-lookup.target[Service]Type=notifyLimitNOFILE=16384PIDFile=/run/squid2.pidExecStart=/usr/sbin/squid --foreground -n squid2 -f "/etc/squid/squid2.conf"ExecReload=/usr/bin/kill -HUP $MAINPIDKillMode=mixedNotifyAccess=all[Install]WantedBy=multi-user.target -
Create a second proxy configuration (
/etc/squid/squid2.conf) and provide your corporate proxy host, port and authentication:acl SSL_ports port 443acl Safe_ports port 80 443 1025-65535acl CONNECT method CONNECThttp_access deny !Safe_portshttp_access deny CONNECT !SSL_portshttp_access allow localhosthttp_access deny allhttp_port 3129access_log daemon:/var/log/squid/access2.log squidcache_log /var/log/squid/cache2.logpid_filename /run/squid2.pidcache_peer upstream-proxy.example.com parent 443 0 default no-digest proxy-only login=proxyuser:proxypass tls tls-min-version=1.2 tls-options=NO_SSLv3never_direct allow allvisible_hostname squid2cache deny all -
Update first proxy configuration (
/etc/squid/squid.conf) to use the second proxy as parent proxy by appending the following lines:cache_peer localhost parent 3129 0 default no-digest proxy-onlynever_direct allow allvisible_hostname squid1 -
Restart both squid services:
sudo systemctl daemon-reloadsudo systemctl enable squid2sudo systemctl start squid2sudo systemctl restart squid -
Verify that proxy chain is working correctly:
curl --proxy localhost:3128 https://example.com
Resource considerations
- Each Squid service requires an additional 500 MiB of RAM, which needs to be taken into account when choosing instance size for a particular workload.
- Requests going through multiple proxies will take longer, so performance metrics will be worse than those from a non-FIPS instance.
 Synthetic Classic