Manage AWS encryption keys
- Latest Dynatrace
- How-to guide
- 5-min read
With Dynatrace, you can create and manage your own encryption keys within your own key management system. This is sometimes called bring-your-own-key (BYOK).
Once configured, you can use your customer-managed key to encrypt and decrypt data stored in the Dynatrace platform—including data stored in Grail, and documents such as Notebooks, Dashboards, and Workflows. While the data is hosted on Dynatrace SaaS infrastructure, you control the encryption.
This page describes how to set up a customer-managed encryption key in Dynatrace and the AWS Management Console.
Make sure that Dynatrace always has access to all customer-managed encryption keys that you have created in the AWS Management Console. This includes both the active key and any previously used keys. If a customer-managed encryption key is revoked or deleted in the AWS Management Console, all Dynatrace data that was encrypted with that key will be lost.
Before you activate a customer-managed encryption key, make sure you have understood this risk.
Introduction
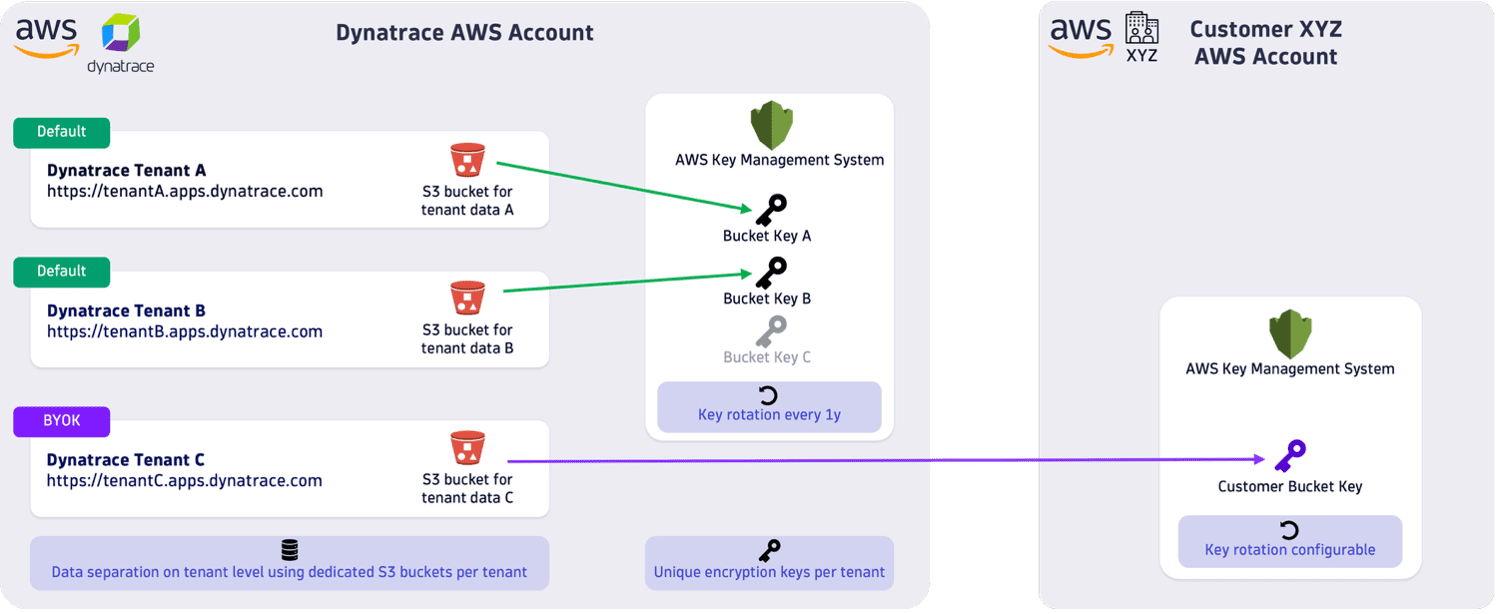
The figure below shows how different encryption keys are managed. In all cases, each environment's data is stored in a dedicated storage and encrypted with a unique encryption key.
- By default, Dynatrace manages these encryption keys. For more information, see Data security controls. In the figure, environment A and environment B use encryption keys managed by Dynatrace.
- A customer-managed key allows you to manage your own encryption key outside of the Dynatrace environment. In the figure, environment C uses a customer-managed encryption key.
Prerequisites
To use the BYOK feature, you need to:
-
Have an active DPS subscription. BYOK is not available for trial accounts.
-
Have a Dynatrace SaaS environment hosted on AWS.
Support for Azure and Google Cloud Platform is planned for the future.
-
Have account administrator permissions (View and manage account and billing information), see Account Management permissions.
-
Make sure that your security contact and emergency contacts are properly configured, so that you can receive notifications if Dynatrace cannot access the customer-managed key. For more information, see Security contact and emergency contacts.
How-to
Follow the steps below to set up and activate a custom-managed encryption key.
1. Start the setup in Dynatrace Account Management
To start, get the Dynatrace-specific information that you will need to enter when you create the key in the AWS Management Console.
-
Go to Account Management > Settings > Environments.
-
In the table, select within the row that contains the relevant Dynatrace environment.
-
Select the Encryption keys tab.
-
Select Add encryption key. The Add encryption key wizard appears.
-
Note down the Region where the environment is hosted, because you'll need to set this region in the AWS Management Console.
-
The Copy Snippet section provides the AWS key policy configuration that you need to set up the encryption key in the AWS Management Console. Select Copy to copy the configuration contents.
Understand the key policy configuration
The policy configuration contains two policy statements. An example policy configuration is provided in the code blocks below.
-
The first statement grants permission to use the KMS key.
{"Sid": "Allow attachment of persistent resources","Effect": "Allow","Principal": {"AWS": "arn:aws:iam::<dynatrace_account_id>:root"},"Action": ["kms:CreateGrant","kms:ListGrants","kms:RevokeGrant"],"Resource": "*","Condition": {"Bool": {"kms:GrantIsForAWSResource": "true"}}}, -
The second statement grants permission to use the KMS key for cryptographic operations, such as data encryption and decryption.
{"Sid": "Key usage from the platform x-accounts","Effect": "Allow","Principal": {"AWS": "arn:aws:iam::<dynatrace_account_id>:root"},"Action": ["kms:Encrypt","kms:Decrypt","kms:ReEncrypt*","kms:GenerateDataKey*","kms:DescribeKey"],"Resource": "*"}
-
-
Optional Save the configuration contents in a text editor for later retrieval.
2. Create an encryption key in the AWS Management Console
Create your customer-managed encryption key with the AWS Management Console. To do this, log in to the AWS Management Console and open the AWS Key Management Service.
For more information, see the AWS Management Console documentation.
For your configuration key to work in Dynatrace:
-
Set the Region: In the AWS Management Console, you need to select a region where the key is created. Set this to the same region as your Dynatrace environment. The region was shown in the Add encryption wizard that you saw in the previous step.
-
Make sure that the following configuration options are set to the following values:
-
Key type: Symmetric.
-
Key usage: Encrypt and decrypt.
-
Advanced options:
- Key material origin: KMS
- Regionality: Single-Region key
-
-
Alias: Enter a name for the key.
-
In the Edit key policy section, paste the contents of the AWS key policy configuration that you copied in the Copy Snippet section of the previous step.
Make sure to add a comma (
,) between any existing policy statements and the new Dynatrace-specific statements.
Once you have created the AWS encryption key, you will need to enter it into Dynatrace.
Open the details of the created AWS encryption key and copy the ARN that starts with arn:aws:kms:....
Optional Save the ARN in a text editor for later retrieval.
3. Complete the setup in Dynatrace Account Management
Return to Dynatrace and enter the information for the key that you've just generated.
-
Return to the Dynatrace Add encryption key wizard.
-
Select Next.
-
Enter a name for the new key.
-
Paste the ARN of the AWS encryption key that you generated in the previous step.
-
Select Save.
-
Dynatrace validates the provided encryption key by performing a temporary write and read operation with the provided key.
-
If the validation succeeds, the new encryption key is saved, and the configuration wizard window closes. You then need to activate the key before using it, see the next step Activate the encryption key.
-
If the validation fails, please go back to the AWS Management Console and check:
- Is the key set to the same region as the Dynatrace environment?
- Is the key policy properly configured?
- Make sure that you've entered the appropriate ARN (it should start with
arn:aws:kms...).
-
4. Activate the encryption key
To activate your customer-managed encryption key in Dynatrace:
-
Return to the Encryption keys tab.
-
Next to the encryption key that you want to activate, select > Activate. An activation pop-up window appears.
-
Select Activate to confirm that you want to activate the key.
Your customer-managed encryption key is now used to encrypt and decrypt all new data that is ingested into the environment.
If Dynatrace can't access the customer-managed encryption key:
- No new data can be written to your environment's permanent storage.
- You can't save any Dynatrace documents (such as Dashboards, Notebooks, or Workflows).
- You can't open any Dynatrace documents.
- Grail queries will fail.
Ingested data is stored in a cache for a few hours before it is permanently written to your environment's storage. This means that a short connection loss to the encryption key won't necessarily cause data loss.
Learn more
Security contact and emergency contacts
Dynatrace periodically checks if it can access the active customer-managed encryption key.
If Dynatrace has problems accessing the active key, it generates a notification and sends an email to the security contact and all designated emergency contacts.
- Security contact: One user should be designated as the security contact. For more information, see Security contact.
- Emergency contact: Any Dynatrace user with access to your environment can be designated as an emergency contact. Make sure that at least one user is an emergency contact. For more information, see User management.
Switching keys
You can rotate your customer-managed encryption key or switch back to the default Dynatrace encryption key.
Key rotation
There are two ways to rotate your active key:
-
Recommended AWS KMS has a built-in automatic key rotation mechanism, which is completely transparent. You don't need to re-configure Dynatrace after this automatic key rotation. For more information, see Rotate AWS KMS keys.
-
Manual key rotation: If you create a completely new key and switch to the new key, you need to go through all the steps on this page to set up a new key in Dynatrace.
With manual key rotation, data that was already encrypted with a previous key won't be re-encrypted.
Switch back to the Dynatrace default encryption key
If you want to switch back to the Dynatrace default encryption key:
-
Go to Account Management > Settings > Environments.
-
In the table, select within the row that contains the relevant Dynatrace environment.
-
Select the Encryption keys tab.
-
Next to the Dynatrace default encryption key (which is named DYNATRACE DEFAULT KEY), select > Activate.
The Dynatrace default encryption key is now used to encrypt and decrypt all new data.
When you switch back to the Dynatrace default encryption key, data that was already encrypted with a previous key won't be re-encrypted.
Do not delete or revoke the previously used customer-managed AWS encryption key! It is still required to decrypt already encrypted data.