Monitor AWS Elastic Beanstalk
- Dynatrace Classic
- How-to guide
- 1-min read
- Published Jul 19, 2017
AWS Elastic Beanstalk is a service provided by Amazon Web Services (AWS) that gives you the option of deploying and auto-scaling applications and services.
As this type of installation depends heavily on user customizations, there isn't any set of steps that will work in all scenarios. The following aims to provide an overview of the entire process, with examples to help you create your own deployment.
Prerequisites
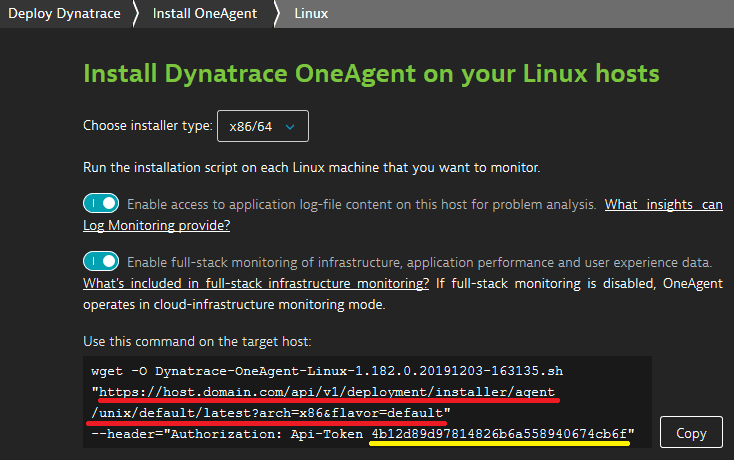
- Locate the
ONEAGENT_INSTALLER_SCRIPT_URL. This information is shared during Dynatrace OneAgent installation.
Locate your installer URL
To get your ONEAGENT_INSTALLER_SCRIPT_URL
- In Dynatrace Hub, select OneAgent.
- Select Set up > Linux.
- Determine the installer script URL and token from the UI-provided
wgetcommand:
This is the URL:

- Replace the value of
archparameter with<arch>. Ignore theflavor=defaultparameter. - For the
API-Tokenvalue, you need a PaaS token.
Your URL should look like this:
https://host.domain.com/api/v1/deployment/installer/agent/unix/default/latest?arch=<arch>
This is your ONEAGENT_INSTALLER_SCRIPT_URL.
- Access to the AWS console
For configurations where OneAgent is already part of your application deployment, you don't have to manually install OneAgent or restart servers to enable service monitoring.
Download OneAgent
- In Dynatrace Hub, select OneAgent.
- Select Set up > Windows or Linux.
For more information, see the OneAgent installation instructions for Windows or Linux.
Customize your installation
- Make sure the configuration files are properly formatted YAML files.
- Don't use tabs for indentation. Only spaces are allowed.
- The Elastic Beanstalk extension script file names are important—the Amazon interpreter executes them in alphabetical order.
To install OneAgent, you need two configuration files:
- One file for downloading the OneAgent installer
- Another file for invoking the installation and post-installation tasks.
-
In the Beanstalk deployment package, create a
.ebextensionsdirectory within the same directory as the main Beanstalk project source code. The two configuration files mentioned above must be placed in this directory. -
Create a configuration file for downloading the installer named
0dynatraceDownload.config.The file must contain a
filessection that defines:- The download path and target file name (for example,
/tmp/dynatraceinstall.sh) - Proper user rights settings
- The OneAgent download URL mentioned in the prerequisites.
Example:
files:"/tmp/dynatraceinstall.sh":mode: "000755"owner: rootgroup: rootsource: "https://abcdefghij.live.dynatrace.com/api/v1/deployment/installer/agent/unix/default/latest?arch=x86&flavor=default&Api-Token=abcdefghijklmnopqrstu"Make sure to replace the generic values in the example above with your own.
- The download path and target file name (for example,
-
Create a configuration file to execute the OneAgent installer and perform other tasks such as service restart, named
1dynatraceInstallAndPost.config.In the example below, the script checks for an existing OneAgent setup and, if no OneAgent is found, executes the installation from the
/tmpdirectory, setting the--set-proxy=172.1.1.128:8080installation parameter to connect the agent to a specific proxy. Then thehttpdservice is restarted.commands:install_dynatrace:cwd: /tmpcommand: "/bin/sh dynatraceinstall.sh --set-proxy=172.1.1.128:8080"restart_httpd:command: "service httpd restart"If you want to add more parameters, separate them with spaces. To learn more about installation parameters, see how to customize OneAgent installation on Linux.
Do not use the command's
envproperty because it overwrites, rather than appends, the existing environment and will cause OneAgent installation to fail. -
Optional Extend your configuration.
You can also include steps to download OneAgent in your configuration.
The example below includes OneAgent download in the configuration. While this is necessary for the first installation of OneAgent, it might substantially lengthen future application updates because you download OneAgent each time you run the script. To improve your Beanstalk configuration, add a check for an existing OneAgent installation and have your scripts download OneAgent only when it isn't found on the system.
Inspect the following Linux configuration example carefully before creating your own scripts. The Amazon interpreter is sensitive to syntax errors. Take care in formatting and escaping special characters.
files:"/tmp/dynatraceinstall.sh":mode: "000755"owner: rootgroup: rootcontent: |#!/bin/bashif [ ! -d /opt/dynatrace/oneagent ]; thenwget -O /tmp/Dynatrace-OneAgent.sh "https://abcdefghij.live.dynatrace.com/api/v1/deployment/installer/agent/unix/default/latest?arch=x86&flavor=default&Api-Token=abcdefghijklmnopqrstu"chmod 755 /tmp/Dynatrace-OneAgent.shsudo chown root:root /tmp/Dynatrace-OneAgent.shsudo /tmp/Dynatrace-OneAgent.shficommands:install_dynatrace:cwd: /tmpcommand: "/bin/sh dynatraceinstall.sh --set-proxy=172.1.1.128:8080"restart_nginx:command: service nginx restartignoreErrors: true
Configure network zones Optional
To configure network zones, use the following argument: --set-network-zone=<your.network.zone>. See network zones for more information.
Monitoring consumption
For AWS Elastic Beanstalk, monitoring consumption is based on hosts units. See Application and Infrastructure Monitoring (Host Units) for details.