Update a cluster
- How-to guide
- 5-min read
Dynatrace Managed versions are released sequentially, but you can skip certain versions in the rollout process to update to a newer version faster. For installed Managed versions that allow for faster updates, we recommend waiting until the target version is released if you cannot complete the update process within one month. The following table illustrates the version logic.
| Installed version | Can update to version 1 |
|---|---|
| 1.306 | 1.308 |
| 1.304 | 1.306 (only before 1.308 is released); 1.308 |
| 1.302 | 1.304 |
| 1.300 | 1.302 (only before 1.304 is released); 1.304 |
You can skip a Managed version only if its installed version is divisible by 4.
If your installed Managed version is 1.300 and you want to update it to version 1.304, you can skip version 1.302 as soon as 1.304 is released. If version 1.304 has not yet been released, you need to first update to version 1.302 and then to version 1.304. However, once version 1.304 is released, version 1.302 will no longer be available for download.
Can I always perform Managed version updates sequentially without skipping a version?
Yes, since Dynatrace Managed version 1.324, you have full control over which versions you update to when using the automatic update functionality. To install each version sequentially:
- Log in to Cluster Management Console.
- Go to Settings > Automatic update.
- Turn on Run Dynatrace cluster updates sequentially without skipping a version.
How can I check my installed Managed version?
To check which Dynatrace Managed version you have currently installed
-
Log in to Cluster Management Console or one of your monitoring environments.
-
Open the User menu in the upper-right corner.
The Dynatrace Managed version number is displayed at the bottom of the menu.
Alternatively, you can
-
Log in to Cluster Management Console and select Deployment status.
-
On the Cluster nodes tab, select a node to display its overview.
The Dynatrace Managed version number is displayed as the value of Version.
Before you begin
Before you begin the cluster update, make sure that the following conditions are met.
- You have at least 5 GB of available disk space on the partition where Dynatrace Managed is installed. For details, see Managed hardware requirements.
- You wait 24 hours between cluster updates to ensure that all post-processing steps are completed before initiating another update.
- If your cluster consists of less than 3 nodes, Dynatrace Managed won't be accessible during the update process.
Update a cluster
There are three different approaches to updating a Managed cluster. Select the approach that best suits your needs.
Automatic update (recommended)
By default, installation packages are downloaded automatically from Mission Control as soon as they are available to your cluster.
After an installation package is downloaded, a 24-hour waiting period is required before an automatic update can run. This means that an automatic update is attempted during the first scheduled maintenance window that occurs 24 hours after the download completes. For example, if you download an installation package today and the maintenance window is scheduled for 1:00 AM tomorrow, your update will be executed in the following week, not tomorrow, because the 24-hour waiting period will not be finished by 1:00 AM tomorrow.
Define a suitable maintenance window in which the automatic update should run.
- Log in to Cluster Management Console.
- Go to Settings > Automatic update.
- Ensure that Install Dynatrace cluster updates automatically during the selected maintenance window is turned on.
- Define a maintenance window start time. The update will run at the time you specify.
Trigger update manually
You can trigger the update manually at any time outside the defined maintenance window via:
- the Automatic update in the Cluster Management Console.
- the Cluster API v1 – Updates – Trigger Upgrade.
If you have turned off Install Dynatrace cluster updates automatically during the selected maintenance window, you must trigger the update always manually.
Semi-automatic update
If you have turned off the automatic download of installation packages or there is no connection to Mission Control, you will receive an email notification whenever a new installation package is available. This email contains links to download the installation packages. After downloading the installation packages, you need to upload them manually to the cluster.
If you need strict control over the installation package download, you can opt out from automatic download of installation packages. In this case, you need to update your license. Please contact Dynatrace Support for assistance.
Update notification email example
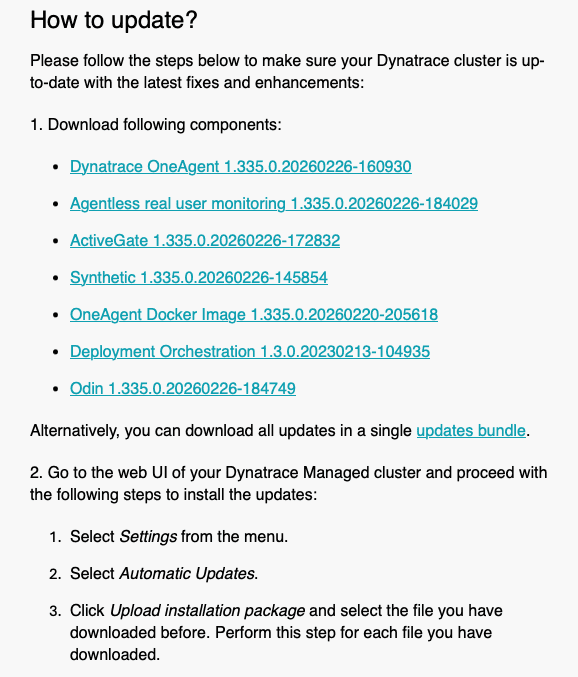
To upload an installation package manually to your cluster:
- Log in to Cluster Management Console.
- Go to Settings > Automatic update
- Select Upload installation package to upload the downloaded package to your cluster.
- After the upload, the installation package is distributed automatically to all nodes of the cluster.
- If you have turned on automatic updates, the update will start automatically during the defined maintenance window.
- Alternatively, you can trigger the update manually.
Copy installation packages manually
You can manually copy an installation package to the following directories on each cluster node.
-
For cluster updates to:
/opt/dynatrace-managed/installer/upgrade -
For OneAgent, RUM JavaScript, ActiveGate, and Synthetic to:
/var/opt/dynatrace-managed/agents
Manual update
After uploading the installation packages manually to each cluster node, you need to run the update script on each node. Since the node that's being updated isn't operating, it's crucial that you manually update one node at a time.
- Run the update script for each node in sequence, one node at a time.
- Wait until the node update completes before starting an update on the next node.
To manually update a cluster node, follow the steps below and replace <version> with your Dynatrace Managed version.
-
Navigate to the update script in:
/opt/dynatrace-managed/installer/upgrade -
Give the update script executable permissions. Use the Linux
chmodcommand.[root@localhost]# chmod +x dynatrace-managed-<version>.sh -
Execute the update script as a
rootuser.[root@localhost]# ./dynatrace-managed-<version>.sh --upgrade -
Once the update is successfully completed, move on to the next node and repeat the procedure.
Successful cluster node update example
[root@localhost]# ./dynatrace-managed-<version>.sh --upgradeStarting Dynatrace <version> installer ... OKTesting connection to Dynatrace Mission Control ... OKVerifying system compatibility ... OKVerifying disk space ... OKVerifying Dynatrace directories ... OKVerifying system privileges ... OKVerifying system connectivity ... OKStopping Dynatrace ... OKPreparing system user for Dynatrace ... OKInitializing upgrade ... OKChecking user permissions ... OKChecking file ownership ... OKDownloading Dynatrace OneAgent. This may take a few minutes ... OKUpgrading. This may take a few minutes ... OKPreparing connectivity settings ... OKSetting up cluster configuration. This may take a few minutes ... OKStarting Dynatrace. This may take up to half an hour ... OKUpgrade completed successfully after 8 minutes 50 seconds.Dynatrace binaries are located in directory /opt/dynatrace-managedDynatrace data is located in directory /var/opt/dynatrace-managedDynatrace metrics repository is located in directory /var/opt/dynatrace-managed/cassandraDynatrace Elasticsearch store is located in directory /var/opt/dynatrace-managed/elasticsearchDynatrace server store is located in directory /var/opt/dynatrace-managed/serverDynatrace session replay store is located in directory /var/opt/dynatrace-managed/server/replayDataYou can now log into your Dynatrace Server at https://10.10.10.10[root@localhost]#