Convert a Managed Cluster to a rack-aware deployment using restore
- How-to guide
- 3-min read
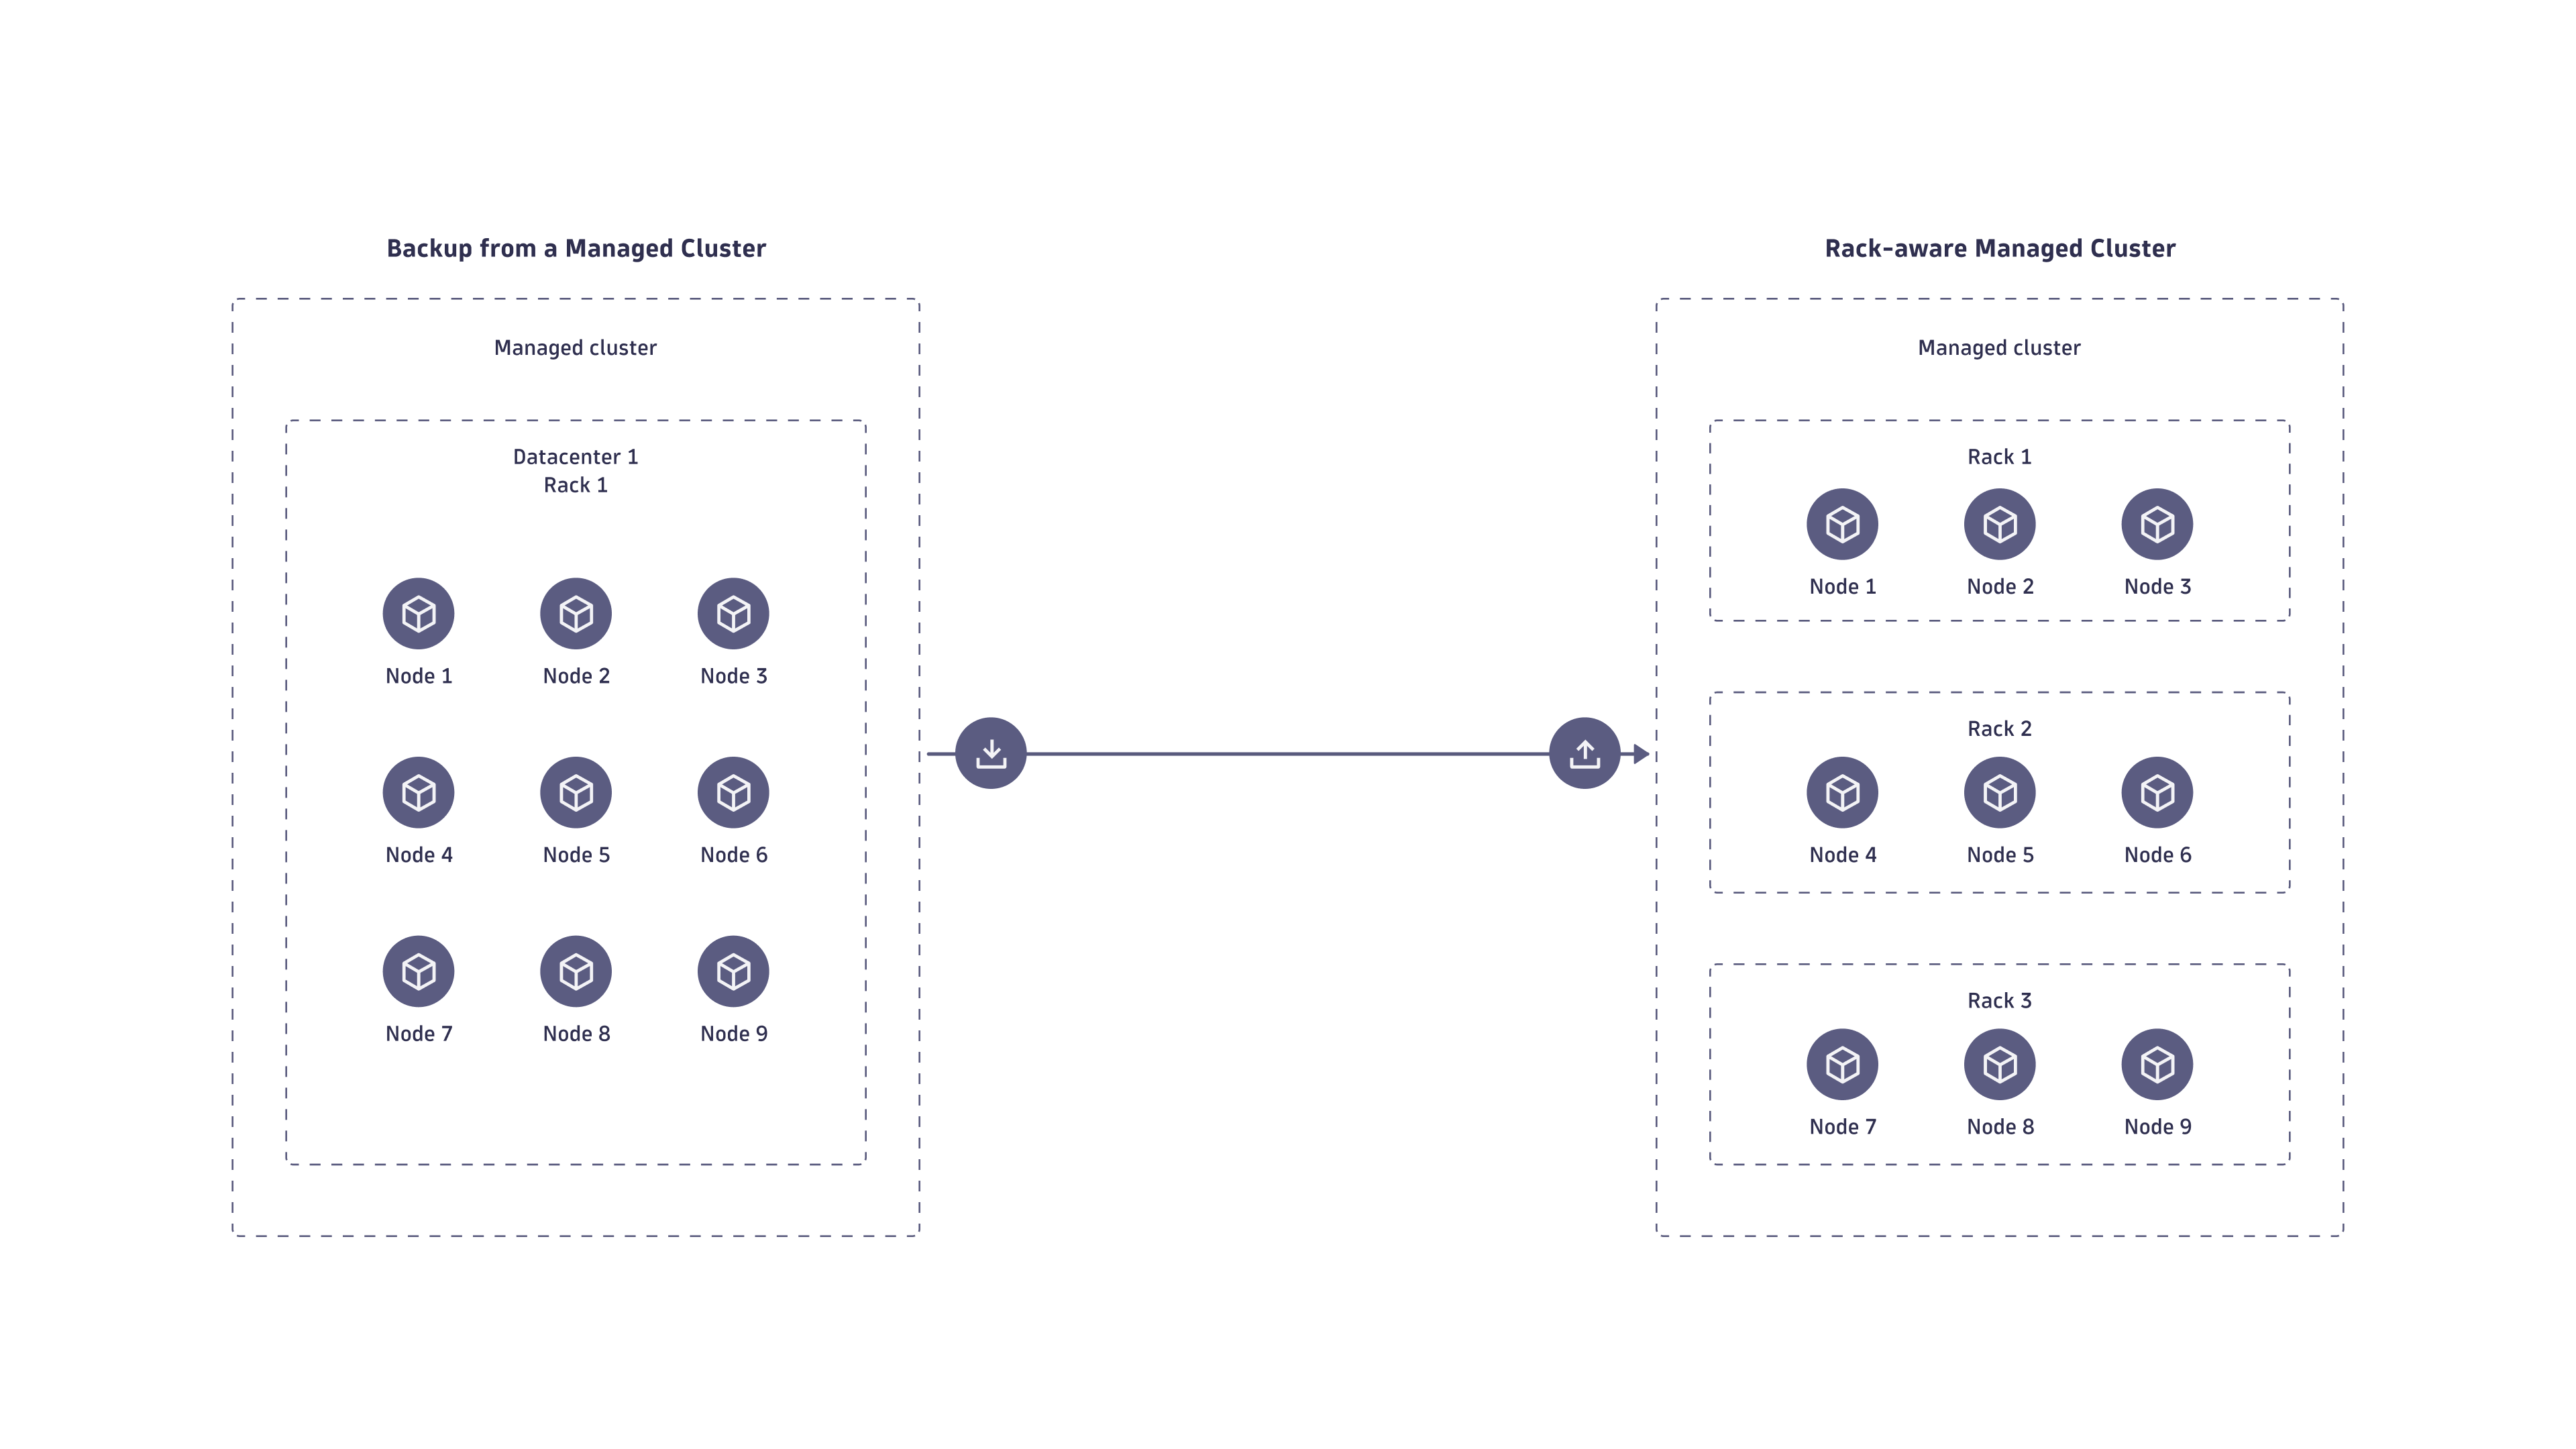
To convert a Managed Cluster to a rack-aware deployment using the backup and restore method, follow the steps below.
This method isn't supported on a Premium High Availability deployment, because it stops and reinstalls the whole Managed Cluster at once. See Combine Premium High Availability with rack awareness for the supported route.
The restore method is universal and works for larger Managed Clusters and more complex topology changes. However, the restoration process is time-consuming, and because backups run daily, the conversion involves some data loss. The backup doesn't include transaction storage (distributed traces). For small Managed Clusters where one node can contain a full replica, use the rack-aware conversion using replication method instead.
 Prepare for the conversion
-
Verify that the Managed Cluster has a recent backup. See Back up and restore a Managed Cluster.
-
Prepare new nodes. Make sure the disk partition allocated for Cassandra storage on the new node is sufficient to contain the entire Cassandra database (with margin for compaction and new data). The disk must be at least twice the combined Cassandra storage of all existing Cluster nodes. Place Cassandra data on a separate volume to avoid disk-space issues from different data types.
-
Create your Managed Cluster inventory. You need the node IDs and the IPv4 addresses of the new machines during the restore. See Back up and restore a Managed Cluster.
 Restore the Managed Cluster into new racks
-
Stop the existing Managed Cluster to prevent two Managed Clusters with the same ID from connecting to Dynatrace Mission Control.
See Start/stop/restart a node. -
Run the Managed Cluster restore procedure (Back up and restore a Managed Cluster), with one modification: run the Dynatrace Managed installer on each node with the rack parameters.
Run the installer in parallel on every node, using the following parameters:
--rack-name: rack this node belongs to--rack-dc: data center this node belongs to--restore: switches the installer into restore mode--cluster-ip: IPv4 address of the node on which you run the installer--cluster-nodes: comma-delimited list of IDs and IP addresses of all nodes in the Managed Cluster, including the one on which you run the installer, in the format<node_id>:<node_ip>,<node_id>:<node_ip>--seed-ip: IPv4 address of the seed node--backup-file: path to the backup*.tarfile — the path combines the shared file storage mount, the Managed Cluster ID, the node ID, the backup version, and the filename, in the format
<path-to-backup>/<UUID>/node_<node_id>/files/<backup_version_number>/<backup_file>
Backup path example
Consider this example path:
/mnt/backup/bckp/c9dd47f0-87d7-445e-bbeb-26429fac06c6/node_1/files/19/backup-001.tarThe parts of the path are as follows:
<path-to-backup>=/mnt/backup/bckp/<UUID>=c9dd47f0-87d7-445e-bbeb-26429fac06c6<node_id>=1<backup_version_number>=19
While the backup is in progress, two backup directories might be present with different backup version numbers:
- The directory with the lower version number contains the old backup. This directory is deleted after the backup completes.
- The directory with the higher version number contains the backup that's in progress.
The backup version number increments with each backup execution.
Get the IDs and IP addresses from the inventory you created before you started. For example:
- IP address of the node to restore:
10.176.41.168 - Node IDs and new IP addresses of all nodes in the Managed Cluster:
1: 10.176.41.168, 3: 10.176.41.169, 5: 10.176.41.170
sudo ./tmp/backup-001-dynatrace-managed-installer.sh \--rack-name rack2 \--rack-dc datacenter1 \--restore \--cluster-ip "10.176.41.168" \--cluster-nodes "1:10.176.41.168,3:10.176.41.169,5:10.176.41.170" \--seed-ip "10.176.41.169" \--backup-file /mnt/backup/bckp/c9dd47f0-87d7-445e-bbeb-26429fac06c6/node_1/files/19/backup-001.tar
 Verify the conversion
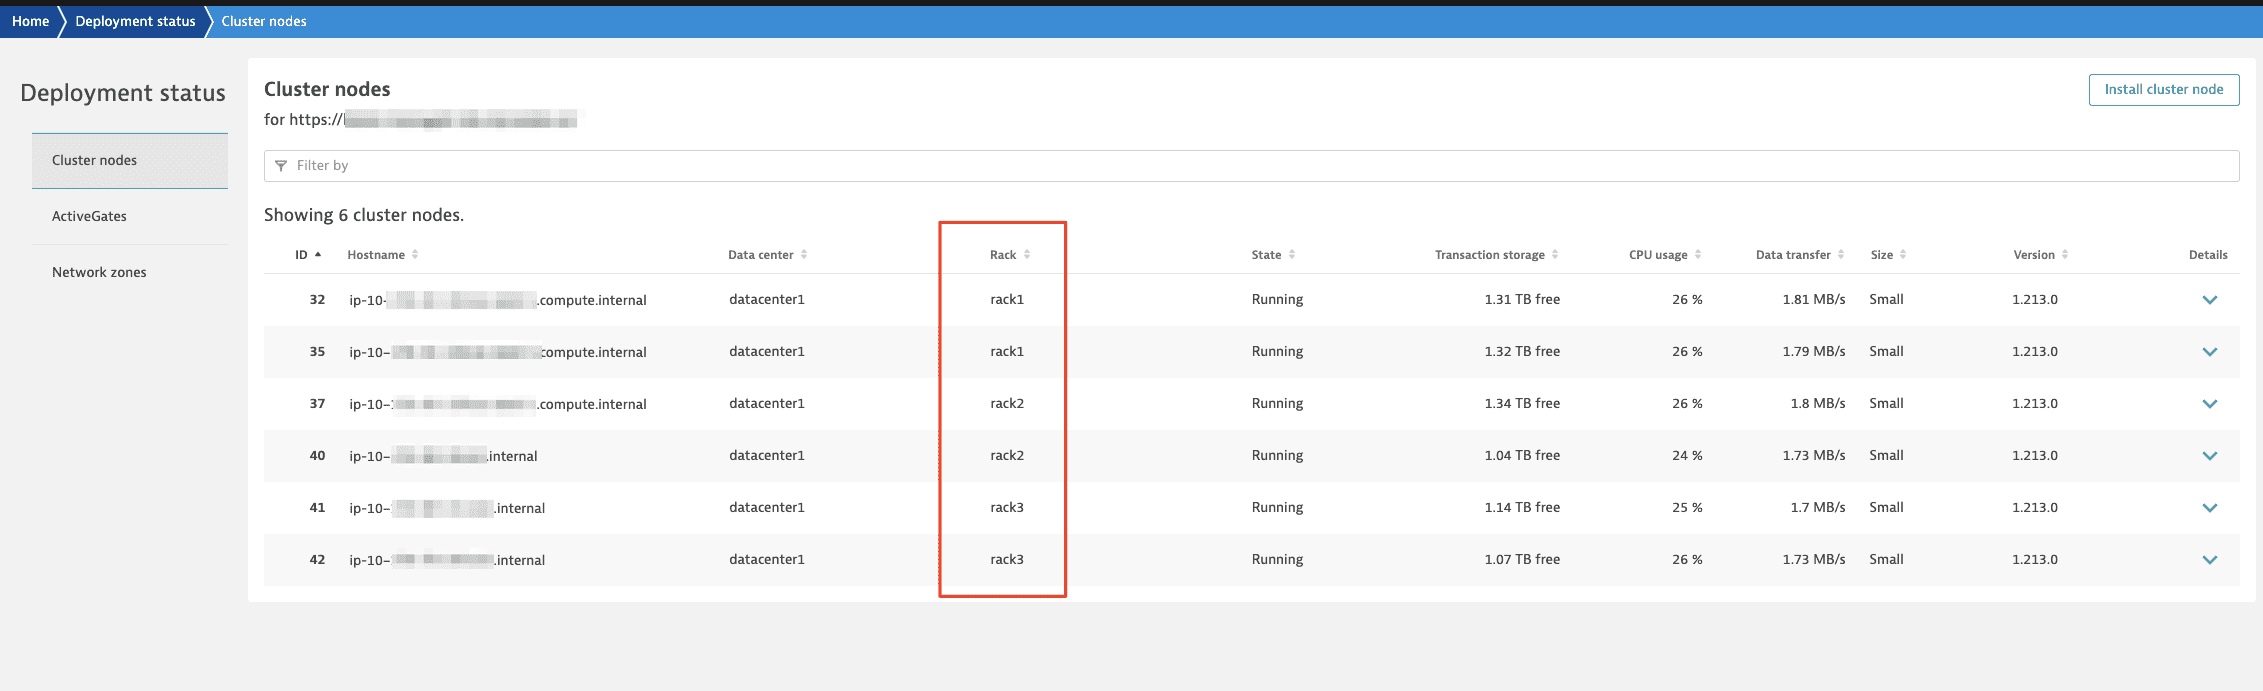
The restore process places the loaded data directly in the target racks. After the conversion is complete, go to the Deployment status page in the Cluster Management Console and confirm that it lists the new racks: