Set up Kubernetes platform monitoring with DaemonSet
- Latest Dynatrace
- 4-min read
- Published Jan 21, 2020
Deprecated
Manually configuring a daemonset to rollout OneAgent on a Kubernetes cluster is deprecated.
We recommend that you leverage Dynatrace Operator and benefit from automated lifecycle management and metadata enrichment. For a clear view of all the deployment strategies, see How it works.
This page describes how you can set up OneAgent on Kubernetes using the OneAgent DaemonSet. DaemonSet is a feature that makes sure that if a copy of a Pod on a node dies, the copy is recreated, and if nodes are added to the cluster, copies of the Pod are added as well.
Prerequisites
- Pods must allow egress to your Dynatrace environment or to your Environment ActiveGate in order for metric routing to work properly.
- Locate the
ONEAGENT_INSTALLER_SCRIPT_URL. This information is shared during Dynatrace OneAgent installation.
How to locate your installer URL
To get your ONEAGENT_INSTALLER_SCRIPT_URL
- In Dynatrace Hub, select OneAgent.
- Select Set up > Linux.
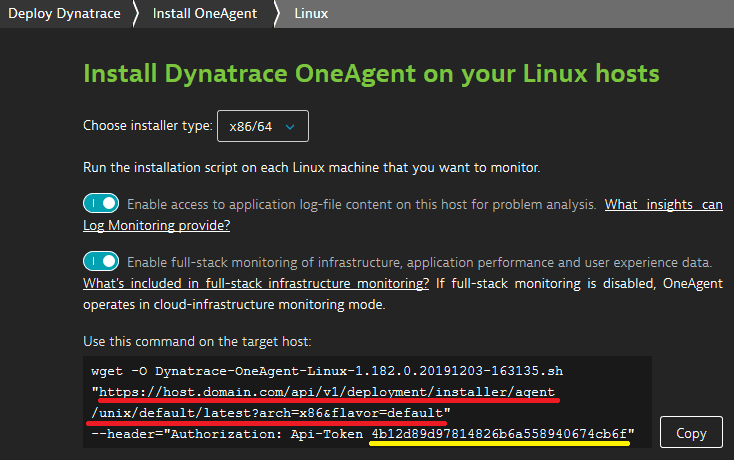
- Determine the installer script URL and token from the UI-provided
wgetcommand:
This is the URL:

- Replace the value of
archparameter with<arch>. Ignore theflavor=defaultparameter. - For the
API-Tokenvalue, you need a PaaS token.
Your URL should look like this:
https://host.domain.com/api/v1/deployment/installer/agent/unix/default/latest?arch=<arch>
This is your ONEAGENT_INSTALLER_SCRIPT_URL.
Install DaemonSet
-
Download or copy the
dynatrace-oneagent.ymlKubernetes template.dynatrace-oneagent.yml
apiVersion: apps/v1kind: DaemonSetmetadata:name: dynatrace-oneagentspec:selector:matchLabels:name: dynatrace-oneagenttemplate:metadata:labels:name: dynatrace-oneagentspec:hostPID: truehostIPC: truehostNetwork: truenodeSelector:beta.kubernetes.io/os: linuxvolumes:- name: host-roothostPath:path: /containers:- name: dynatrace-oneagentimage: dynatrace/oneagentenv:- name: ONEAGENT_INSTALLER_SCRIPT_URLvalue: your_URL- name: ONEAGENT_INSTALLER_SKIP_CERT_CHECKvalue: 'false'- name: ONEAGENT_INSTALLER_DOWNLOAD_TOKENvalue: '<API-Token>'args:- '--set-network-zone=<your.network.zone>'volumeMounts:- name: host-rootmountPath: /mnt/rootsecurityContext:privileged: trueONEAGENT_INSTALLER_DOWNLOAD_TOKENis only needed for OneAgent container image versions 1.39+ and is ignored for earlier versions.- The
--set-app-log-content-accessparameter is passed to the OneAgent installer and, when set totrue(or1), allows OneAgent to access log files for the purpose of log monitoring. For more about this and other parameters, see Customize OneAgent installation on Linux. - You can configure network zones by setting the
--set-network-zone=<your.network.zone>parameter. See network zones for more information.
-
Deploy Dynatrace OneAgent using the created file
dynatrace-oneagent.yml.kubectl apply -f dynatrace-oneagent.yml --namespace=kube-systemdaemonset "dynatrace-oneagent" created -
Verify that the
dynatrace-oneagentDaemonSet has deployed Pods to the cluster nodes successfully:kubectl get pods --namespace=kube-systemNAME READY STATUS RESTARTS AGEdynatrace-oneagent-abcde 1/1 Running 0 1mkubectl logs -f dynatrace-oneagent-abcde09:46:18 Using volume-based storage09:46:18 Started agent deployment as a Docker container, PID 1234.09:46:18 Downloading agent to /tmp/Dynatrace-OneAgent-Linux.sh via https://EnvironmentID.live.dynatrace.com/api/v1/deployment/installer/agent/unix/default/latest?Api-Token=***&arch=x86&flavor=default09:46:21 Download complete09:46:21 Downloaded version: 1.x09:46:21 Validating downloaded agent installer09:46:23 Verification successful...
Limitations
- When you set up Kubernetes/OpenShift monitoring with DaemonSet, the shutdown state of the host is not detected. For details, see Host availability states.
- See Docker limitations.
Connect your Kubernetes clusters to Dynatrace
Now that you have OneAgent running on your Kubernetes nodes, you're able to monitor those nodes and the applications running in Kubernetes. The next step is to connect the Kubernetes API to Dynatrace in order to get native Kubernetes metrics, like request limits, and differences in Pods requested vs running Pods.
For further instructions, see Connect your Kubernetes clusters to Dynatrace.
Update OneAgent DaemonSet
Whenever a new version of OneAgent becomes available in Dynatrace, you can redeploy OneAgent as explained in the steps below. The dynatrace-oneagent container will automatically fetch the latest version of Dynatrace OneAgent.
If you've specified a default OneAgent installation version for new hosts and applications in your OneAgent updates settings, the dynatrace-oneagent container will automatically fetch the defined default version of OneAgent.
-
Delete the
dynatrace-oneagentDaemonSet.kubectl delete ds/dynatrace-oneagent -
Deploy Dynatrace OneAgent using the
dynatrace-oneagent.ymlDaemonSet file.kubectl apply -f dynatrace-oneagent.yml --namespace=kube-system
Uninstall OneAgent DaemonSet
-
Delete the
dynatrace-oneagentDaemonSet.kubectl delete ds/dynatrace-oneagent -
Optional After deleting the
dynatrace-oneagentDaemonSet, the OneAgent binary remains on the node in an inactive state. To uninstall it completely, run theuninstall.shscript and delete logs and configuration files.
See Linux related information.
