Webhook integration for security notifications
- How-to guide
- Published Oct 21, 2021
This page refers to the classic Attacks (previous Dynatrace) or  Attacks app, which is deprecated. If you're currently using this app, we recommend transitioning to the corresponding
  Threats & Exploits in the latest Dynatrace experience, which offers enhanced functionality and ongoing support. For details, see Upgrade to the latest Dynatrace.
Integrate security notifications with Dynatrace to pass security issues and/or attacks to your teams for alerting and remediation purposes.
To integrate security notifications using webhooks, follow the instructions below.
Set up notifications for attacks
To set up notifications for attacks
 Create an alerting profile
Create an alerting profile, which allows you to set up alert-filtering rules that are based on the state of detected attacks.
- Go to Settings and select Alerting > Attack alerting profiles.
- Select Add alerting profile.
- Enter a Name for the profile on which you want to receive security notifications.
- Turn on the switch of any attack status for which you want to receive notifications. You can select more than one.
- Select Save changes to save your configuration.
 Link the alerting profile to a webhook security notifications integration
Link the alerting profile to a security notifications integration using webhooks. You can define the webhook integration and configure the payload (in the form of a message template) that you want to receive with your security notifications.
-
Go to Settings and select Integration > Security notifications.
-
Select Add integration and enter the following information.
- Security alert type: Select Attack alert.
- Notification type: Select Custom integration.
- Display name: Enter a name for the webhook integration. This name will be displayed on Settings > Integration > Security notifications after you save this configuration.
- Webhook endpoint URL: Enter the URL of the webhook API endpoint.
-
Optional Choose whether you want to accept any SSL certificate.
- On = Accept any SSL certificate (including self-signed and invalid certificates)
- Off = Dynatrace verifies the SSL certificate of the URL. (Recommended)
-
Select Add HTTP header to specify additional HTTP header fields, such as
Content-TypeorAuthorization. These custom HTTP header fields can be used if the target endpoint needs an authentication token within the HTTP header or if you would like to send different content types such asapplication/json,application/xml,text/plain.The Content-Type field is required, others are optional.
-
In the Custom payload field, customize your notification format and content. Once an attack is detected, this customizable payload is pushed through an HTTP POST to the target system. Select the Info icon for a list of Available placeholders that you can use for this integration. Placeholders are automatically replaced with information related to the attack when the notification is generated.
Example message template:
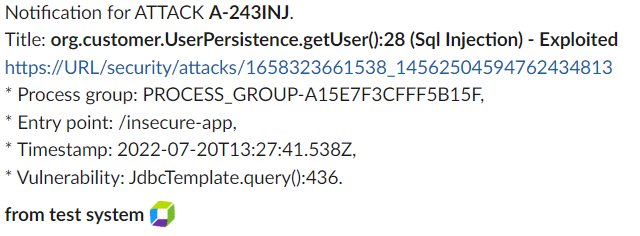
{"text": "Notification for ATTACK *{AttackDisplayId}*. \nTitle: *{Title} - ({Type}) - {State}*\n{AttackUrl}\n* Process group: {ProcessGroupId}, \n* Entry point: {EntryPoint}, \n* Timestamp: {Timestamp}, \n* Vulnerability: {VulnerabilityName}. \n\n *from test system* :dynatrace:"}
Example payload:

-
From the Alerting profile list, select the alerting profile on which you want to receive security notifications.
-
Optional To verify your configuration, select Send test notification. If your configuration is correct:
- You should receive a notification on your organization's endpoint.
- The following info message should be displayed on the Dynatrace settings page:
Test notification sent successfully.
-
Save changes.
Verify your configuration
To verify that your integration is set up correctly
- Go to Settings and select Integration > Security notifications.
- Select Details for the integration you want to check.
- Select Send test notification. If your configuration is incorrect and the test notification hasn't been sent to your organization's selected endpoint, you'll receive an error message that will help you identify the problem.
 Attacks