Explore your DPS for Hybrid subscription with dashboards
- Latest Dynatrace
- How-to guide
- 30-min read
- Published Feb 24, 2026
You can use  Dashboards to view and explore cost and usage information related to your DPS for Hybrid subscription.
This guide will show you how to:
- Access account-level usage data via using the Account Management API.
- Send this data to your Dynatrace environment.
- View this data in a custom dashboard.
After completing this guide, you'll have a customizable dashboard in Dynatrace that you can use and modify to view and explore your DPS for Hybrid subscription and cost information.
You can also use the exported business events for other Dynatrace platform features, such as  Workflows and automations.
Prerequisites
Before you begin, make sure you have:
- At least one SaaS environment included in your DPS for Hybrid setup.
- Administrator permissions for all Dynatrace accounts that you'll want to access.
- Read/write access to a Dynatrace environment that has Business Events powered by Grail.
- A JavaScript environment with
node.js. - A basic understanding of JavaScript and DQL.
How to
 Set up access to account API and subscription API
Dynatrace provides all relevant data of your subscription via an API, see Dynatrace Platform Subscription API. To access these APIs, you need to set up OAuth clients and access tokens as described in this section.
The API definitions are available at Dynatrace Account Management API, under the Dynatrace Platform Subscription drop-down.
1. Create an OAuth client for your account
Access to the API requires an access token. Each Dynatrace account requires its own access token.
This section guides you through how to create an OAuth client, which you can then use to request the access token. For more information about OAuth clients, see OAuth clients.
-
Go to the Account Management portal. Either:
- Enter https://myaccount-dev.dynatracelabs.com/accounts in your browser.
- In your Dynatrace environment, select your user name in the bottom-left and then select Account Management .
-
Select Identity & access management > OAuth clients.
-
Select Create client. The Create OAuth client screen appears.
-
Enter the following information:
- The email address that should be associated with this OAuth client.
- A description (optional).
- Select the checkbox next to Permissions > Account > View usage and consumption
account-uac-read.
-
Scroll to the bottom of the screen and select Create client. A OAuth client created pop-up appears, which contains:
- Client ID
- Client secret
- Dynatrace account URN
-
Copy this information and store it safely and securely.
You can only access this information once upon creation. You can't reveal it afterward.
-
Additionally, save your account's UUID. You can find it in the browser's address bar and has the format
c4f3c4f3-c4f3-c4f3-c4f3-c4f3c4f3c4f3. -
Select Finish.
Congratulations! You have created your first OAuth client. Repeat these steps for all accounts you want to access.
2. Request an access token
Now that you have your OAuth clients ready, use them to request access tokens. For more information about access tokens, see Request a token.
Each API call requires an access token. Tokens are valid for time 5 minutes for security reasons, therefore it doesn't make sense to persist them.
You can request an access token via API at the Dynatrace SSO URL: https://sso.dynatrace.com/sso/oauth2/token.
-
Create a JavaScript file with the following contents.
const ssoURL = "https://sso.dynatrace.com/sso/oauth2/token";const secret = {"client_id": "", // insert your OAuth client id here"client_secret": "", // insert your OAuth client secret here"uuid": "" // insert your account UUID id here};async function getToken() {var requestBody = [];requestBody.push(encodeURIComponent("grant_type") + "=" +encodeURIComponent("client_credentials"));requestBody.push(encodeURIComponent("client_id") + "=" +encodeURIComponent(secret.client_id));requestBody.push(encodeURIComponent("client_secret") + "=" +encodeURIComponent(secret.client_secret));requestBody.push(encodeURIComponent("resource") + "=" +encodeURIComponent("urn:dtaccount:" + secret.uuid));requestBody = requestBody.join("&");const tokenRequest = await fetch(ssoURL,{method: "POST",headers:{"Content-Type": "application/x-www-form-urlencoded"},body: requestBody});const tokenResponse = await tokenRequest.json();const token = tokenResponse.access_token;if (tokenResponse.error) {console.error("Error getting token: " + JSON.stringify(tokenResponse));}return token;}async function main() {const token = await getToken();console.log("Access token: \n" + token);}main(); -
Update placeholders with the information from the previous step.
uuidclient-idclient-secret
-
Run the script. Your access token will appear in the console output.
C:\Program Files\nodejs\node.exe .\script.jsAccess token:d3m0d3m0d3m0d3m0d3m0d3m0...
Congratulations! You have requested an access token for your account. You can now start querying subscription data.
3. Query your subscription details
You can query your subscription details via the Account Management API.
-
Define the API endpoint. Add a new
constat the top of your script:const apiURL = "https://api.dynatrace.com"; -
Query the account's active subscription. Add the following
getSubscription()function to your script, immediately after thegetToken()function:async function getSubscription(token) {var activeDPS;const url = apiURL + "/sub/v2/accounts/{accountUuid}/subscriptions".replace("{accountUuid}", secret.uuid);const httpHeader = {"Authorization": "Bearer " + token};const subscriptionRequest = await fetch(url, {method: "GET", headers: httpHeader});const subscriptionResponse = await subscriptionRequest.json();// loop all subscriptions, only return the active onevar subscriptions = subscriptionResponse.data;// assume there is only one active regular DPS subscriptionvar subscriptionUuid = subscriptions.find(item => item.status === "ACTIVE" && item.type === "REGULAR").uuid;if (typeof subscriptionUuid !== 'undefined') {// we got the subscription UUID, lets query the details:const subUrl = apiURL +"/sub/v2/accounts/{accountUuid}/subscriptions/{subscriptionUuid}".replace("{accountUuid}", secret.uuid).replace("{subscriptionUuid}", subscriptionUuid);const subscriptionDetailsRequest = await fetch(subUrl,{ method: "GET", headers: httpHeader });const subscriptionDetailsResponse =await subscriptionDetailsRequest.json();activeDPS = subscriptionDetailsResponse;}return activeDPS;} -
Modify the
mainmethod to call thegetToken()andgetSubscription()functions. Replace the script's contents with the following code:async function main() {const token = await getToken();const subscription = await getSubscription(token);console.log("active subscription:\n" + JSON.stringify(subscription, null, 4));} -
Run the new script. You should get an output similar to this:
C:\Program Files\nodejs\node.exe .\script.jsactive subscription:{"uuid": "c4f3c4f3-c4f3-c4f3-c4f3-c4f3c4f3c4f3","type": "REGULAR","subType": null,"name": "Dynatrace Platform Subscription For You","status": "ACTIVE","startTime": "2024-09-26","endTime": "2025-09-25","account": {"uuid": "c4f3c4f3-c4f3-c4f3-c4f3-c4f3c4f3c4f3"},"budget": {"total": 1000000,"used": 27328.8794184588,"currencyCode": "USD"},"currentPeriod": {"startTime": "2024-09-26","endTime": "2025-09-25","daysRemaining": 313},"periods": [],"capabilities": [...]}
Congratulations! You have queried your subscription details. Let’s continue and query your usage and cost data.
4. Query subscription usage and cost data
Now that you've queried the active regular subscription, you can analyze usage and costs that are booked against this subscription.
-
Update the script to query all cost information related to the subscription. To do this, add a
requestDailyCostsmethod to your JavaScript file.async function requestDailyCosts(token, subscriptionUuid) {var cost;const url = apiURL+ "/sub/v2/accounts/{accountUuid}/subscriptions/{subscriptionUuid}/cost".replace("{accountUuid}", secret.uuid).replace("{subscriptionUuid}", subscriptionUuid);const httpHeader = {"Authorization": "Bearer " + token};const costRequest = await fetch(url,{ method: "GET",headers: this.httpHeader});const costResponse = await costRequest.json();// get all costs booked by account against the currently active DPSif (costResponse.error || costResponse.data === undefined) {console.log("no daily costs found");} else {cost = costResponse.data;// the costs by startTime first:cost.sort((a, b) =>(new Date(a.startTime) > new Date(b.startTime) ? 1 : -1));postProcessCosts(cost);}return cost;} -
Create a
postProcessCosts()function in your JavaScript. This function loops through all cost records and creates the cumulative "cost-to-date" value, which is the cumulative amount of costs consumed from the subscription at the given date.To do so, copy the following function into your script.
function postProcessCosts(cost) {var cumulatedCosts = 0;for (var curCost of cost) {cumulatedCosts += curCost.value;curCost.costToDate = cumulatedCosts;}} -
Modify the existing
mainmethod to call thegetDailyCosts()function.async function main() {const token = await getToken();const subscription = await getSubscription(token);const cost = await getDailyCosts(token, subscription.uuid);console.log("costs:\n" + JSON.stringify(cost, null, 4));} -
Run the new script. You should get an output similar to this:
C:\Program Files\nodejs\node.exe .\script.jsactive subscription:{"uuid": "c4f3c4f3-c4f3-c4f3-c4f3-c4f3c4f3c4f3","type": "REGULAR","subType": null,"name": "Dynatrace Platform Subscription For You","status": "ACTIVE","startTime": "2024-09-26","endTime": "2025-09-25","account": {"uuid": "c4f3c4f3-c4f3-c4f3-c4f3-c4f3c4f3c4f3"},"budget": {"total": 1000000,"used": 27328.8794184588,"currencyCode": "USD"},"currentPeriod": {"startTime": "2024-09-26","endTime": "2025-09-25","daysRemaining": 313},"periods": [],"capabilities": [...]}
Congratulations! All costs booked against your subscription are now available for further processing.
 Convert subscription data into business events
Dynatrace provides a simple yet powerful mechanism to feed data into Grail: business events ("bizevents").
In this section, you'll retrieve subscription information via the API and convert it into business events, which can be imported into Dynatrace. For more information about business events, see Business Analytics.
1. Create an OAuth client to send business events
To send business events to Dynatrace, you need an OAuth client. This is in addition to the clients that you created to access the Account Management API.
For more information about OAuth clients, see OAuth clients.
-
Go to the Account Management portal. Either:
- Enter https://myaccount-dev.dynatracelabs.com/accounts in your browser.
- In your Dynatrace environment, select your user name in the bottom-left and then select Account Management .
-
Select Identity & access management > OAuth clients.
-
Select Create client. The Create OAuth client screen appears.
-
Enter the following information:
- The email address for the service user that should be associated with this OAuth client.
- A description (optional).
- Select the checkbox next to Permissions > Account > Create and edit events
storage:events:write.
-
Scroll to the bottom of the screen and select Create client. A OAuth client created pop-up appears, which contains:
- Client ID
- Client secret
- Dynatrace account URN
-
Copy this information and store it safely and securely.
You can only access this information once upon creation. You can't reveal it afterward.
-
Additionally, save your account's UUID. You can find it in the browser's address bar and has the format
c4f3c4f3-c4f3-c4f3-c4f3-c4f3c4f3c4f3. -
Select Finish.
Congratulations! You have created an OAuth client.
2. Create a new policy
Once you've created an OAuth client to send business events, define user access through policy and group management.
-
In Account Management, go to Identity & access management > Policy management.
-
Select Add policy.
-
Enter the following information:
-
A name for the policy.
-
A description (optional).
-
The policy statement. Copy and paste the following lines:
ALLOW storage:buckets:read WHERE storage:table-name = "bizevents";ALLOW storage:bizevents:read;ALLOW storage:events:write;
-
-
Select Save.
-
Go to Identity & access management > Group management.
-
In Groups, find the group that contains the service user. Then, select > View group
-
Select Permission.
-
Define the permissions:
- In the Please select a permission drop-down menu, find and select the policy that you just created. (It will be located within the Custom group.)
- Under Scope, make sure that the Account (all environments) checkbox is not selected.
- Select the specific environment where you want the business events to be stored.
-
Select Save.
Congratulations! You've now set up everything to ingest business events into your environment.
3. Create a business event
Now that you've prepared everything to ingest business events into Grail, you can prepare the data to be exported to Dynatrace. To do this, update the script to create JSON objects that can be sent via the API and viewed in the dashboard.
We'll create two objects, each with a different event.type, to represent subscription information and cost information.
-
Add an
account_nameattribute to your secret at the top of your JavaScript. This name will later be visible in the dashboard.const secret = {"client_id": "", // insert your OAuth client id here"client_secret": "", // insert your OAuth client secret here"uuid": "", // insert your account UUID id here"account_name": "" // insert your account name for Dashboard here -
Add two functions to your JavaScript file. These functions will create JSON objects that can be passed to Dynatrace.
function createSubscriptionBizEvent(subscription) {return {"event.type" : "dps.subscription.status","event.provider" : "dps4ma.ingester","uuid" : subscription.uuid,"account" : subscription.account,"name" : subscription.name,"budget" : subscription.budget.total,"used" : subscription.budget.used,"currency" : (subscription.budget.currencyCode?subscription.budget.currencyCode:"USD"),"startTime" : subscription.currentPeriod.startTime,"endTime" : subscription.currentPeriod.endTime,"daysRemaining" : subscription.currentPeriod.daysRemaining};}function createCostBizEvent(cost, subscription, accountUuid, accountName) {return {"event.type" : "dps.cost2.booked","event.provider" : "dps4ma.ingester","lastBookingDate" : cost.lastBookingDate,"subscriptionUuid" : subscription.uuid,"accountUuid" : accountUuid,"accountName" : accountName,"startTime" : cost.startTime,"endTime" : cost.endTime,"value" : cost.value,"costToDate" : cost.costToDate};} -
Modify your
main()function to call these newly-created functions. Use the following code, which callscreateCostBizEventfor each cost record returned by the Account Management API in a loop.async function main() {const token = await getToken();const subscription = await getSubscription(token);const cost = await getDailyCosts(token, subscription.uuid);var subscriptionBizEvent = createSubscriptionBizEvent(subscription);console.log("subscription Event:\n"+ JSON.stringify(subscriptionBizEvent, null, 4));for (var dailyCost of cost) {var costBizEvent =createCostBizEvent(dailyCost, subscription,secret.uuid, secret.account_name);console.log("cost Event:\n"+ JSON.stringify(costBizEvent, null, 4));}} -
Run the new script. You should get an output similar to this:
C:\Program Files\nodejs\node.exe .\step6.jssubscription Event:{"event.type": "dps.subscription.status","event.provider": "dps4ma.ingester","uuid": "c4f3c4f3-c4f3-c4f3-c4f3-c4f3c4f3c4f3","account": {"uuid": "4f3c4f3c-c4f3-c4f3-c4f3-c4f3c4f3c4f3"},"name": "Dynatrace -- DPS AX Test - Dieter-1","budget": 1000000,"used": 27328.8794184588,"currency": "USD","startTime": "2024-09-26","endTime": "2025-09-25","daysRemaining": 312}cost Event:{"event.type": "dps.cost2.booked","event.provider": "dps4ma.ingester","lastBookingDate": "2024-10-22T00:00:00.000Z","subscriptionUuid": "c4f3c4f3-c4f3-c4f3-c4f3-c4f3c4f3c4f3","accountUuid": "c4f3c4f3-c4f3-c4f3-c4f3-c4f3c4f3c4f3","accountName": "ACME Global","startTime": "2024-10-22T00:00:00.000Z","endTime": "2024-10-23T00:00:00.000Z","value": 0.0098,"costToDate": 0.0098} ...
Congratulations! You have successfully converted data from the Account Management API into business events! In the next step, we will send these events to one Dynatrace environment, so that we can build a dashboard.
4. Send data to your Dynatrace environment
We are almost there.
Now that you've created the JSON objects with your data, let's send these to Dynatrace. Then we can use the data to create dashboards, notebooks, and automations.
We'll send the JSON objects to the Business Events API, which is reachable at /api/v2/bizevents/ingest.
For more information, see Business Events API v2.
-
Define the environment ingest endpoint. Add the following definition to the top of your script.
const ingestURL = "https://{environment-uuid}.live.dynatrace.com/api/v2/bizevents/ingest"; -
Add a secret to access the environment's API. Add the following code to your script, replacing the placeholders with the values from Create an OAuth client to send business events.
const environmentSecret = {"client_id": "", // insert your OAuth client id here"client_secret": "", // insert your OAuth client secret here"uuid": "", // insert your account UUID id here"account_name": "", // insert your account name for Dashboard here"environment_uuid": "" // insert the UUID of the target environment here} -
Update the
getToken()method to accept a secret and a scope parameter to re-use existing logic.async function getToken(secret, scope) {var requestBody = [];requestBody.push(encodeURIComponent("grant_type") + "=" +encodeURIComponent("client_credentials"));requestBody.push(encodeURIComponent("client_id") + "=" +encodeURIComponent(secret.client_id));requestBody.push(encodeURIComponent("client_secret") + "=" +encodeURIComponent(secret.client_secret));requestBody.push(encodeURIComponent("resource") + "=" +encodeURIComponent("urn:dtaccount:" + secret.uuid));if (scope != undefined) {requestBody.push(encodeURIComponent("scope") + "=" + encodeURIComponent (scope));}requestBody = requestBody.join("&");const tokenRequest = await fetch(ssoURL,{method: "POST",headers:{"Content-Type": "application/x-www-form-urlencoded"},body: requestBody});const tokenResponse = await tokenRequest.json();const token = tokenResponse.access_token;if (tokenResponse.error) {console.error("Error getting token: " + JSON.stringify(tokenResponse));}return token;}async function main() {const token = await getToken();console.log("Access token: \n" + token);}main(); -
Add a function to send business events to Dynatrace. This method calls the ingest API endpoint and posts the business event as JSON data. Copy the following code and paste it into your script.
async function sendBizEvent(token, environmentUuid, event) {const url = ingestURL.replace("{environment-uuid}", environmentUuid);var httpHeader = {"Authorization": "Bearer " + token};httpHeader["content-type"] = "application/json";fetch(url,{method: "POST", headers: httpHeader, body: JSON.stringify(event)} ).then((response) => console.log("server responded: " + response.status)).catch(error => console.error(error));console.log("Event sent: " + event["event.type"]);} -
Update your
main()method to request an access token with a special scope, and then to push the subscription status and cost events to the environment.async function main() {const token = await getToken(secret);const subscription = await getSubscription(token);const cost = await getDailyCosts(token, subscription.uuid);const envToken = await getToken(environmentSecret, "storage:events:write");var subscriptionBizEvent = createSubscriptionBizEvent(subscription);sendBizEvent(envToken, environmentSecret.environment_uuid,subscriptionBizEvent);for (var dailyCost of cost) {var costBizEvent = createCostBizEvent(dailyCost, subscription, secret.uuid, secret.account_name);sendBizEvent(envToken, environmentSecret.environment_uuid, subscriptionBizEvent);}} -
Run the new script. You should get an output similar to this:
C:\Program Files\nodejs\node.exe .\script.jsEvent sent: dps.subscription.statusEvent sent: dps.cost.bookedEvent sent: dps.cost.bookedEvent sent: dps.cost.bookedEvent sent: dps.cost.bookedEvent sent: dps.cost.bookedEvent sent: dps.cost.bookedEvent sent: dps.cost.bookedserver responded: 202server responded: 202server responded: 202server responded: 202server responded: 202server responded: 202server responded: 202server responded: 202 -
Confirm that the data is imported into Dynatrace.
- In your Dynatrace environment, go to
 Notebooks.
 - Select to create a new section.
- Select Explore Business Events.
If you see events with the
event.typeofdps.cost2.bookedanddps.subscription.status, congratulations! You have successfully imported subscription data into Dynatrace. - In your Dynatrace environment, go to
5. Configure ingest from multiple accounts
Now that you're successfully ingesting data from a single account, you can expand your workflow for multiple accounts.
For each additional account whose data you want to import:
-
Set up an OAuth client with Account Management API access permissions, see Set up access to account API and subscription API.
-
Update your script with the credentials for each OAuth client. You can configure as many accounts as you need.
An example for two accounts is shown in the code block below.
const secrets = [{"client_id": "", // insert your OAuth client id here"client_secret": "", // insert your OAuth client secret here"uuid": "", // insert your first account UUID id here"account_name": "" // insert your account name for Dashboard here},{"client_id": "", // insert your OAuth client id here"client_secret": "", // insert your OAuth client secret here"uuid": "", // insert your account UUID id here"account_name": "" // insert your account name for Dashboard here}]; -
Update your
main()method to loop through each account that is configured in the secrets array. Use the code block below, which:- Collects the subscription and all cost data of all accounts.
- Collects all cost records and enriches them with account and subscription data.
- Sends all cost data as business events to the ingest API.
async function main() {var allCosts = [];var subscription;for (var secret of secrets) {console.log("processing " + secret.name);const token = await getToken(secret);if (secret == secrets.at(0)) {subscription = await getSubscription(token, secret.uuid);}var cost = await getDailyCosts(token, secret.uuid, subscription.uuid);if (cost != undefined) {// add account and subscription meta data to each recordcost.forEach((item, index) => {cost[index].account_uuid = secret.uuid;cost[index].account_name = secret.name;cost[index].subscription_uuid = subscription.uuid;});allCosts = allCosts.concat(cost);}}const envToken = await getToken(environmentSecret,"storage:events:write");var subscriptionBizEvent = createSubscriptionBizEvent(subscription);sendBizEvent(envToken,environmentSecret.environment_uuid,subscriptionBizEvent);for (var dailyCost of allCosts) {var costBizEvent = createCostBizEvent(daily cost);sendBizEvent(envToken,environmentSecret.environment_uuid,costBizEvent);}} -
Run the new script. You should get an output similar to this:
C:\Program Files\nodejs\node.exe .\script.jsprocessing Account 1processing Account 2processing Account 3no daily costs foundprocessing Account 4no daily costs foundprocessing Account 5Event sent: dps.subscription.statusEvent sent: dps.cost.booked...server responded: 202
Congratulations! You have successfully converted all cost data from your accounts into business events, and ingested these into your Dynatrace environment.
 View your data in Dashboards
Now that your cost data is available in Dynatrace, you can use a ready-made dashboard template to visualize the information. This dashboard can then be modified to meet your use cases.
- If your dashboard doesn't show the expected data, please check your global timeframe filter.
- Note that forecast data may not be available from the start but requires a bigger data sample.
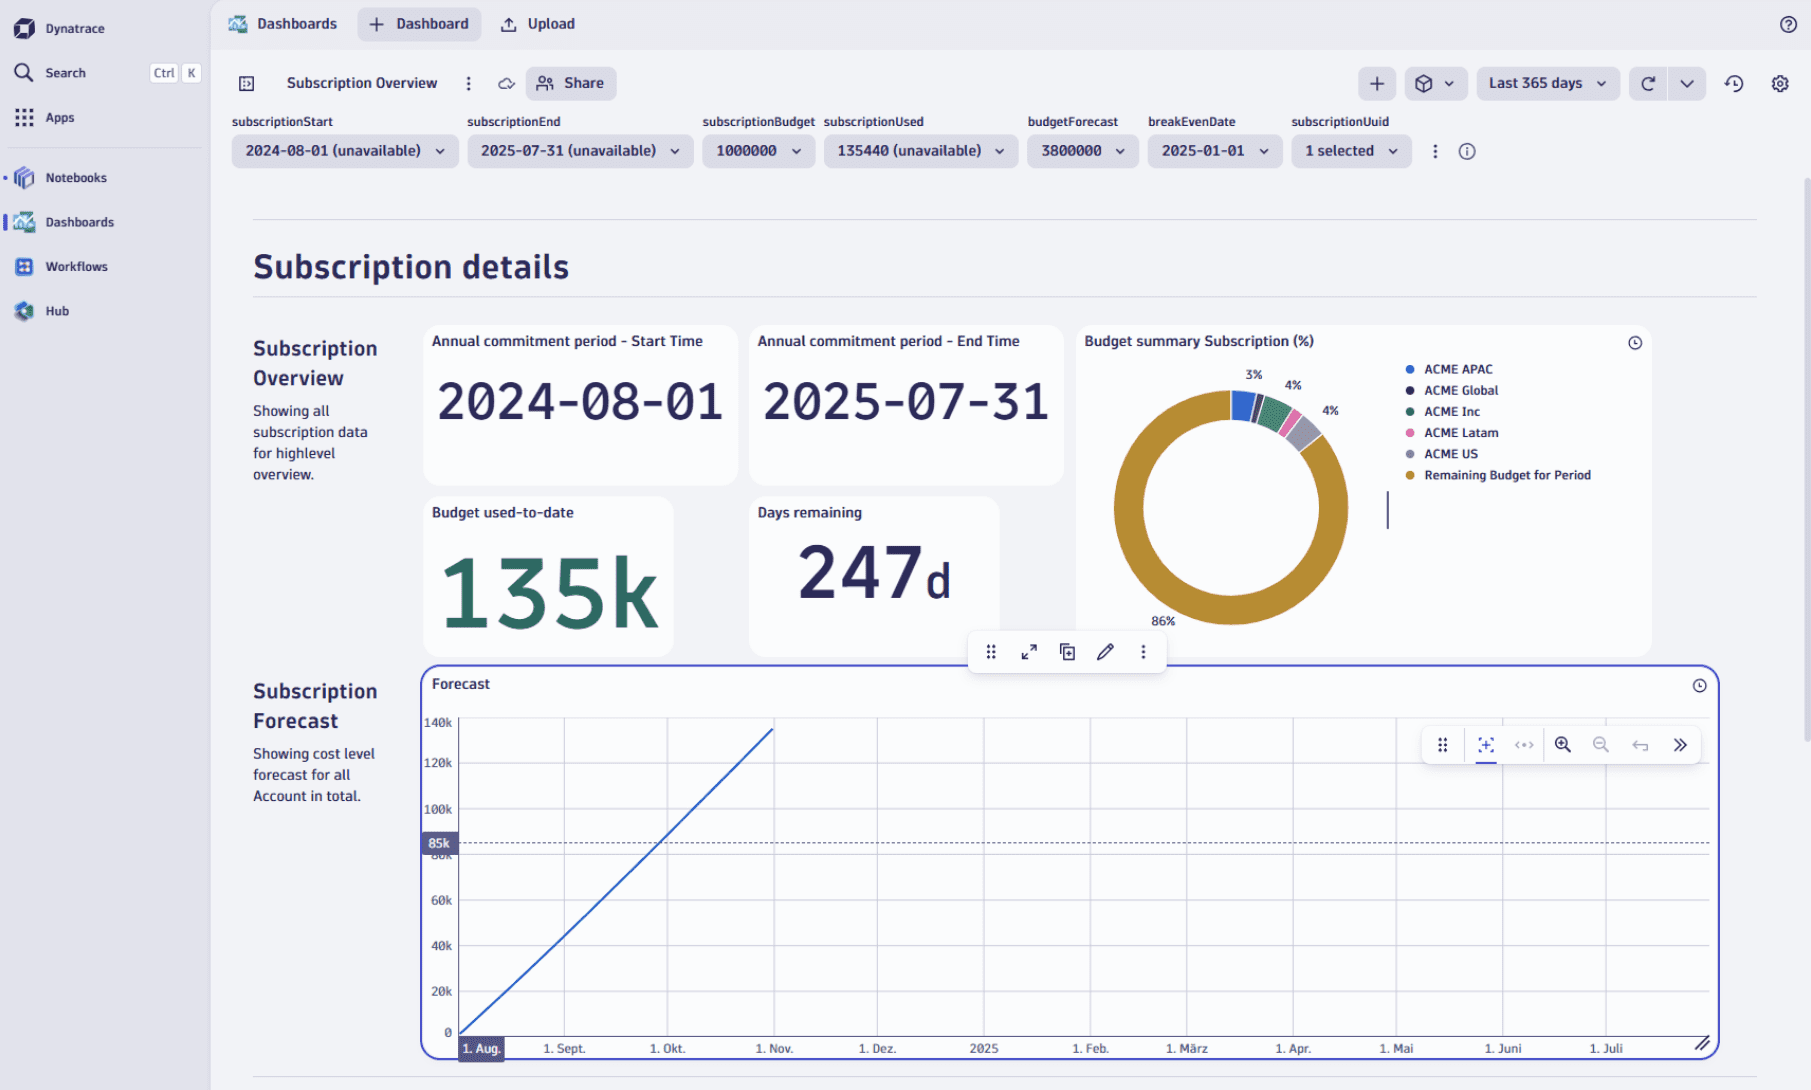
The dashboard template has the following sections.
-
The Subscription details section provides an overview of your subscription:
-
Annual commitment period - Start Time
-
Annual commitment period - End Time
-
Budget used-to-date
-
Days remaining
-
Budget summary Subscription (%)
-
Subscription Forecast: Forecasted usage for all accounts in the subscription.
Forecast and cost events are only estimates and therefore can be misleading in some cases. Forecasts are based on statistical models and therefore be relied on with caution.
-
-
The Account Level Details section provides:
- Daily cost distribution per account, with daily costs.
- Cumulative cost distribution per account, a burn-up consumption chart.
-
The Forecast & Advanced Cost Management section provides total individual account forecasts. You You can use this to predict each account's costs until the end of the subscription.