Create multi-environment dashboards
- How-to guide
- 4-min read
To show monitoring data from a remote Dynatrace environment, such as metrics, logs, events, user sessions, and server-side traces, on your dashboard tiles, follow the steps below. Tiles that support a custom management zone can also use a remote management zone.
Limitations
- A remote environment tile is backward compatible for up to five versions. A tile in a Dynatrace version x environment works correctly with Dynatrace version x minus five or later in the remote environment. With a larger difference, the tile might still work, but that configuration isn't supported.
- A remote environment tile shows only the features included in the remote environment's cluster version. If a tile depends on a feature that the remote environment doesn't support, the tile shows an error message that explains the difference. To keep maximum compatibility, keep your Dynatrace environments on the same version.
- Remote environment connections don't pass user context and permissions across environment boundaries. Use management zones to limit dashboard tiles that show remote information. For this reason, only environment administrators can configure multi-environment dashboards. Everyone else can still view and use them without limitation.
- The world map tile doesn't support remote environments.
The steps below use the Dynatrace web UI. To do the same through the API, see:
- Access tokens API to create a token in the remote environment.
- Remote environments API to link the remote environment to the local environment.
- Dashboards API to configure a dashboard with tiles that query the remote environment.
 Create an access token in the remote environment
Create a token that lets your local environment pull data from the remote environment. If you can't sign in to the remote environment, ask someone with access to do this step for you.
- Sign in to the remote environment, which is the environment you pull data from.
- Go to Access Tokens and select Generate new token.
- Enter a token name.
- Select the Fetch data from a remote environment scope (
RestRequestForwarding). - Select Generate token.
- Select Copy, and store the token in a secure location. You need it in the next step.
 Add the remote environment
Add the remote environment to the list of remote environments in your local environment.
- Sign in to your local Dynatrace environment.
- Go to Settings > Integration > Remote environments.
- Select Connect environment.
- Define the remote environment:
- Name: The name under which this environment appears when you configure a tile. The free-form name doesn't affect the remote environment.
- Remote environment URI: Dynatrace Managed accepts any URI.
- Network scope:
External: The remote environment is in another network. Dynatrace uses globally configured proxy settings if present.Externalis the default.Internal: The remote environment is in the same network. Dynatrace doesn't use globally configured proxy settings.Cluster: The remote environment is in the same cluster. The request goes tolocalhost.
- Token: The token from the previous step, with the Fetch data from a remote environment scope (
RestRequestForwarding).
- Select Test connection, and make sure you get a
connection successfully establishedmessage before you continue. - Select Save changes.
 Point a tile to the remote environment
Configure a dashboard tile to query the remote environment.
-
Open the dashboard that should show the tile, and select Edit.
-
Select or add the tile that should show remote data. The Environment section of the tile settings pane lists the available environments:
- Default (local) pulls data from the local Dynatrace environment.
- Every other entry is a connected remote environment, listed by the name you gave it. For example, a remote environment named
Bostonappears asBoston.
-
Select the remote environment that the tile should query.
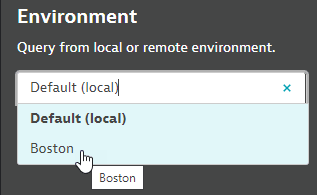 Example: select remote environment for tile
 -
Select Done.
The tile now queries the remote environment. To confirm, hover over the tile filter icon to see the selected environment.
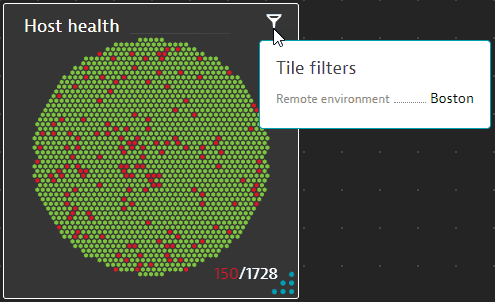 Example: display tile filters to see remote environment selection
Selecting a tile that shows remote data opens a view of the remote environment, where you can continue your analysis.
What's next
- To compare environments side by side, add a Header tile labeled Local and one labeled Remote, place the same tiles under each, and point the tiles under Remote to the remote environment.
- If you get the message
Verification failed, please check your settings: Constraints violated.when you add a remote environment, see this troubleshooting article.