Configure Session Replay for iOS
- Latest Dynatrace
- How-to guide
- 8-min read
- Published May 21, 2026
- Preview
This page describes how to activate and customize Session Replay for your iOS apps.
OneAgent for iOS version 8.323 or later is required for applications compiled with Xcode 26.
Use Session Replay
Session Replay on iOS allows you to capture your customers' interactions with your mobile app and replay each tap, swipe, and screen rotation in a movie-like experience.
Use Session Replay on crashes
You can also use it to get more context for crash analysis in the form of video-like screen recordings that replay the user actions preceding a detected crash.
Prerequisites
Make sure that your system meets the following requirements:
- Dynatrace version 1.303.
- OneAgent for iOS version 8.323.
- Real User Monitoring activated for your application.
- Active Dynatrace Digital Experience Monitoring license.
- Swift 5+.
- iOS 15+.
- Xcode 16+.
- SwiftUI is supported.
- Real User Monitoring activated for your application
- Active Dynatrace Digital Experience Monitoring license
- The web UI URL has a trusted certificate
Known restrictions and issues
- iOS 15.0+ is supported.
- Swift 5+.
- Xcode 16+.
- SwiftUI is supported.
- Session Replay is not available for tvOS and iPadOS.
- Session Replay is not available for cross-platform frameworks such as Cordova, React Native, Flutter, and Xamarin.
- For a hybrid app, Session Replay is supported only for the native part of the app. For the browser part, Session Replay only supports webpage load events.
- We recommend not using other crash reporting tools together with Dynatrace Session Replay.
- Session Replay can capture only certain events. However, if you need to track a specific view or event that is not supported by default, you can capture a custom event.
- You can only play back the user sessions recorded with Session Replay in certain browsers.
- For iOS 26 applications generated with Xcode 26, masking functionality is only available with OneAgent for iOS version 8.323+.
Session Replay is a video-like reconstruction of the user interactions with mobile applications that use captured events and data. Because of this approach, replayed sessions can differ from the actual user experience.
Activate Session Replay on iOS and adjust number of recorded sessions
If you haven't done so already, complete all steps described in the initial setup for iOS frontends.
- Go to
 Experience Vitals > Overview.
 - Select Mobile to view all mobile frontends.
- Select the frontend you want to configure.
- Switch to the Settings tab.
- Under Enablement and cost control:
- Turn on Real User Monitoring Classic or both Real User Monitoring Classic and Real User Monitoring.
- Select Session Replay Classic or both Session Replay Classic and Session Replay, and then enter the new Capture rate of session replay value:
100percent to capture all sessions.- Lower than
100percent to capture randomly selected sessions.
- To capture all sessions with a crash regardless of the capture rate, select Session Replay for crashes Classic or both Session Replay for crashes Classic and Session Replay for crashes.
- From the application settings, select Instrumentation wizard, and then select iOS.
- Follow the steps in the instrumentation wizard.
Activate Session Replay for SwiftUI apps
OneAgent for iOS version 8.249+
If you've already instrumented your SwiftUI app, you can additionally activate Session Replay for such a mobile app.
To activate Session Replay for your instrumented SwiftUI app
-
Complete all the steps of the Activate Session Replay instruction above.
-
Set the
DTXSwiftUIEnableSessionReplayInstrumentationconfiguration key totruein your project'sInfo.plistfile.<key>DTXSwiftUIEnableSessionReplayInstrumentation</key><true/>
Supported SwiftUI containers
We support Session Replay for the following SwiftUI containers:
Known restrictions for SwiftUI apps
Dynatrace doesn't instrument the following SwiftUI containers:
- Lists inside extensions
- Lists with static content
- Lists where the feeding object does not conform to the
Equatableprotocol
Mask sensitive data
Data masking levels
Session Replay comes with three predefined masking levels:
- Safest—all the editable text fields, images, labels, web views, and switches are masked.
- Safe—all the editable text fields are masked.
- Custom—by default, masks the same elements as Safest, but you can decide exactly which application components or views should be masked. See Configure custom masking for details.
Change masking level
By default, OneAgent applies the Safest masking level. To change it to the Safe or Custom level, use the API to configure OneAgent. If you've opted for the Custom level, see Configure custom masking for details on how to set which application components or views should be masked.
Example 1: Change masking level to Safe
Use the following code to set the masking level to Safe.
let maskingConfiguration = MaskingConfiguration(maskingLevelType: .safe)try? AgentManager.setMaskingConfiguration(maskingConfiguration)
Configure custom masking
If you set the data masking level to Custom, you can use additional API methods to decide which application components or views should be masked. You can:
Activate or deactivate masking rules
You can activate or deactivate rules globally or for the selected components, such as text fields, images, labels, web views, and switches.
try? maskingConfiguration.add(rule: .maskAllImages) // Adds one ruletry? maskingConfiguration.remove(rule: .maskAllSwitches) // Removes one ruletry? maskingConfiguration.addAllRules() // Adds all rulestry? maskingConfiguration.removeAllRules() // Removes all rules
If you remove all masking rules, Session Replay won't mask anything. If you activate all masking rules, it's equivalent to the Safest masking level.
Mask views using accessibilityIdentifier
You can activate or deactivate masking of the selected views based on their accessibilityIdentifier.
try? maskingConfiguration.addMaskedView(viewIds: ["masked_view_id"])try? maskingConfiguration.removeMaskedView(viewIds: ["masked_view_id"])try? maskingConfiguration.addNonMaskedView(viewIds: ["nonMasked_view_id"])try? maskingConfiguration.removeNonMaskedView(viewIds: ["nonMasked_view_id"])
Mask views using a masking tag
You can also mask a view by adding the data-dtrum-mask masking tag to the view's accessibilityIdentifier. A view with this masking tag is always masked.
Activate Session Replay logs
You can activate Session Replay logs the same way as for OneAgent. See Debug logging for more information.
Capture custom events
Session Replay records only certain events. You can additionally capture custom events that are not supported by default. You can capture a custom event with an included screenshot of a specific view, specific screen region, or full screen.
All methods for capturing custom events can throw a TrackCustomEventError.notInMainThread error if you try to capture a custom event from a thread that is not the main thread. We suggest that you include a do-catch clause until everything works properly; then you can replace the clause with a simpler version that, even in case of an error, just doesn't capture the custom event.
do {try AgentManager.trackCustomEvent(name: "my_event_name", view: nil)} catch {print(error)}
Specific view
Capture a custom event with a screenshot of the specific view.
try? AgentManager.trackCustomEvent(name: "my_view_name", view: myView)
Specific screen region
Capture a custom event with a screenshot of the specific screen region.
try? AgentManager.trackCustomEvent(name: "my_view_name", frame: anyFrame)
Full screen
Capture a custom event with a screenshot of the full screen.
try? AgentManager.trackCustomEvent(name: "my_view_name")
Change transmission mode to Wi-Fi for images
By default, all data—information on captured events and images—is sent over any connection. However, you can opt to transfer images only when the users are connected to Wi-Fi to save their mobile data.
AgentManager.setTransmissionMode(.wifi) // .data by default
Use the screenshot debugger
The Session Replay screenshot debugger allows you to see when the screenshots are taken, which parts of the screen are captured, and what data—text fields, images, labels, web views, and toggles—is masked.
You can use the Session Replay screenshot debugger when running your mobile app in the simulator, so you don't have to wait until the session is closed and uploaded to Dynatrace.
After you activate the Session Replay screenshot debugger, you can see the corresponding keys in your project. Note that these keys are not sent to the app code for release or archive compilations, so they are never included in the production code. These keys are used only for debug runs.
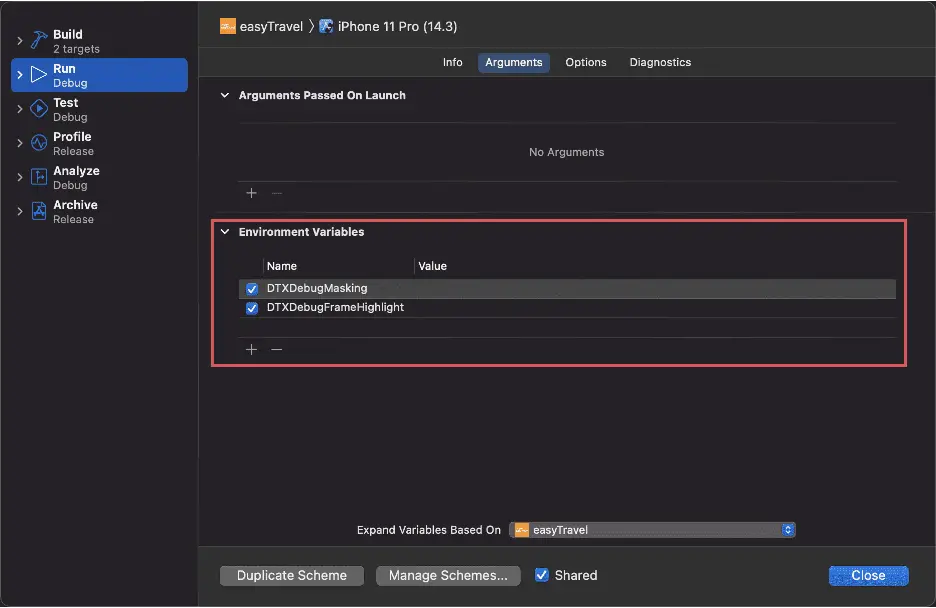
To activate the Session Replay screenshot debugger:
- In Xcode, select Edit Scheme from the Scheme menu to change your application scheme.
- From your application scheme settings, select the Run action, and then switch to the Arguments tab.
- Under Environment Variables, add one or both of the following keys:
- DTXDebugMasking. This key shows screenshots taken by Session Replay, including masked content and UI controls. For each captured screenshot, you see a brief flash.
- DTXDebugFrameHighlight. This key highlights the captured part of the screen with a red frame so that you can know exactly what part of the screen is captured.