Share a dashboard externally
- Latest Dynatrace
- How-to guide
- 10-min read
- Published Aug 12, 2026
External links let you share a dashboard with people who don't have a Dynatrace account. Viewers open the link in any browser. No login required. When you create the link, Dynatrace captures the dashboard configuration as a snapshot. The underlying data refreshes on each load, subject to short-lived caching (see Caching and data freshness).
Typical use cases:
- Executives and senior leaders who need access to data and insights without a Dynatrace account
- NOC and operations center wall screens and kiosks
- Dashboards embedded in internal portals or external tools such as Backstage
- Read-only views shared with partners or stakeholders outside your organization
Prerequisites
- You must be the owner and creator of the dashboard.
- You need the
public-access:shares:readandpublic-access:shares:writepermissions to create external links. Contact your Dynatrace administrator if you don't have them (see Assign permissions to users). - To disable the environment IP allowlist for a specific link, you additionally need the
public-access:shares.ip-allowlist:writepermission.
Create an external link
Sharing a dashboard externally may increase data usage and costs, since viewer requests are billed like any other access to the dashboard.
To create an external link
-
Open the dashboard you want to share.
-
Select Share in the toolbar, then select Share externally.
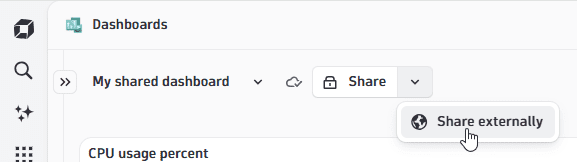 Select "Share externally"
 -
In the Share externally panel, select Add external link.
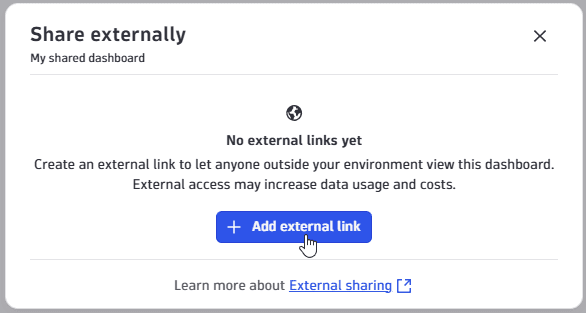 "Share externally" before you add a link
 -
The Name field is pre-filled with the dashboard's name. Change it if you want a different label for the link in your list.
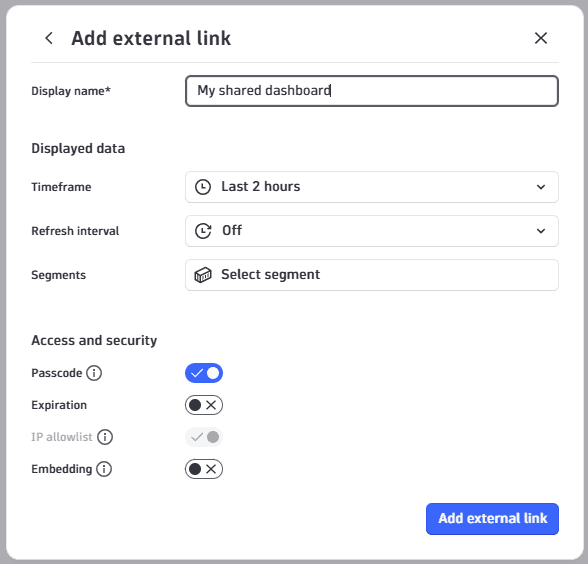 "Add external link"
 -
The Timeframe and Refresh interval fields under Displayed data are pre-populated from the current dashboard state when the form opens. If the dashboard has no explicit selection, the application default applies. These fields always carry a value and can't be left unset. Segments is the only field that can be left unset. Adjust any of these if you want the link to show something different from the current dashboard view.
-
Under Access and security, configure passcode, expiration, IP allowlist, and embedding.
-
Select Add external link.
Turning off Passcode shows a warning: Anyone with this link can view this dashboard. Add a passcode to restrict access. Leave the passcode enabled unless the link is intentionally public.
Displayed data
| Field | Default | Description |
|---|---|---|
Name | Pre-filled with the dashboard's name; can be changed | Identifies the link in the list |
Timeframe | Current dashboard selection or app default | Time range shown to viewers |
Refresh interval | Current dashboard selection or app default | How often the dashboard reloads data for viewers (see options below) |
Segments | None (optional, can be left unset) | Filters applied to all queries in the dashboard |
Timeframe, Refresh interval, and Segments live on the link itself, separately from the dashboard's own content. To change these fields, edit the link directly. Publishing changes to the link (see Publish changes to a link) never touches these three fields.
The variable values currently selected on the dashboard are captured as part of the snapshot when the link is created. Viewers always see the dashboard with those variable values. Variables aren't interactive. Selecting Publish changes on a link replaces the snapshot with the current dashboard state, including any variable values currently selected, which may differ completely from the ones saved in the link.
Refresh interval options:
| Value | Description |
|---|---|
Off | No automatic refresh |
1 minute | Near-real-time monitoring |
5 minutes | Standard operations dashboards |
1 hour | Periodic summary views |
1 day | Daily digest dashboards |
Access and security
All four access controls can be switched on or off at any time by editing the link. The following table summarizes the default state and what it means when a control is off.
| Setting | Default | What it means when off |
|---|---|---|
Passcode | On | Anyone with the link can open the dashboard. No authentication required. |
Expiration | Off | The link never expires |
IP allowlist | On | Any IP can access the dashboard; override requires permission |
Embedding | Off | The dashboard can't be loaded inside an iframe |
Passcode
On by default. Dynatrace automatically generates an alphanumeric passcode when you create the link. The passcode is embedded in the link itself.
- To share the link, open the menu on the link card and select Copy link and passcode. Viewers who open the full link aren't prompted to enter the passcode. It's embedded automatically. A passcode entry page only appears if someone navigates to the bare link URL without the passcode.
- To regenerate a passcode (for example, after revoking access for a specific viewer), open the menu and select Regenerate passcode. Viewers currently viewing the dashboard are signed out after a short delay.
- Viewers who attempt to enter the passcode manually and get it wrong see a Wrong passcode message. There's no lockout after multiple failed attempts.
If you turn off Passcode, anyone with the link can open the dashboard without any authentication, and the menu shows Copy link instead of Copy link and passcode.
Expiration
Off by default. When expiration isn't set, the link remains active indefinitely.
Enable Expiration to set a date and time after which the link becomes inaccessible. Use the quick-select buttons to set an expiration relative to today, or enter a custom date and time using the date picker.
| Option | Typical use case |
|---|---|
1 day | Short-lived access for a specific event |
7 days | Weekly reports |
30 days | Monthly recurring views |
90 days | Long-running kiosk or TV screens |
Expired links show Expired on [date] in red in the link list and can no longer be opened by viewers. Expiration can be removed or extended at any time by editing the link.
IP allowlist
On by default. IP allowlist enforcement reflects your environment's existing IP allowlist settings. When active, only viewers connecting from an allowed IP address can open the link.
If you have the public-access:shares.ip-allowlist:write permission, you can disable the IP allowlist for a specific link, for example, to allow access from outside your corporate network. If you don't have the permission, the toggle is visible but locked. Contact your administrator to request permission or to change the environment allowlist.
Embedding
Off by default. When embedding is disabled, the dashboard can't be loaded inside an iframe.
Enable Embedding to allow the dashboard to be embedded in an external page or tool such as Backstage or an internal portal.
Embedding can't be restricted to specific origins. When enabled, any website can frame the dashboard. Combined with no passcode and a disabled IP allowlist, this makes the dashboard embeddable by anyone on the internet. Enable Embedding only for links that need it.
Once the link exists, enabling Embedding and selecting Save in the Edit dialog reveals an <iframe> snippet with a Copy snippet button.
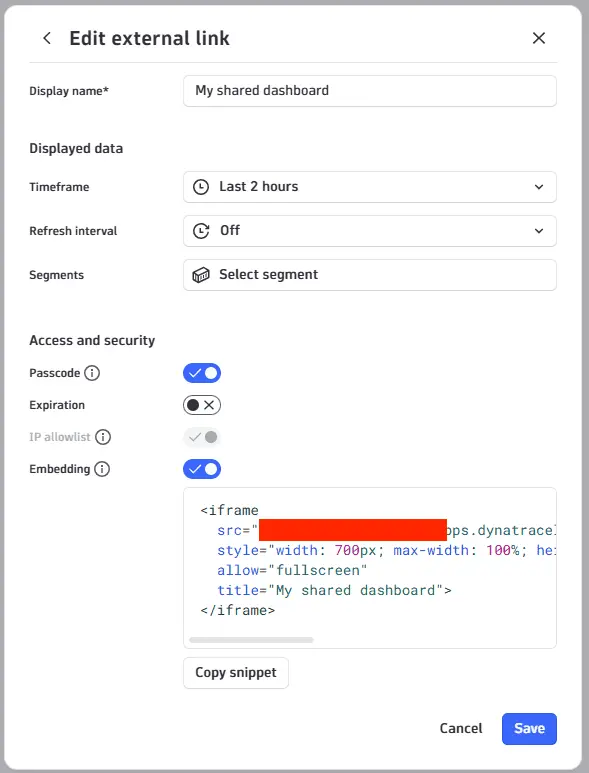
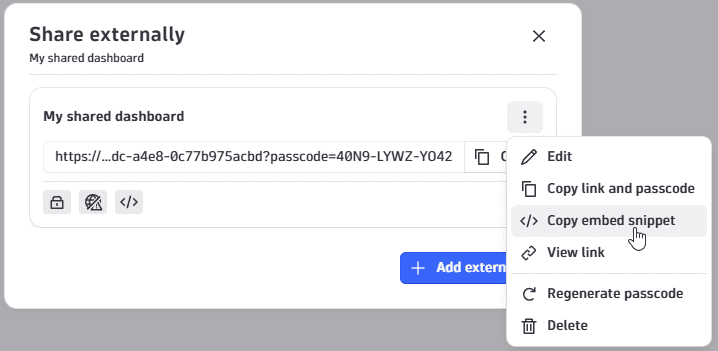
You can also get the same snippet later without opening Edit by selecting Copy embed snippet from the menu on the link card.
Manage external links
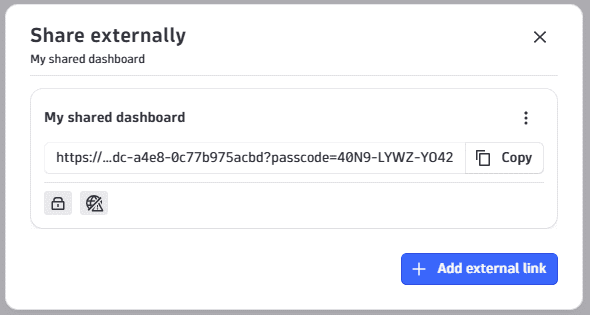
All external links for a dashboard are listed in the Share externally panel. Each card shows the link name, a truncated link URL, a Copy button, security indicator icons, and the link status.
Status indicators:
- Expires [date]: The link has an expiration set.
- Expired on [date] (red): The link has passed its expiration and is no longer accessible.
- Publish changes: The dashboard has changed since the link was last published. For details, see Publish changes to a link.
Icon indicators on each card show which access controls are active (passcode, embedding, IP allowlist override).
Available actions
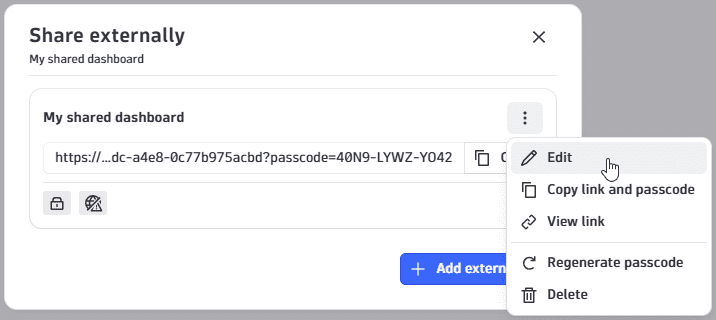
Open the menu on a link card to access the following actions:
| Action | Active (no passcode) | Active (passcode set) | Expired |
|---|---|---|---|
Edit | Yes | Yes | Yes |
View link | Yes | Yes | Yes |
Copy link | Yes | - | No (grayed out) |
Copy link and passcode | - | Yes | - |
Regenerate passcode | - | Yes | - |
Delete | Yes | Yes | Yes |
Copy embed snippet also appears in this menu whenever Embedding is enabled for the link. For details, see Embedding.
Edit a link
To edit a link, open the menu on the link card and select Edit, or select the link name directly. Update any link scope or access setting, then select Save.
Publish changes to a link
Creating a link takes a snapshot of the dashboard's tiles, layout, annotations, and variable values. Editing the dashboard afterward doesn't automatically update links created from it. Only the dashboard owner can publish changes to a link, consistent with the permission required to create them.
When the dashboard has changed since a link was last published, a Publish changes link appears next to the link name in the Share externally panel.
Select Publish changes to open a confirmation dialog that lists exactly what publishing does and doesn't affect:
- Updated for viewers: Tiles and layout, variables, annotations
- Unchanged: Timeframe, refresh interval, and segments; passcode, expiration, IP allowlist, and embedding
The previously published version can't be recovered after you select Publish changes.
Viewers continue to see the previously published version until you publish again.
To see exactly what current viewers see without publishing, open the menu and select View link.
Delete a link
To delete a link, open the menu and select Delete. Deleted links can't be recovered.
What viewers see
When a viewer opens an external link
- If a passcode is set, it's automatically included in the link. Viewers who receive the full link aren't prompted to enter it. A passcode entry page only appears if someone navigates to the link without the embedded passcode.
- The dashboard opens full-screen, with no Dynatrace navigation or dock.
- Data reflects the timeframe and variable values defined in the link, refreshed on each load subject to caching (see Caching and data freshness).
- If the link has expired, they see a page indicating the link is no longer available.
- A cookie consent banner appears on first load. Dynatrace uses cookies only for performance monitoring. Viewers can accept or decline.
For displays without a keyboard or mouse, such as NOC wall screens and kiosks, add ?showCookieBanner=no to the link to skip the cookie consent banner. Because the passcode is appended as a URL fragment (#passcode=...), insert the parameter before the #, not after it, for example:
https://<environment>.apps.dynatrace.com/shared/<share-id>?showCookieBanner=no#passcode=<passcode>
This also stops Dynatrace from collecting RUM data for that viewing session; it has no effect on the dashboard's own data.
Caching and data freshness
Because external links are served anonymously, without a Dynatrace login, several parts of a shared dashboard are cached rather than queried fresh on every load. This keeps public dashboards fast and reduces load on the back end from anonymous traffic.
As a result, a shared link's data and content can be up to a minute behind the same dashboard viewed while logged in. This is most noticeable with relative timeframes such as Last 2 hours, since the cached response and a fresh request cover slightly different time windows.
| What | Maximum staleness |
|---|---|
Dashboard content (tiles, layout, annotations) | 1 minute |
Tile and annotation results (query and code tiles) | 1 minute |
Map visualization settings | 1 hour |
Tile and annotation results are cached independently of each other, so different widgets on the same dashboard can be stale by different amounts at the same moment.
The values above are the maximum staleness you'd see if nothing changes, not a delay after an edit. Editing a link's settings, publishing dashboard changes, or a new tile result all clear the relevant cache as soon as they're saved. Map visualization settings are the one exception: they always wait out the full 1-hour window before refreshing, even after a change.
Important notes
-
The dashboard content is a snapshot, but tile results are still fetched on each load.
Tiles, layout, annotations, and variable values are captured when the link is created and only change when the owner publishes changes. Timeframe, refresh interval, segments, and every access and security setting live on the link itself and are unaffected by publishing. Tile results, whether from queries or code, are subject to short-lived caching (see Caching and data freshness).
-
Tiles run as the link creator.
Query and code tiles run under the identity of the user who created the link, regardless of who views it. If the creator's account is removed or their data access permissions change, the link may stop returning data correctly.
Owner-only publishing is also a security design: since tiles run as the link creator, an editor with less data access could otherwise add a tile that surfaces data they can't see themselves. Requiring the owner to publish changes prevents that, and also protects editors from unknowingly breaking an external link they may not know exists.
-
Dashboard edits require a manual publish.
Editing the dashboard doesn't automatically update existing links. Affected link cards show a Publish changes link in the Share externally panel. See Publish changes to a link.
Administrator tasks
Assign permissions to users
External link permissions aren't assigned to users by default. As an administrator, you control who can create and manage external links by creating policies in Account Management and binding them to user groups.
To assign external link permissions
- Go to Account Management (select your profile picture in your Dynatrace environment, then select Account Management).
- Go to Identity & access management > Policy management and create a policy with the desired permissions. See Example policies for guidance.
- Go to Identity & access management > Group management and open or create a group.
- On the Permissions tab, select Edit > + Add permission, choose the policy you created, set the Scope, and select Save.
Example policies
Use these as a starting point when creating policies in Account Management.
| Policy name | Permissions | Use case |
|---|---|---|
Public Shares User |
| Standard users who need to create and view external links |
Public Shares User + IP allowlist |
| Users who additionally need to disable the environment IP allowlist on individual links |
Public Shares Power User |
| Users who need full control including administration of other users' links |
Administer other users' links
The public-access:shares:admin permission lets you retrieve, edit, or delete external links across all dashboards via the Public Access Admin API. It doesn't grant the ability to create new external links.
For the full endpoint reference, open your environment's Swagger UI at https://{your-environment-id}.apps.dynatrace.com/platform/swagger-ui/index.html?urls.primaryName=Public+Access&apiType=Public#/Admin.
To revoke access to a link without deleting it, set its expiration date to a date in the past.
This permission is available in Dynatrace's default administrator policy (DynatraceAccessAdminUser). Administrators whose environment uses this default policy have the permission automatically. If your environment uses a custom administrator policy, add public-access:shares:admin to it manually via Account Management.
There is no admin UI for managing other users' links in the current release.
Deactivate external sharing
To prevent users from creating new external links, remove the public-access:shares:write permission from all user groups in Account Management. Users without this permission see the Share externally option disabled.
To fully deactivate external sharing and clean up existing links
- In Account Management, remove all public sharing policies from all user groups.
- Use the Public Access Admin API to delete or deactivate existing links one by one.
Removing permissions doesn't automatically delete existing links. Links that were already created remain accessible to viewers until you explicitly delete or deactivate them via the API.